Replication steps
How to replicate data using Replication Manager
This procedure provides the steps required to quickly create a replication plan visually through your browser interface. To follow along you should have Replication Manager installed and your browser pointed to the configured web server port.
The Replication Manager provides many features for fine-tuning your replication plan, importing existing replication, and monitoring your replication environment.
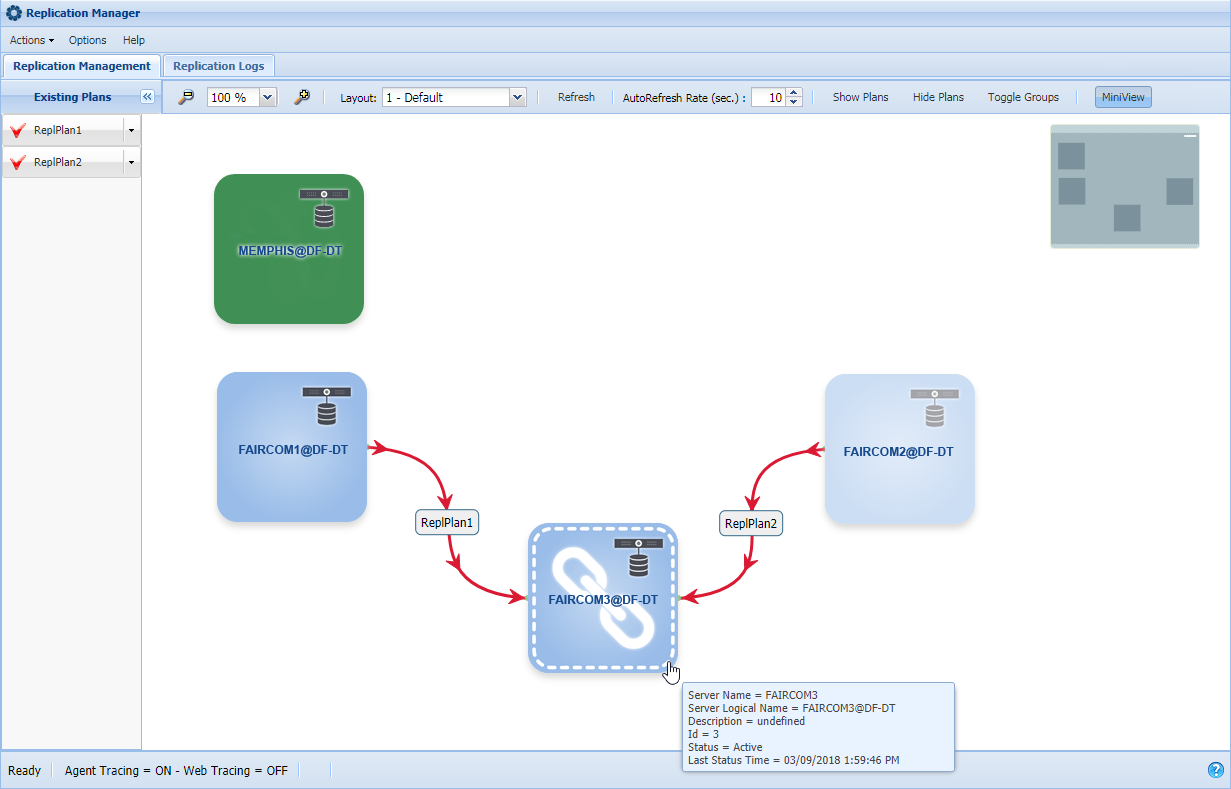
how to replicate data using replication manager and replication steps
Get a quick idea of the process, you can set up replication.
Hover over the edge of the source server and observe a chainlink icon.
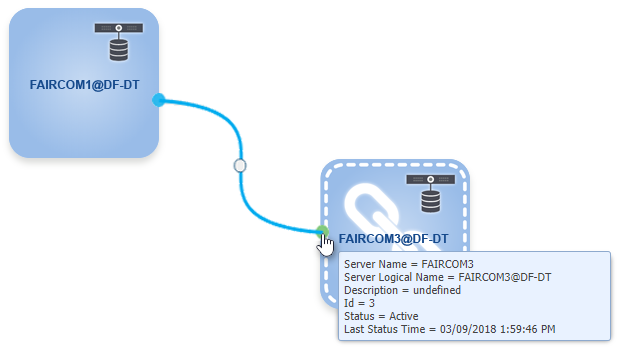
Drag from the source server and drop on the target server.
Right-click the source server and select Create New Publication to use the replication plan to create a publication (this is the files on the source server to be replicated).
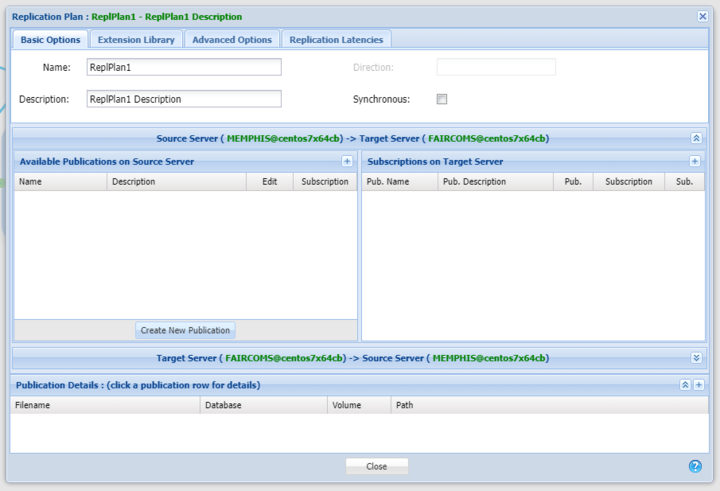
Click Subscribe to make a subscription (this will be the destination of the replicated files on the target server).
In Existing Plans, deploy a plan by clicking the dropdown menu and selecting Deploy for the corresponding plan.
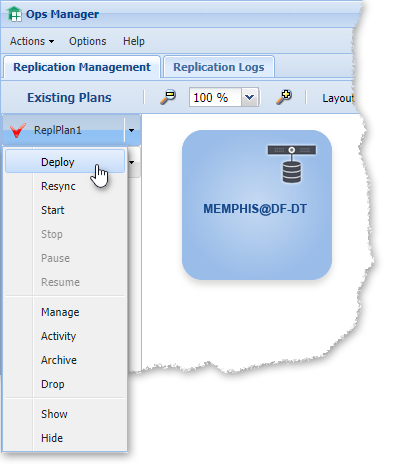
Click Start to begin replication.
When setting up replication, you will define a replication plan, which will determine which tables or files are replicated from the source server to the target server. This is done simply by dragging the mouse from the edge of the source server and dropping it on the target server.
Important
Drag the border, not the center of the server. When you hover the mouse near the edge of the source server, a dashed border and a chainlink icon will appear. The mouse pointer will change to a hand with the index finger extended (see Figure 2, “Dashed outline and chainlink icon”).
Place the mouse over the edge of the source server square.
Observe the dashed outline and chainlink icon.
Figure 2. Dashed outline and chainlink icon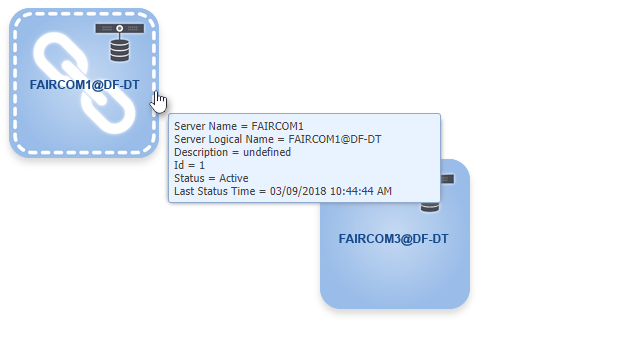
Drag the mouse pointer toward the target server (a connecting line will appear between the two servers).
Figure 3. Connect the source server to the target server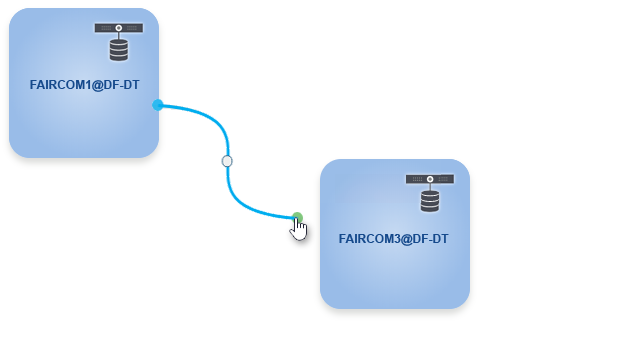
Release/drop the mouse pointer when hovering over the target server connecting the line between the two servers.
Figure 4. Connected source and target servers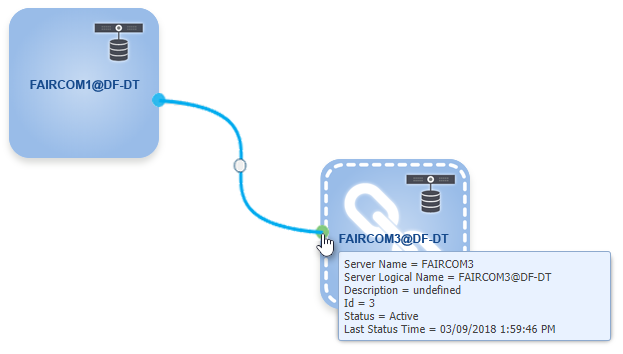
Observe the Replication Plan window to define the replication plan.
Dragging the source server to the target server displays the Replication Plan window. This windows is used to set up replication.
This section outlines the tabs that are in the Replication Plan window.
Note
After you have published the material to be replicated from the source server and subscribed to it on the target server, you will be ready to initiate replication (see Deploy and manage existing replication plans).
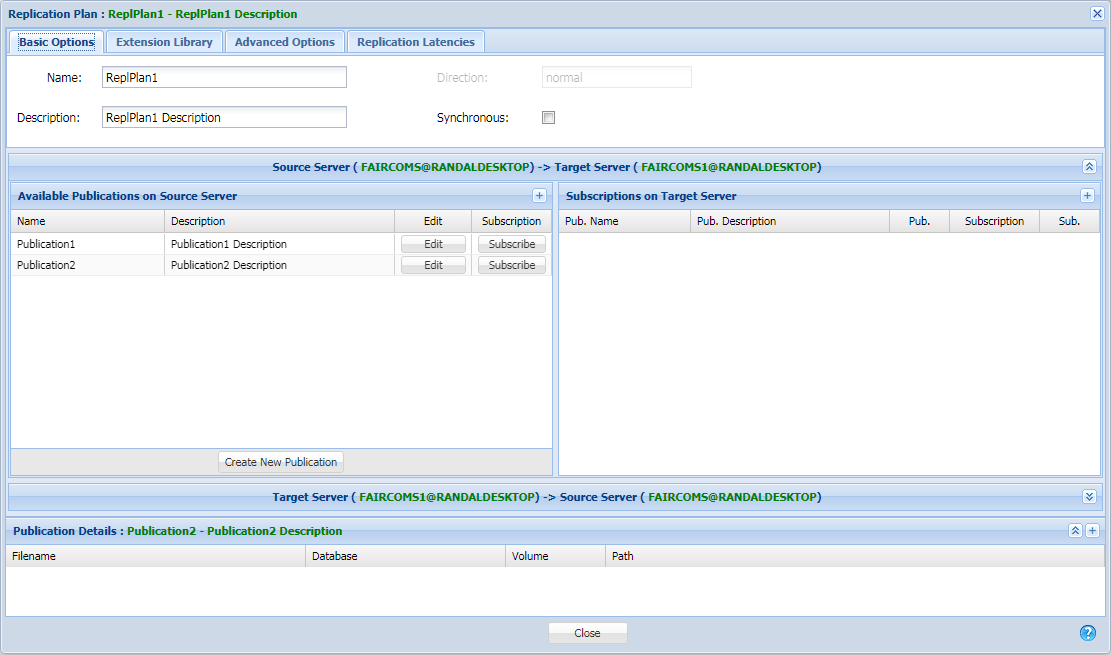
The Basic Options tab is used to define the source and target for your replication.
The Create New Publication button in the Available Publications on Source Server panel defines the files, folders, or database folders to be replicated.
The source for replication is defined in a publication.
The target for replication is defined in a subscription.
The Extension Library tab of the Replication Plan window allows you to add functionality to your replication plan.
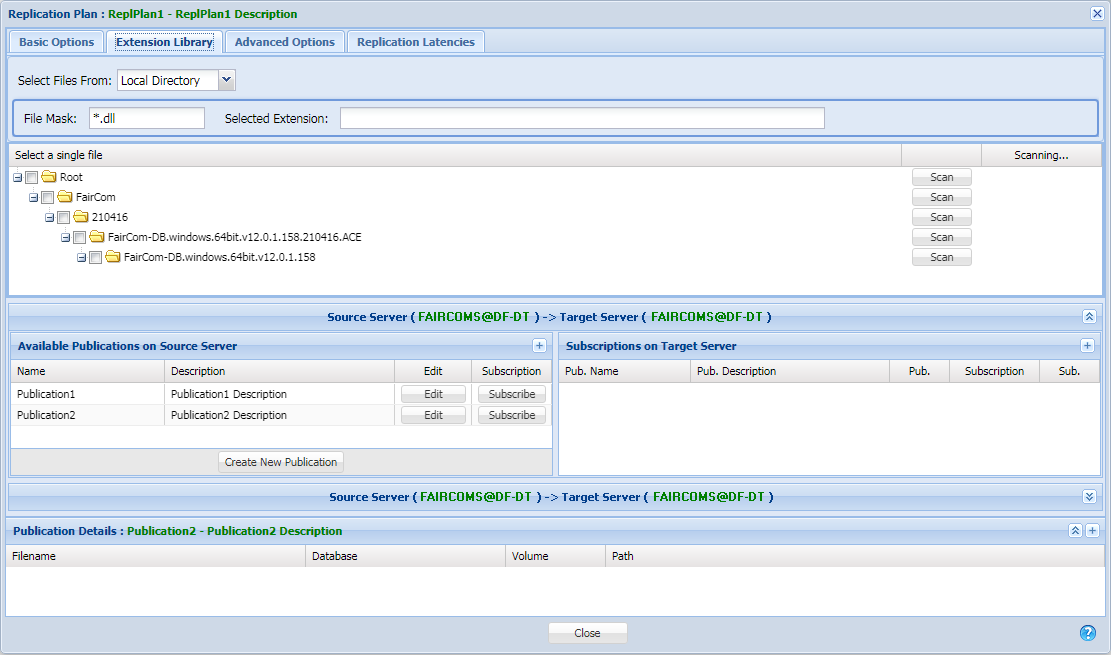
Select Files From dropdown menu:
Local Directory
The tree view of files is open to the data directory of the c-tree server,
C: Drive
The tree view of files is open to the server's
C:drive.
File Mask textbox
You can enter a filter using wild cards. The default is
*.dll, which searches for all DLLs.Selected Extension textbox
Displays the name of the extension library (DLL) that is selected from the file tree.
Select a single file panel
Presents a tree view of the file system. You can navigate through the files to find the desired library.
The / buttons expand and collapse the file tree.
The button searches the selected folder and displays additional files.
The chevron button (
 ) expands the area where files and folders are displayed.
Navigate to the desired extension library (DLL).
Check the checkbox for the desired library file.
Observe the selected library file in the Selected Extension field.
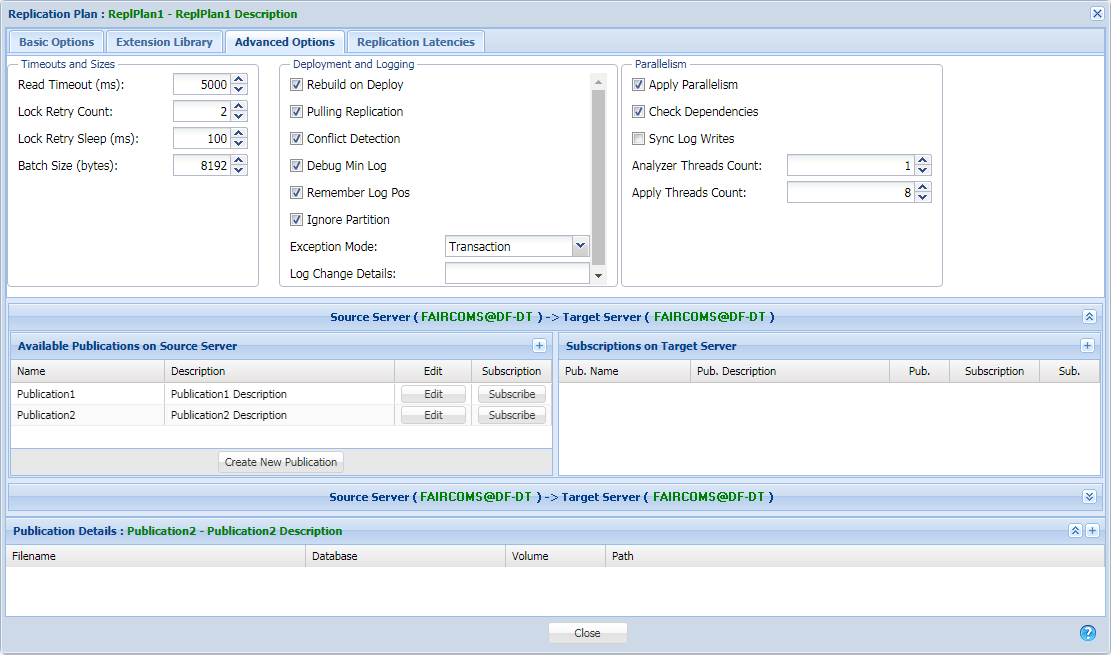
The Advanced Options tab of the Replication Plan window allows you to fine-tune your replication plan. If you have configured the Replication Agent by manually entering keywords in the replication configuration file, you may recognize these options, because they map to the settings in the replication configuration file.
Available Publication on Source Server and Subscriptions on Target Server panels
The button expands to show additional information in the lists.
Note
The ID for each item is displayed in the list.
Timeouts and Sizes panel
Read Timeout (ms) textbox
Set the polling timeout value in milliseconds to use when reading from the source server. The default is 5000.
Lock Retry Count textbox
Specify how many times to attempt to lock a record. These options are used when the Replication Agent attempts to update a record on the target c-tree server. The default is 2.
Lock Retry Sleep (ms) textbox
Specify how much time in milliseconds to sleep between record lock attempts. This option is used when the Replication Agent attempts to update a record on the target c-tree server. The default is 100.
Batch Size (bytes) textbox
The size, in bytes, of the batch to read from the source server. The default is 8192.
Deployment and Logging panel
Rebuild and Deploy checkbox
During the deployment, if it is set, only data files are copied and indexes are rebuilt. Otherwise, deployment will also add indexes in the stream dynamic dump and no rebuild will be executed. It is checked by default.
Pulling Replication checkbox
When checked, the replication engine resides on the destination servers, so data is pulled from the source servers to the target servers. When unchecked, the replication engine resides on the source servers, so data is pushed from the source servers to the target servers — for example, as used when security prevents outside processes from making requests, such as with the FairCom Edge. It is check by default.
Conflict Detection checkbox
Replication conflicts are detected. It is checked by default.
Debug Mini Log checkbox
Enables logging messages to
ctreplagent.logwhen the minimum log number is changed. It is checked by default.Remember Log Pos checkbox
Requests the source server to persist required logs in lieu of using the server-side
KEEP_LOGSoption. It is checked by default.Note
The Replication Agent stores its current minimum required log in the
REPLSTATEDT.FCSrecord on the target server.Ignore Partition checkbox
When this box checked, partitioned files on the source will be converted to non-partitioned files on the target. It is checked by default.
Exception Mode dropdown menu
Determines how errors that occur when applying operations to the target server are handled.
Transaction
When an operation fails, abort the transaction. This option preserves the atomicity of transactions. Either all or none of the operations for the transaction are applied to the target server. This is the Exception Mode default.
Operation
When an operation fails, continue the transaction, skipping only the operation that failed. This option does not preserve the atomicity of transactions. Only the operations that replication successfully applies to the target server are committed.
Log Change Details textbox
Log change details to the specified file.
Note
This keyword should only be used during diagnostic testing as the performance impact will be measurable.
Parallelism panel
Apply Parallelism checkbox
Check this box to enable parallel replication, which uses multiple threads running in parallel while ensuring transaction order. This can be much faster than serial replication (see Plans in the clustering concept book).
Check Dependencies checkbox
Dependent changes are serialized by parallel replication. In the unusual case where many transactions have dependencies, parallel replication becomes slower than serial replication because of the overhead of dependency checking combined with the net result of serialized transactions. If you know your transactions have no dependencies, uncheck this box to improve performance.
Sync Log Writes checkbox
When checked, this enables synchronous log writes.
Analyzer Threads Count textbox
Analyzer Threads Count sets the number of threads dedicated to analyzing replication dependencies.
Apply Threads Count textbox
Apply Threads Count sets the number of threads used for replicating files.
The Replication Latencies tab of the Replication Plan window allows you to set limits for the number of seconds of latency allowed. You will receive warning or error alerts when latency exceeds these limits. The goal of replication is to keep the replicated data as recent as possible. When a change is made on the source server, it must be immediately replicated to the target server. The latency is a measure of the time required to update the replicated data. The latency value is shown in the Plan Activity window. The Replication Latencies tab of the Replication Plan window allows you to set the limits for alerts.

Latency Warning (secs) textbox
A warning alert will be issued if the latency exceeds the number of seconds set in this textbox.
Latency Error (secs) textbox
An error alert will be issued if the latency exceeds the number of seconds set in this textbox.
Disable Latency checkbox
Check this box if you do not want latencies to be monitored — for example, if your system is tolerant to large latencies, you might want to disable the monitoring of latencies.
The Replication Manager uses a publish and subscribe model. The source server will publish the tables or files to be replicated. The target server will subscribe to that publication. This determines which files will be replicated from the source to the target server.

Click the button in the Available Publications on Source Server panel (on the Basic Options tab).
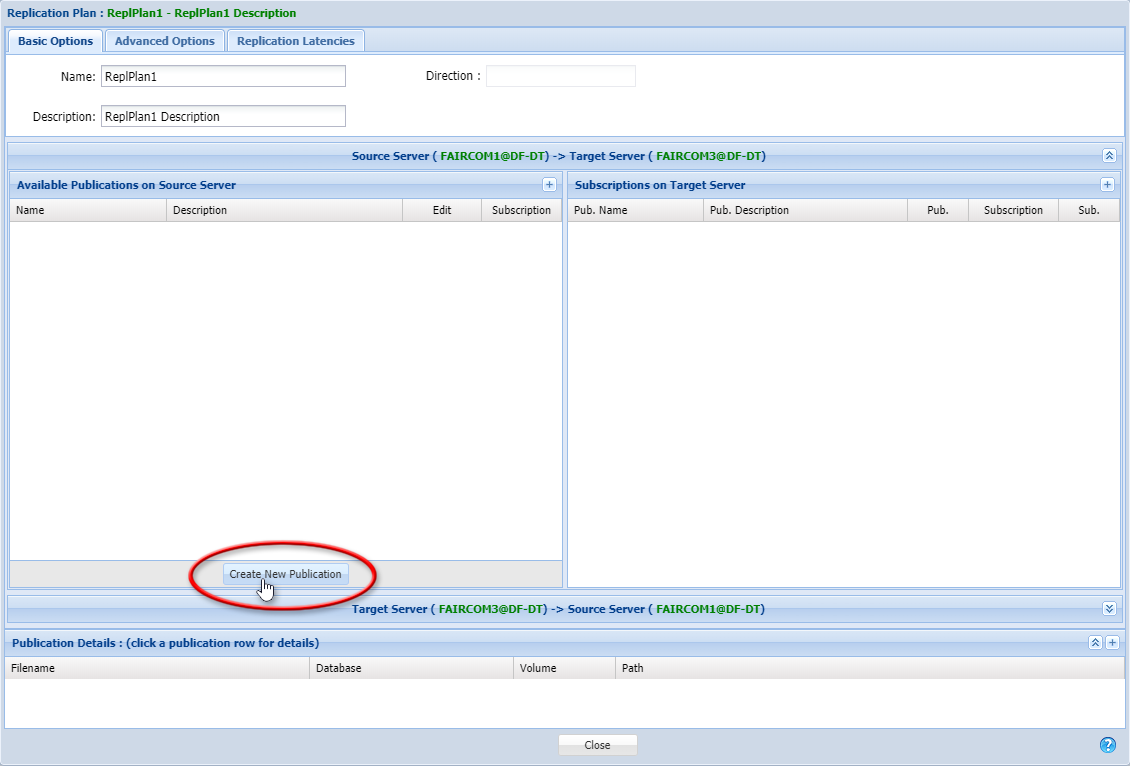
Observe the Publications for FairCom server: window.
This window will show the name of the source server and will begin a wizard to create a new publication.
Note
You will use this wizard to select the database folders or files to be published so they will be available for replication. The target server will need to subscribe to this publication to receive the replicated files (done in the Replication Plan window).
Select a mode (publication type) for the publication:
By Database Folders
Replicates the data dictionary and data files belonging to a specified database (see Publish database folders).
By Folder
Replicates the data files in a specified folder. If data files are added to the folder later, they are included in the replication, unless filters (specified later) exclude them from the replication (see Publish folders).
By Files
Replicates specified data files. You can use this mode if you need to replicate files that do not correspond to database tables — for example, non-database files that are under the control of FairCom DB or c-treeRTG, such as c-tree data files that do not have a data dictionary (for a tutorial, see Publish files).
Note
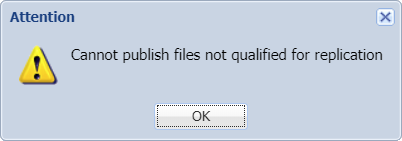
c-tree supports several types of files, some of which cannot be replicated — for example, non-transaction-controlled files cannot be replicated. Only files that can be replicated will be included in the publication. If you check the publish checkbox on a file that is not suitable for replication, an error message indicates that this file cannot be published because it does not qualify for c-tree replication.
Ensure the publication is not in use.
In the Replication Plan window, ensure the publication is listed in the Available Publications on Source Server panel and not on the Subscriptions on Target Server panel.
If it is in the right-hand list, labeled Subscriptions on Target Server, click Unsubscribe.
Right-click on the server icon and select Manage Publications.
Select the desired publication from the Select Publication dropdown menu.
With the publication selected in the Select Publication dropdown menu, click the trashbin icon.
Enter a publication Name.
Note
A single replication plan can include multiple publications to provide a descriptive name for each one.
Optionally, provide a Description for the publication.
Select By Database Folder for the Mode (publication type).
Note
If you change modes after you have made selections, those selections will be lost. When you click one of the Mode selections you will be asked to confirm that you want to lose your selections and start over in the other mode.
Click to continue with the wizard.
Select a database from the list of databases on the server in Database dropdown menu.
Click to continue to add files, folders, or filters otherwise, click .
Optionally, select a folder to add it to the publication.
Note
Use the and buttons to expand and collapse the file system.
Click Next to continue to Select Files to exclude otherwise, click Finish.
In the file tree labeled Select Files, select a file to be excluded from the publication.
Note
Excluding a file from the publication excludes it from replication, so you are selecting the file you do not want to replicate.
Use the and buttons to expand and collapse the file system.
Use the Scan Options to view only c-tree/FairCom DB files.
Use the File Mask field to filter the displayed files using wildcards.
Observe the selected files in the Excluded Files list.
Note
If you need to remove a file from the Excluded Files list, use the checkboxes to the right of the file.
Click to continue to set criteria otherwise, click .
Select a folder from the Folders dropdown menu.
Note
The exclusion lists will apply to the files in the selected folder. You can select one folder for each row in the wildcards and regular expressions (RegEx).
Enter criteria in the Wildcard or RegEx fields — for example, entering
*.txtin the Wildcard field matches any text files found in the selected folder and excludes them from the publication.Click to add the criteria to the list.
Note
If you need to remove a row from the criteria list, use the trashcan icon.
Repeat Step 12 through Step 14 to add more folders and other criteria.
Observe a summary of the created publication.
Note
Use the button to return to previous windows and make changes.
Click to return to the Replication Window.
Enter a publication Name.
Note
A single replication plan can include multiple publications to provide a descriptive name for each one.
Optionally, provide a Description for the publication.
Select By Folder for the Mode (publication type).
Note
If you change modes after you have made selections, those selections will be lost. When you click one of the Mode selections you will be asked to confirm that you want to lose your selections and start over in the other mode.
Click to continue with the wizard.
Select a source for the file from the Select Files From dropdown menu.
Local Directory
The tree of files is open to the data directory of the c-tree server.
C: Drive
The tree of files is open to the server's
C:drive.
Select to either include or exclude everything from the selected folder.
Include everything from the selected folder
The publication will include everything in the selected folder.
Tip
Start by including something general, such as the data folder, and then use Exclude everything from the selected folder to exclude individual folders within the data folder.
Exclude everything from the selected folder
The publication will exclude everything in the selected folder. Use this if you have individual folders you do not want to publish for replication.
As you select folders, observe your selections listed in the Published Folders panel.
Note
Use the chevron button (
 ) to expand the area where files and folders are displayed.
Use the button can clear your selections.
Click Next to continue to Select folders to exclude otherwise, click Finish.
In the file tree labeled Select Files, select a file to be excluded from the publication.
Note
Excluding a file from the publication excludes it from replication, so you are selecting the file you do not want to replicate.
Use the and buttons to expand and collapse the file system.
Use the Scan Options to view only c-tree/FairCom DB files.
Use the File Mask field to filter the displayed files using wildcards.
Observe the selected files in the Excluded Files list.
Note
If you need to remove a file from the Excluded Files list, use the checkboxes to the right of the file.
Click to continue to set criteria otherwise, click .
Select a folder from the Folders dropdown menu.
Note
The exclusion lists will apply to the files in the selected folder. You can select one folder for each row in the wildcards and regular expressions (RegEx).
Enter criteria in the Wildcard or RegEx fields — for example, entering
*.txtin the Wildcard field matches any text files found in the selected folder and excludes them from the publication.Click to add the criteria to the list.
Note
If you need to remove a row from the criteria list, use the trashcan icon.
Repeat Step 12 through Step 14 to add more folders and other criteria.
Observe a summary of the created publication.
Note
Use the button to return to previous windows and make changes.
Click to return to the Replication Window.
If your c-tree data files do not use a data dictionary, they will not appear when the mode is set to By Database. In this case, the Replication Manager allows you to select By Files.
Enter a publication Name.
Note
A single replication plan can include multiple publications to provide a descriptive name for each one.
Optionally, provide a Description for the publication.
Select By Files for the Mode (publication type).
Note
If you change modes after you have made selections, those selections will be lost. When you click one of the Mode selections you will be asked to confirm that you want to lose your selections and start over in the other mode.
Click to continue with the wizard.
Use the checkboxes next to each file to include that file for replication.
Note
The checkboxes next to folders allow you to select all files in that folder.
As you select folders, observe your selections listed in the Published Folders panel.
Note
Use the chevron button (
 ) to expand the area where files and folders are displayed.
Use the button can clear your selections.
Select a source for the file from the Select Files From dropdown menu.
Local Directory
The tree of files is open to the data directory of the c-tree server.
Drives found in the selected server
Use the Scan Options to select:
c-tree Files Only
When checked, this restricts the displayed files to only files controlled by c-tree (FairCom DB).
File Mask
Allows you to filter displayed files. The default is
*.*which shows all c-tree files.
In the file tree labeled Select Files, select a file to be excluded from the publication.
Note
Excluding a file from the publication excludes it from replication, so you are selecting the file you do not want to replicate.
Use the and buttons to expand and collapse the file system.
As you select folders, observe your selections listed in the Published Folders panel.
Note
Use the chevron button (
 ) to expand the area where files and folders are displayed.
Use the button can clear your selections.
Click Next to continue to Select folders to exclude otherwise, click Finish.
After creating your publication, you will return to the Replication Plan window. The publication you created will be shown in the Available Publications on Source Server panel.
Each publication has corresponding and buttons.
Allows you to return to the Publications for FairCom server... window to alter the plan.
Subscribing is the next step in creating a Replication Plan. The button makes the target server subscribe to this publication. The Subscription Options window will appear, allowing you to give the subscription a name and description, as well as set a few other options.
When you click in the Replication Plan window, you will be presented with the Subscription Options window. You can use this window to enter information about your subscription to determine the behavior of your Replication Plan.
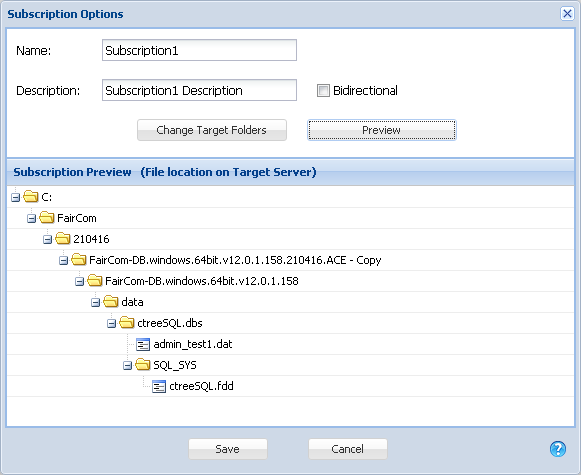
Name textbox
Enter a name for the subscription or use the default.
Description textbox
Optionally, enter a description for the subscription.
Bidirectional checkbox
When checked, this enables bidirectional replication between the source (published) and target (subscribed) servers. This means replication will go in both directions making is useful for making changes on both servers — for example, if you have a distributed application that needs to synchronize multiple servers, such as an application used at several different offices, each with its own copy of the database.
Note
When setting up a bidirectional replication, make sure none of the involved servers has the
"accept_conn"property set tofalsein theirctagent.jsonfiles, found in the agent folders.button
This button opens the Redirections window, which allows you to edit the redirection rules that are defined for this subscription.
button
This button allows you to see how these settings affect your subscription by displaying the full path to the replicated files on the target server.
The Redirections window can be used to edit the redirection rules defined for this subscription. By default, this window shows the default rule (by local directory).
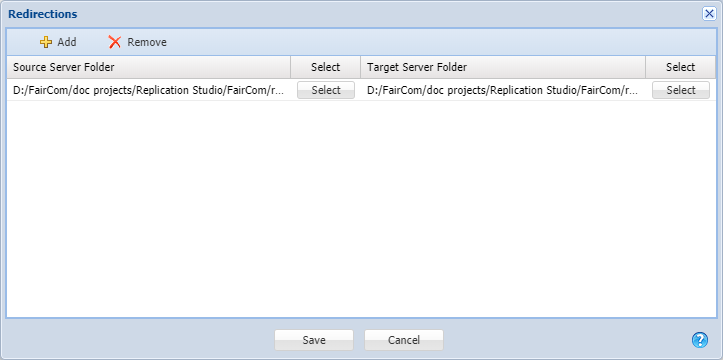
The and buttons
Allows you to define your own rules.
Note
Each rule states "All the files in the Source Server Folder should be redirected to the Target Server Folder."
button
Allows you to edit the Source Server Folder or the Target Server Folder.
button
Returns you to the Subscription Options window without saving any changes made.
In the Subscriptions Options window, click to return to the Replication Plan window.
Observe the publication has moved from the Available Publications on Source Server panel to the Subscriptions on Target Server.
Note
Any publications listed in the Available Publications on Source Server panel are publications that have not been subscribed to. If a publication has been subscribed to it is automatically removed from the Available Publications on Source Server list.
If necessary, click to make any changes to a publication or subscription.
Note
Editing a publication opens the Publications window. Editing a subscription opens the Subscription Options window.
Optionally, use the button to remove a subscription from the Subscriptions on Target Server panel.
Note
The publication will remain in the Available Publications on Source Server panel.
Once a replication plan has been set up, it will be listed in the Existing Plans panel on the Replication Management tab. Clicking on a listed plan will highlight that plan in blue in the server diagram.
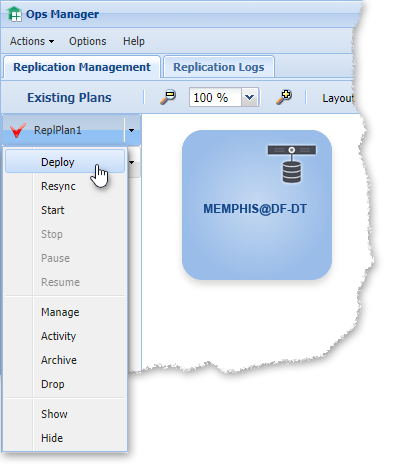
Clicking on the dropdown menu for an existing plan will display a list of options. This menu can also be accessed by right-clicking an existing plan.
Deploy/Redeploy
Sends the plan to the affected servers and sets up Replication Agent on those servers if necessary. Once a plan has been deployed, it can be started and stopped (and paused and resumed) as many times as necessary. There is no need to deploy the plan again until it has been changed.
Resync
The Replication Agent allows you to pause or stop replication. It is designed to catch up with replication after it is resumed by replicating any changes that occurred while it was stopped. In the unlikely event that files have become out-of-sync while replication was paused, the Replication Agent has the ability to synchronize them. Use this option if you need to initiate resynchronization.
Start
Begins replication using the deployed plan.
Stop
Stops replication based on this plan.
Note
Multiple plans may be running at any time and this will stop only the selected plan.
Pause
Temporarily stops replication based on this plan.
Note
Multiple plans may be running at any time and this will pause only the selected plan.
Resume
Restarts a paused replication plan.
Manage
Opens the Replication Plan window to edit the plan.
Activity
Opens the Plan Activity window to monitor replication activity for the selected plan.
Archive
Saves the replication plan and removes it from the list of Existing Plans. Archived plans can be viewed in the Archived Plans Management window.
Drop
Deletes the selected plan.
Show
Displays the replication plan. A connection arrow labeled with the name of the plan connects the source and target servers. Double-click the connecting arrow or name to edit the plan.
Note
This is equivalent to the button, except that it shows an individual plan.
Hide
Hides the connecting arrow that depicts the plan. This can be used to simplify the display.
Note
This is equivalent to the button, except that it hides only the selected plan.
Deploy the required plans.
Start the plans.
Stop the plan
Click the dropdown menu for the replication plan in the Existing Plans panel.
Select Stop.
Note
The replication plan can be restarted by selecting Start there is no need to Redeploy the plan unless changes were made to the replication plan.
Pause the plan
Click the dropdown menu for the replication plan in the Existing Plans panel.
Select Pause.
Note
If changes are made to the plan during the pause, you will need toStop the plan and then redeploy it.
The main window features a Replication Management tab and Replication Logs tab that display logs of replication activity. You can monitor many details of the operation in this tab. Filtering is provided to help you drill down to areas of interest.
If there are a large number of entries to display (for example, if you specified a very long custom time period on a busy installation) the Replication Manager will display the log in multiple pages.
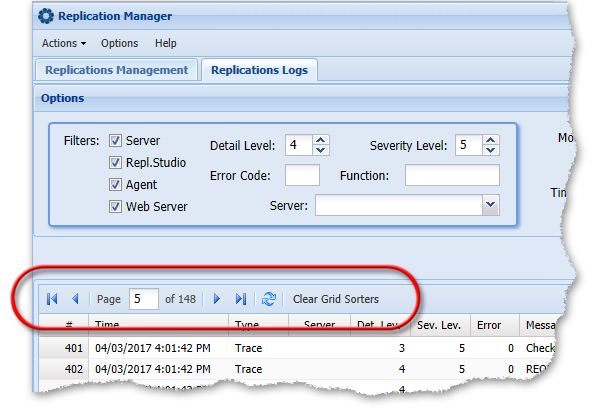
Skip backward (
 ) button
Skips backwards to the first page in the range.
Backward (
 ) button
Moves one page backwards.
Page (
 ) textbox
Displays the current page number and allows you to enter in a specific page number to move to.
Forward (
 ) button
Moves one page backward.
Skip forward (
 ) button
Skips forwars to the last page in the range.
Refresh (
 ) button
Refreshes the current page.
Clear Grid Sorters (
 ) button
Clears any grid sorter filters.
The Replication Logs tab displays logs of replication activity. You can monitor many details of the operation in this tab. Filtering is provided to help you drill down to areas of interest. This allows you to filter the entries displayed in the log to make it easier to find what you are looking for.
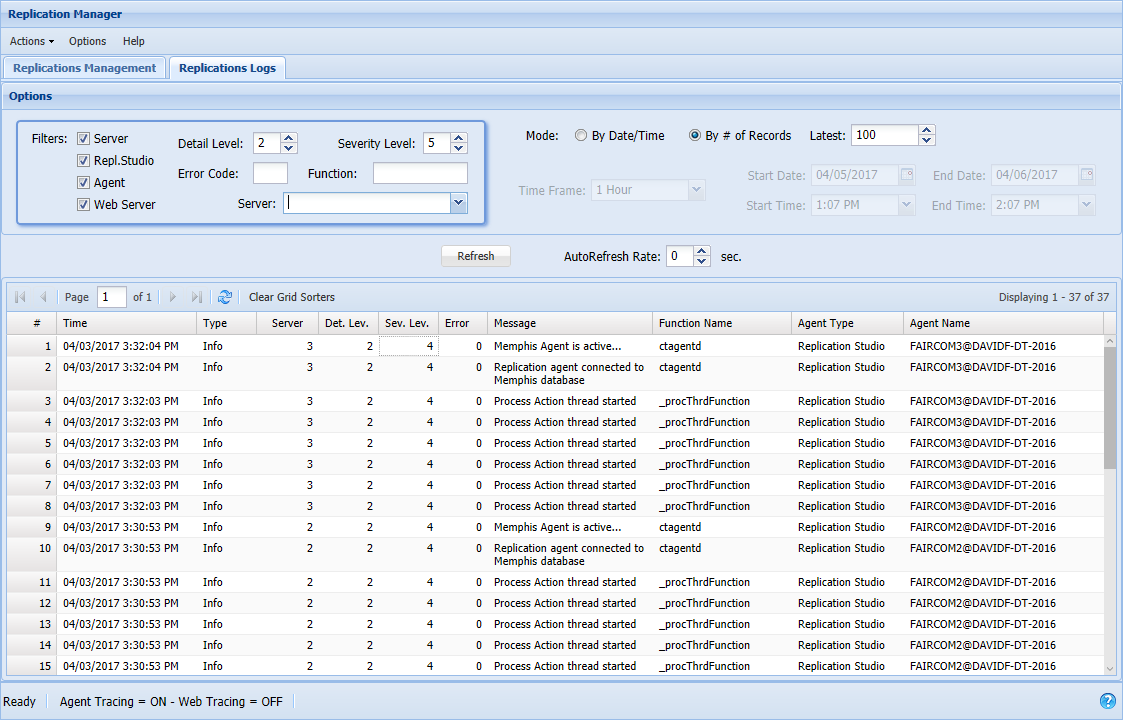
Note
Filtering affects the display only. It removes entries from the display, but it does not remove them from the log nor does it prevent them from being logged.
Filters
Server checkbox
When checked, shows entries logged by a c-tree server.
Repl. Studio checkbox
When checked, shows entries logged by the Replication Manager.
Agent checkbox
When checked, shows entries logged by the Replication Agent.
Web Server checkbox
When checked, shows entries logged by the c-tree web server.
Detail Level textbox
Allows you to select the level of detail to display.
1 - only error (the least amount of detail)
2 - basic/limited information
3 - trace basic level
4 - trace detail level (the most amount of detail)
Severity Level textbox
Allows you to select the level of severity to display.
Note
Items less severe than the selected severity level will not be shown.
0 - most critical errors (most severe)
1 - critical errors
2 - important errors
3 - normal errors
4 - informational messages
5 - trace-level messages (least severe)
Note
To see all info, select Detail Level 4 and Severity Level 5.
To see errors only, select Severity Level 3.
To see less info about the errors, also select Detail Level 2.
Error Code textbox
Filter to see only entries of the error code you enter.
Function textbox
Filter to see only entries logged by the function you enter. You do not need to enter the entire function name. Any function name beginning with the letters you type will be matched.
Note
This function name is case-sensitive (an appears in the field to allow it to be cleared).
Server dropdown menu
Select a server to see only entries from that server (an by the server name allows you to stop filtering).
Mode
You can display a portion of the log based on a selected mode.
By Date/Time
When you display by date and time, you can specify a period of interest starting at a date and time and ending at a date and time.
Time Frame dropdown menu
This allows you to view entries logged in the most recent hour, day, week, or month.
Start Date
Customize the start date.
Start Time
Customize the start time.
End Date
Customize the end date.
End Time
Customize the end time.
By # of Records
If you set Mode to By # of Records, you can use the Latest textbox to specify how many log entries to display. By default, the window displays the latest 100 log entries. You can use this control to adjust the number of entries displayed.
button
Updates the log with the latest data.
Note
This button can be used if AutoRefresh is set to 0.
AutoRefresh Rate textbox
Allows you to set the number of seconds between each automatic refresh of the log data.
Note
A setting of 0 shuts off AutoRefresh (the data will be updated when you click ).
Columns
#
Displays the line number/position in the log.
Time
Displays the time the entry was logged
Type
Displays the nature of the event (Exception, Error, Info, Trace).
Server
Displays the server number (the database ID of the server as shown in the Publications window).
Det. Lev.
Displays the detail level of the log entry. You can filter to see only entries of a certain level of detail — for example, 4 shows the greatest level of detail. Showing all details displays the full text of the messages.
Sev. Lev.
Displays the severity level of the log entry. You can filter to see only entries of at least a certain level of severity.
Error
Displays the error number of the entry.
Message
Displays the text of the message.
Function Name
Displays the name of the function that logged the message.
Agent Type
Displays the type of agent that logged the message (the c-tree web server or the Replication Manager).
Agent Name
Displays the name of the server that the agent is on or displays "Web Server" if the message was logged by the c-tree web server.
The Plan Activity for plan... window allows you to monitor the activity of the selected replication plan.
Click the dropdown menu in the Existing Plans dropdown menu.
Select Activity.
Time Frame dropdown menu
1 Hour, 1 Day, 1 Week, or 1 Month or Custom, in which case you can use the Start Date, Start Time, Stop Date, and Stop Time to define a time period.
button
Refreshes the data shown.
Note
This button can be used if AutoRefresh is set to 0.
AutoRefresh Rate textbox
Allows you to set the data to refresh automatically periodically. This textbox lets you set the interval between refreshes in seconds.
Note
A setting of 0 shuts off AutoRefresh (the data will be updated when you click ).
button
Downloads the current snapshot to a file in JSON format.
Statistics tab
This tab shows the basic operation of replication activities related to the selected plan. It can be used to watch the replication log in real time.
Exceptions tab
This tab shows various levels of error and informational messages written by the Replication Agent.
Function Timing tab
This tab displays the time spent on each operation. This can be important in analyzing the site if a plan is not performing as expected. Shows how many operations (for example, update, delete, and so forth.) are going on and how much time is spent on each average operation.
The Statistics tab shows the replication activities related to the selected plan.
Identification fields:
#
Shows a number assigned to each log entry.
Type
The type of function that is being called.
Direct - source-to-target
Reverse - target-to-source
Time
Shows the timestamp of the most recent transaction.
DB Connections fields:
Source
Shows if the connection to the source server (master server) is live.
Target
Shows if the connection to the target server (the local replicated server) is live.
Replication fields:
Paused
Indicates if replication has been paused.
Aborted
Indicates if replication has been aborted.
Failures
Indicates replication failures.
Latency
Indicates how long ago the current-replicated action happened.
Thread Count fields:
Analyze
The number of threads used by the analyzer.
Apply
The number of apply threads.
Transactions Waiting fields:
Analyzer
The number of transactions waiting for the analyzer.
Eval
The number of transactions waiting for the dependency analyzer.
Resolution
The number of transactions waiting for the dependency resolution.
Apply
The number of transactions waiting to be applied.
Transaction Throughput fields:
Commits
The number of commits.
Add
The number of adds.
Update
The number of updates.
Delete
The number of deletes.
The Exceptions tab shows error and informational messages written by the Replication Agent.
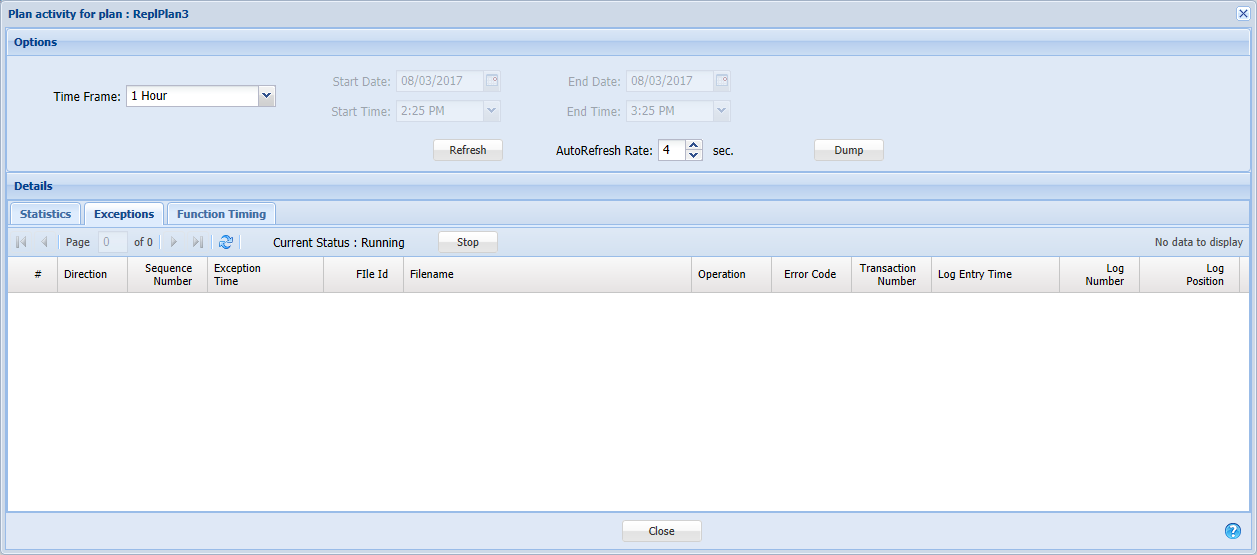
#
A number assigned to each log entry.
Direction
Shows the direction of source-to-target (Direct) or target-to-source (Reverse).
Sequence Number
Shows the number of times the function has been called. This is a number the Replication Agent increments for every function call it makes to the source and target servers. It is provided as an easy way to confirm activity is occurring within the system.
Exception Time
The time the exception occurred.
Filed ID
The unique identifier of the file involved.
Filename
The name of the file involved.
Operation
The operation that was being performed when the exception occurred.
Error Code
The error that was generated.
Transaction Number
The number assigned to the transaction.
Log Entry Time
The time the entry was logged.
Log Number
The number assigned to the log entry.
Log Position
The position of the entry in the transaction log that is being replicated.
The Function Timing tab displays the time spent on each operation.
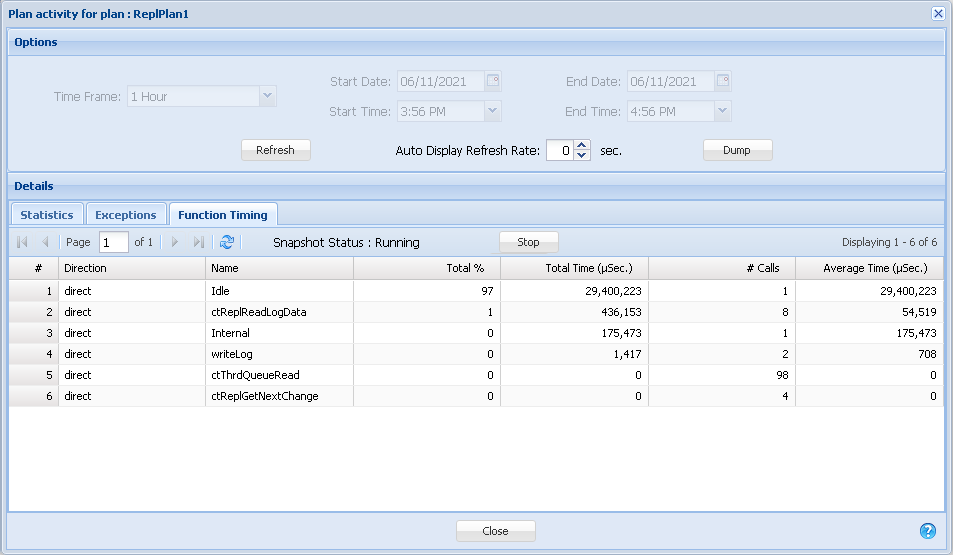
#
A number assigned to each log entry.
Direction
Shows the direction of source-to-target (Direct) or target-to-source (Reverse).
Name
The name of the function.
Total %
Function time as a percentage of the total time replication has been running.
Total Time (µSec)
The number of microseconds spent on this function.
# Calls
The number of times the function has been called.
Average Time (µSec)
The average number of microseconds spent performing this function.
In addition to the main Replication Management tab and the Replication Logs tab, the Replication Manager provides several other windows to help you manage replication.
Replication plans can be archived, which removes them from the list of existing plans without deleting them. Archived plans can be viewed in the Archived Plans Management window.
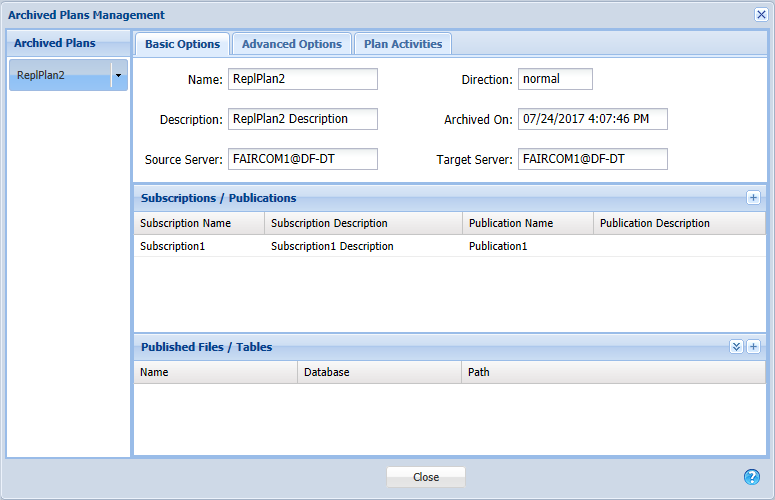
Click the dropdown menu for the replication plan in the Existing Plans panel.
Select Archive.
Note
This window is read-only. To edit a plan, restore it and use the Manage option in the Existing Plans menu.
Click the Actions dropdown menu.
Select Manage Archived Plans.
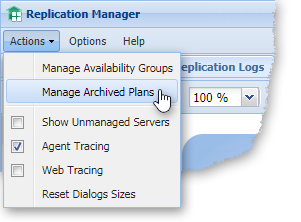
Archived Plans panel
Clicking on the dropdown menu for an archived will display a list of options.
Restore
This selection returns the archived plan to the list of Existing Plans on the Replication Management tab of the main window, which allows it to be deployed (see Deploy and manage existing replication plans).
Drop
This deletes the selected plan.
Basic Options tab
This tab shows basic information, such as name, description, the date it was archived, and so forth. It also lists the subscriptions and publications and shows the files or tables affected.
Advanced Options tab
This tab corresponds to the information shown in the Advanced Options tab of the Replication Plan window.
Plan Activities tab
This tab corresponds to the information about the plan shown in the Plan Activity for plan... window.
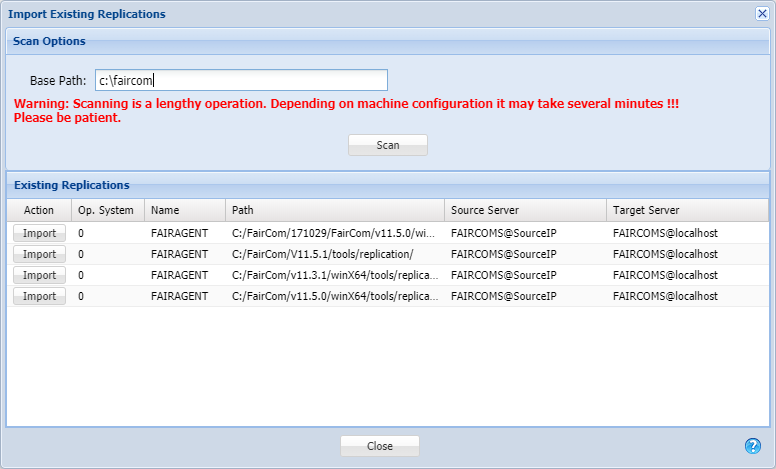
Right-click on the server icon that is configured for replication.
Select Import Existing Replications.
If you know where the replication configuration files are located on the selected server, type the path in the Base Path text box, otherwise skip this step.
Note
You do not need to know the exact path; you can type a portion — for example,
C:\FairCom. Scanning for replication configuration files can be time-consuming, so it is helpful to enter a base path to restrict the search.Click .
Observe the configurations found on the server in the Existing Replications panel.
Click in the Action column to import the desired replication.
Note
This will convert the replication into a Replication Plan.
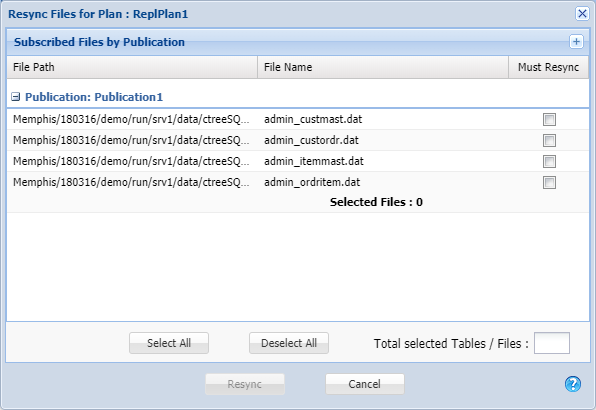
Resync allows you to synchronize a target replica file based on the current source file with minimum impact in runtime.
Important
Use this on the rare occasion when the replica file becomes out-of-sync with the source — for example, a lost transaction log file that was not applied to the target, a conflict while applying the modification to the target, or an inadvertent update to the target while replication was inactive.

Click the dropdown menu for the replication plan in the Existing Plans panel.
Select Resync.
Check the Must Resync checkboxes for the files that need to be synchronized.
Note
Use the button to select every file.
Click Resync.
The Options window provides several tabs to allow you to configure the default settings for various Replication Manager features.
On the Replication Manager window click Options.
Observe the Options window.
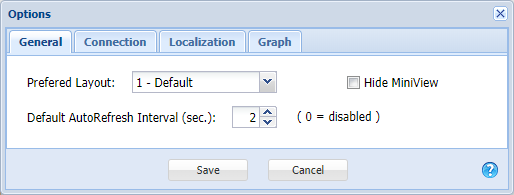
General tab
Preferred Layout dropdown menu
You can select one of the saved layouts to use as the default (see Manage layouts).
Default AutoRefresh Interval (sec.) textbox
The information shown in the Replication Management tab of the Replication Manager can be refreshed automatically at a rate of your choosing. The default is to disable auto-refresh (0) so you must click the button to see updated information. This textbox allows you to set the time (in seconds) between automatic refreshes.
Hide MiniView checkbox
This check box allows you to shut off the display of the MiniView (see Arrange your canvas).
Connection tab
Note
If you leave both fields in this tab blank but you will need to enter your username and password every time you log in. You can enter your username and leave the password blank.
Username textbox
You can store the username so you do not need to enter it to log in.
Password textbox
You can store the password so you do not need to enter it when you log in.
Localization tab
This tab allows you to set the way the date and time are formatted.
Note
For changes to these settings to take effect you will need to exit Replication Manager and re-enter to see the changes.
US English
Formatting will be done according to US English customs.
Browser's Locale
The formatting will be determined based on the browser settings.
Custom Local
The formatting will be determined by this entry in the textbox.
Graph tab
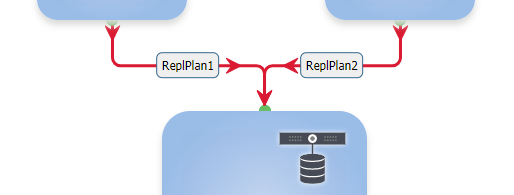
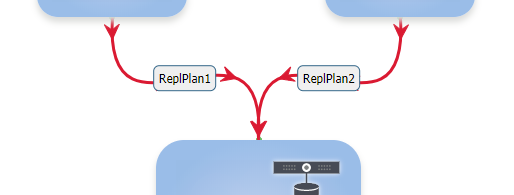
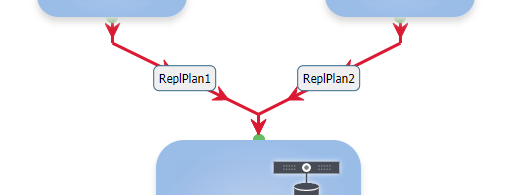
This tab affects the graphical display of the connections between servers, which represents the flow of data in the replication plans. This setting does not affect the operation of the tool. It is merely provided so you can select the style of display you prefer.
Note
For changes to these settings to take effect you will need to exit Replication Manager and re-enter to see the changes.
Flowchart
Forces the connecting arrows to be either horizontal or vertical.
Bezier
Allows the connecting arrows to be curved.
Straight
Uses straight lines for the connecting arrows.
Value | Symbolic constant | Description |
|---|---|---|
0 | RCES_SUCCESS | Replication Manager API returned OK |
1 | RCES_EOF | Cursor is at the end of the file (EOF) |
2 | RCES_DUPKEY | Key value already exists |
100 | RCES_NOTFOUND | Record not found |
129 | RCES_DISCONNECTED | Disconnected server |
133 | RCES_SERVERNOTFOUND | Not able to connect to server |
150 | RCES_SHUTDOWN_ERR | Shutdown error |
156 | RCES_TIMEOUT_ERR | Timeout error |
428 | RCES_BATFINISHED | No more info; batch canceled |
454 | RCES_NOTSUP_ERR | Feature not yet supported |
9000 | RCES_WARNING | RCES warning error code |
9001 | RCES_CONFIG_ERR | Could not initialize the configuration object |
9002 | RCES_LOGGER_ERR | Could not initialize the logger object |
9003 | RCES_NOTIF_ERR | Could not initialize the notification object |
9004 | RCES_FILESYSTEM_ERR | Could not initialize the filesystem object |
9005 | RCES_PROVIDER_ERR | Could not initialize the data provider object |
9006 | RCES_INVARG_ERR | Invalid argument count |
9007 | RCES_INVARGVAL_ERR | Invalid argument value NoteThis can occur if an element is missing from a connection string, such as a missing or invalid username or password when connecting to the sever. |
9008 | RCES_MISARG_ERR | Missing required argument |
9009 | RCES_HASHFULL_ERR | Hash table exceeded the maximum size |
9010 | RCES_MEM_ERR | Memory allocation error |
9011 | RCES_QUEUEFULL_ERR | Queue exceeded maximum size |
9012 | RCES_INVACTION_ERR | Invalid notification action |
9013 | RCES_QUEUE_ERR | Queue is not initialized |
9014 | RCES_MUTEX_ERR | Mutex is not initialized |
9015 | RCES_PROCTHRD_ERR | Mutex has not started the process thread |
9016 | RCES_ACTION_ERR | Invalid action |
9017 | RCES_DB_TYPE_ERR | Mismatch provider DB type |
9018 | RCES_LOCALCT_ERR | Could not load local c-tree library |
9019 | RCES_SESSION_ERR | Could not allocate c-tree session |
9020 | RCES_INVFLD_ERR | Invalid field number |
9021 | RCES_SCHEMATHRD_ERR | Could not start schema update thread |
9022 | RCES_INTERN_ERR | Internal error in |
9023 | RCES_REPL_ERR | Could not initialize the replication object |
9024 | RCES_INVREPLOBJ_ERR | Invalid replication object |
9025 | RCES_STARTED_ERR | Already started error |
9026 | RCES_CONSUMER_ERR | Consumer not found |
9027 | RCES_ALREADYEX_ERR | Already exists error |
9028 | RCES_INVFILTYP_ERR | Invalid file type |
9029 | RCES_INVFILVOL_ERR | Invalid file volume |
9030 | RCES_REPLNDEP_ERR | Replication Plan is not deployed |
9031 | RCES_MISAUTH_ERR | Missing authentication information |
9032 | RCES_FTRNSFR_ERR | File transfer not initialized |
9033 | RCES_REPLACT_ERR | Replication Plan is not stopped |
9034 | RCES_REPLNFOUND_ERR | Replication Plan is not found |
9035 | RCES_INUSE_ERR | Entity is in use |
9036 | RCES_MISREPL_ERR | Missing Replication Plan error |
9037 | RCES_MISDB_ERR | Missing database in subscription |
9038 | RCES_MISVOL_ERR | Missing volume information |
9039 | RCES_FNOTFOUND_ERR | File not found error |
9040 | RCES_INVSUBS_ERR | Invalid subscription |
9041 | RCES_INVPATH_ERR | Invalid file path |
9042 | RCES_INVFUNC_ERR | Invalid function |
9043 | RCES_INVOS_ERR | Invalid operating system (opSystem) |
9044 | RCES_NOTRUN_ERR | Thread is not running |
9045 | RCES_NACTIVE_ERR | Replication Plan is not started |
9046 | RCES_MISLPOS_ERR | Replication Plan is missing log position |
9047 | RCES_NCONN_ERR | Agent is not connected |
9048 | RCES_INVTOK_ERR | Invalid token NoteIt could be the wrong token or an expired token. |
9049 | RCES_DBINUSE_ERR | DB Engine is in use |
9050 | RCES_REPLAGENT_ERR | Replication Agent error |
9051 | RCES_MASTERNOTRDY_ERR | Master server is not ready yet |
9052 | RCES_MISSUBS_ERR | Replication doesn ot have any subscription |
9053 | RCES_TARFIL_ERR | Target file already exists |
9054 | RCES_REPLDISC_ERR | Replication Agent is disconnected |
9055 | RCES_RESYNC_ERR | Replication resync failed |
9056 | RCES_INRESYNC_ERR | Replication is in a resync operation now |
9057 | RCES_EREPLFILE_ERR | Replication does not have any file |
9058 | RCES_CANCELLED_ERR | Operation has been canceled |
9059 | RCES_RESTORE_ERR | File dump restore error |
9060 | RCES_SQLPORT_ERR | SQL Port mismatch |
9061 | RCES_REPLEXIST_ERR | Replication Plan information already exists |
9062 | RCES_NINACTIVE_ERR | Replication Plan is not inactive. |
9063 | RCES_NARCHIVED_ERR | Replication Plan is not archived |
9064 | RCES_MISPROV_ERR | Missing data provider |
9065 | RCES_MEMUNMG_ERR | Not possible to mark the main Replication Manager server as unmanaged |
9066 | RCES_FTINSUP_ERR | FTI is not supported |
9067 | RCES_DELEXCEP_ERR | Not able to clean Replication Exceptions |