AWS IoT Core bridge tutorials
Connect FairCom Edge to AWS IoT Core bridge
The purpose of this tutorial is to demonstrate and describe how to use FairCom APIs and services to forward (bridge) messages from the FairCom broker to an AWS IoT Core broker.
Ensure the FairCom server is installed and running.
Confirm server access by running the FairCom API Explorer. The typical URL is
https://localhost:8443/.
The purpose of this tutorial is to demonstrate and describe how to use FairCom APIs and services to forward (bridge) messages from the FairCom broker to an AWS IoT Core
Create an AWS account.
Log into your AWS account.
Navigate to the IoT core management center.
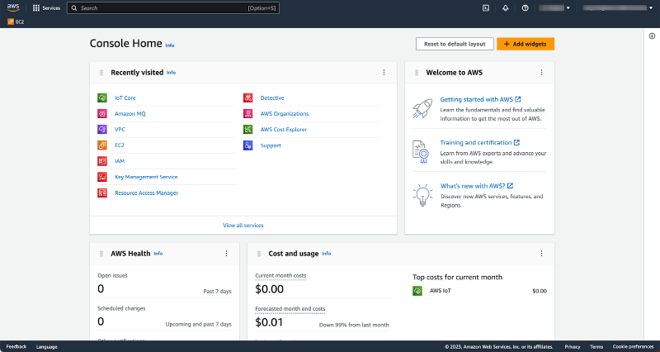
Create required AWS service endpoints.
Create AWS IoT client certificates.
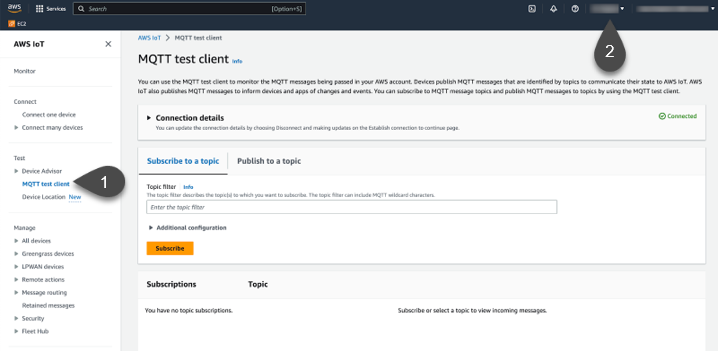
Navigate to the AWS IoT Core MQTT test client in the AWS core console (see Figure 1, “Access an AWS IoT Core MQTT client”).
Observe that your location is set to the correct region referred to in AWS Endpoint in the console header.
Use this console to see forwarded messages from the FairCom broker, published messages, the topics you are subscribed to, and more.
Learn more about features of the MQTT test client at View MQTT messages with the AWS IoT Core MQTT client.
Configure a custom port for MQTTS messaging in the
FairCom-Edge<version>\config\services.jsonfile.Note
This step is optional.
The port defaults to
8883.
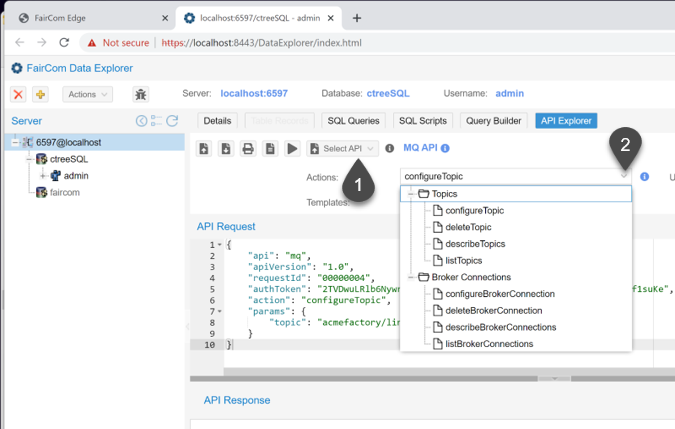
Select the MQ API from the Select API dropdown menu.
Select
"configureBrokerConnection"from the JSON Actions dropdown menu.Insert the
"brokerPort"and"brokerTLS"properties into the API Request.Figure 3. Insert"brokerPort"and"brokerTLS"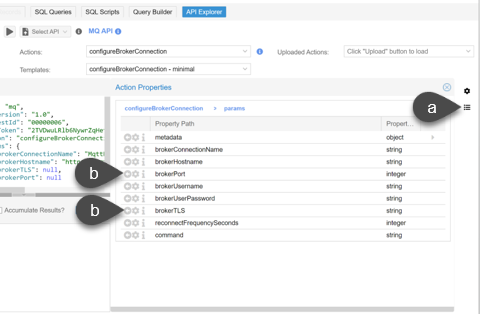
Click the Show all action properties icon (
 ) (see Figure 3, “Insert
 "brokerPort"and"brokerTLS"”).Click the Add Property icon (
 ) for the
 "brokerPort"and"brokerTLS"properties.
Replace the
"brokerHostname"property value with the applicable values in the following format."brokerHostname": "<uniqueID>-<location>.amazonaws.com",
Replace the
"tls"property values with the following"tls"values:{ "api": "mq", "apiVersion": "1.0", "requestId": "00000006", "authToken": "aValidAuthToken", "action": "configureBrokerConnection", "params": { "brokerConnectionName": "AWS_Broker", "brokerHostname": "a3306bbg4mk0h9-ats.iot.us-west-2.amazonaws.com", "tls": { "certificateFilename": "C:/Certificates/certificate.pem.crt", "privateKeyFilename": "C:/Certificates/private.pem.key", "certificateAuthoritiesFilename": "C:/Certificates/root.pem" }, "brokerPort": 8883 } }Replace the
"brokerPort"property value with the port number you are using.Click Send request (
 ).
).Observe the response and ensure the action completed successfully.
Note
"errorCode"with a value of0indicates success."errorCode"with a non-zero value indicates a failure. See Errors and contact FairCom for more information about an error.
Select MQ API from the Select API dropdown menu.
Select "describeBrokerConnection" from the
JSON Actionsdropdown menu.Replace the JSON in the API Request editor with the following JSON:
{
    "api": "mq",
    "apiVersion": "1.0",
    "authToken": "aValidAuthToken",
    "requestId": "00000011",
    "action": "describeBrokerConnections",
    "params": {
        "brokerConnectionNames": [
            "AWS_Broker"
        ]
    }
}
Observe the response and ensure the action completed successfully.
Note
"errorCode"with a value of0indicates success."errorCode"with a non-zero value indicates a failure. See Errors and contact FairCom for more information about an error.
Select MQ API from the Select API dropdown menu.
Select
"configureTopic"from the JSON Actions dropdown menu.Insert the
"forwardToExternalBrokers"property into the API Request.Figure 4. Insert"forwardToExternalBrokers"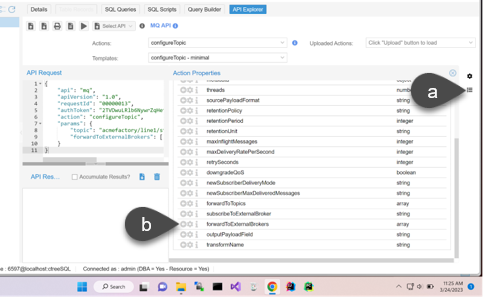
Click the Show all action properties icon (
 ) (see Figure 4, “Insert
 "forwardToExternalBrokers"”).Click the Add Property icon (
 ) for the
 "forwardToExternalBrokers"property.
Replace the
"forwardToExternalBrokers"property values with the following"forwardToExternalBrokers"values:{ "api": "mq", "apiVersion": "1.0", "requestId": "00000014", "authToken": "aValidAuthToken", "action": "configureTopic", "params": { "topic": "acmefactory/line1/station1/acidbath/telemetry", "forwardToExternalBrokers": [ { "brokerConnectionName": "AWS_Broker", "topic": "acmefactory/line1/station1/acidbath/telemetry" } ] } }Click Send request (
 ).
).Observe the response and ensure the action completed successfully.
Note
"errorCode"with a value of0indicates success."errorCode"with a non-zero value indicates a failure. See Errors and contact FairCom for more information about an error.
The FairCom package includes the ability to run a Python script that can publish to a currently running FairCom broker.
Navigate to and open the
publishfolder through<FairCom-Edge>\drivers\python.mqtt\pythonMQTTTutorial1.Open the
data.jsonwith a text editor.Update the
data.jsonfile with a test message — for example,test message here.Run the following command in a command prompt to publish the
data.jsonfile to the FairCom broker.python publish.py -t acmefactory/line1/station1/acidbath/telemetry -f data.json
Note
The
publish.pyfile in thepublishfolder is preconfigured to publish to port8883. If you changed this port inservices.json, edit thepublish.pyfile to publish to the same port.
For more information to publish and subscribe using FairCom Python.MQTT driver, see MQTT client for Python.
Subscribe to a topic in the test client to see messages published from the FairCom broker to the AWS MQTT test client.
Note
Subscribing to # in the test client, will result in you seeing messages from every topic.
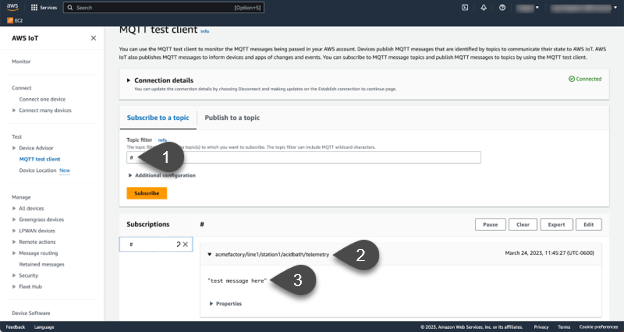
Subscribe to all topics.
In the Topic Filter textbox type #.
Click (
 ).
).Observe # listed under Subscriptions.
Observe that the message is from the
acmefactory/line1/station1/acidbath/telemetrytopic which was specified during the Configure a broker connection.Observe
test message herein the message body from thedata.jsonfile that was edited in Create a client and publish to the FairCom broker.
Note
If the table has no records, look at <faircom>/data/CTSTATUS.FCS to see errors related to the connector.