Data Explorer SQL tutorials
SQL tutorials for FairCom DB
These tutorials show how to perform actions using SQL commands in the FairCom API Explorer.
Ensure the FairCom server is installed and running.
Confirm server access by running the FairCom API Explorer. The typical URL is
https://localhost:8443/.
SQL tutorials for FairCom DB
Both Create table procedures will create a table named "athlete". You can use either of these procedures to create this table.
Create a table using a form
Navigate and right-click Tables in the Server navigation window through
faircom>admin.Select Create New Table from the dropdown menu.
Enter
"athlete"into the Table Name textbox.Add desired values for fields under each Column.
Observe the Resulting SQL Statement for the added fields.
Click (
 ).
).
Create a table using SQL statements
Click the SQL Scripts tab (
 ).
).Paste this code into the SQL Script Request editor.
create table "admin"."athlete" (
	"id" bigint identity (1,1),
	"name" varchar(30),
	"ranking" smallint not null,
	"birthdate" date,
	"playernumber" numeric(32,6),
	"livedpast2000" bit,
	"earnings" money(32),
	"favoritesaying" varchar(500)
);
Click (
 ).
).Observe the Script results.
Navigate to and select the Tables folder in the Server navigation window through
faircom>Tables.Click (
 ).
).Observe the new table in the Tables list in the Server navigation window.
Click the SQL Scripts tab (
 ).
).Paste this script into the SQL Script editor.
insert into "admin"."athlete" values('Michael Jordan','1','02/17/1963','23',1,'1700000000','There is no i in team but there is in win.');
insert into "admin"."athlete" values('Babe Ruth','2','02/06/1895','3',0,'800000','Every strike brings me closer to the next home run.');
insert into "admin"."athlete" values('Muhammed Ali','3','01/17/1942','1',1,'60000000','Float like a butterfly, sting like a bee.');
insert into "admin"."athlete" values('Pele','4','10/23/1940','10',1,'115000000','Everything is practice.');
insert into "admin"."athlete" values('Wayne Gretzky','5','01/26/1961','99',1,'1720000','You miss 100 percent of the shots you never take.');
insert into "admin"."athlete" values('Michael Schumacher','6','01/03/1969','1',1,'990000000','Once something is a passion, the motivation is there.');
Click (
 ).
).Observe the Script results.
Click the SQL Scripts tab (
 ).
).Paste this script into the SQL Script editor.
create index "admin"."athlete_earnings_idx" on "admin"."athlete" ("earnings");Click (
 ).
).Observe the Script results.
Navigate to Indexes in the Server navigation window through
faircom>admin>Tables>athlete.Observe the new index.
Click the SQL Scripts tab (
 ).
).Paste this script into the SQL Scripts editor.
SELECT * FROM athlete;
Click Send request (
 ).
).
Both Drop table procedures will drop a table from a list. You can use either of these procedures to drop a table.
Drop a table using a menu selection
Navigate to and right-click the
athletetable in the Server navigation window.Select Drop Table from the dropdown menu.
Drop a table using a SQL statement
Click the SQL Scripts tab (
 ).
).Paste this script into the SQL Script editor.
DROP TABLE athlete;
Click Send request (
 ).
).Click Refresh (
 ).
).Observe that the
athletetable is no longer listed in the Server navigation window.
Right-click the table you wish to clone and click Clone Table.
Enter a table name into the Table Name textbox.
Make any alterations to the table's fields.
Observe the Resulting SQL Statement and see what will run to create your cloned table.
Click .
Click (
 ).
).Observe the new cloned table in the Server navigation window.

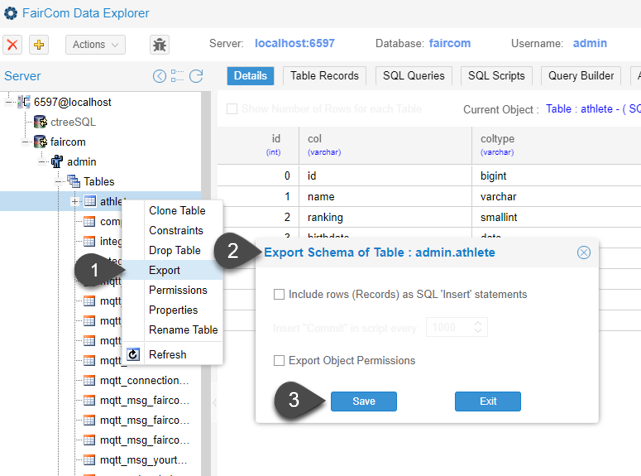
In the Server navigation window, right-click on a table to select Export from the dropdown menu (see Figure 1, “Export a table”).
Make any desired selections in the Export Schema of Table pop-up window.
Click .
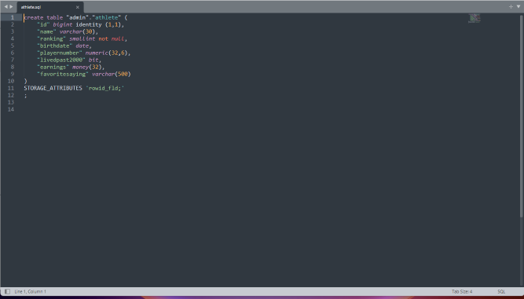
Observe the new
.sqlfile in yourDownloadsfolder.