Node-RED tutorial
Use Node-RED with FairCom DB to create tables, store data, and retrieve data
This tutorial shows how to use FairCom DB with Node-RED to create tables, store data, and retrieve data.
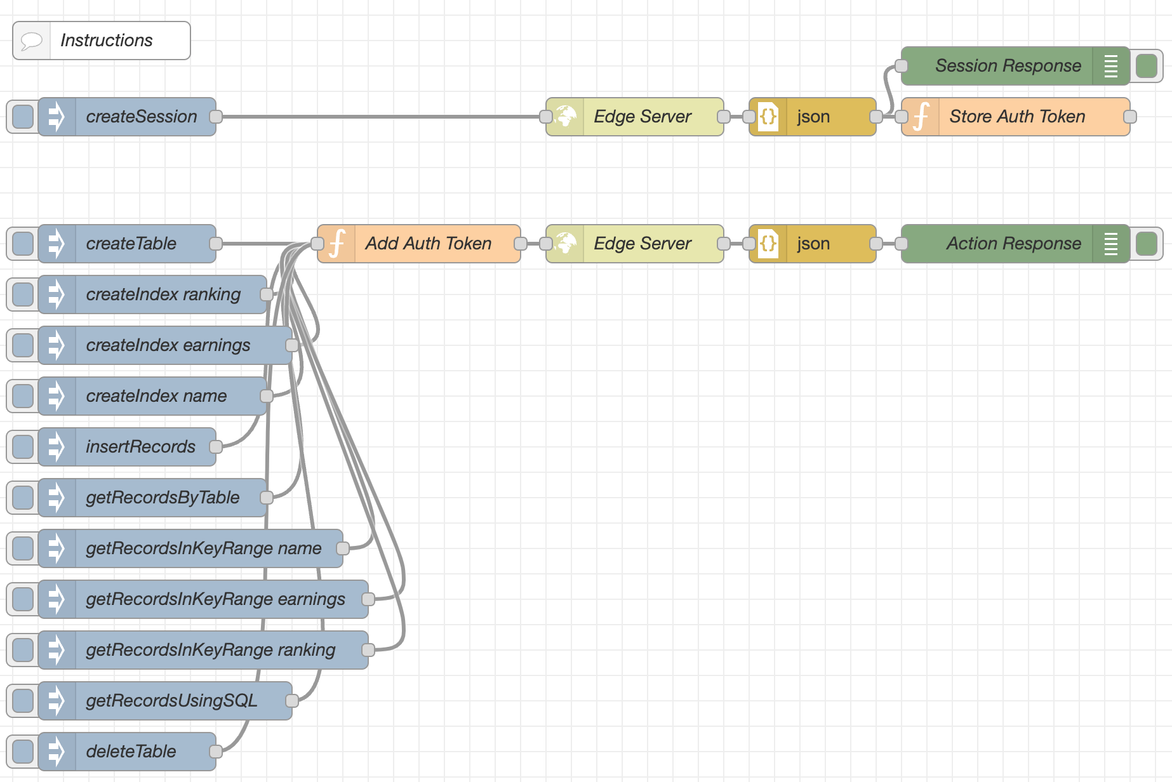
The basic structure of the demo is a series of inject nodes configured to send different JSON objects to an HTTPS request node. The response is converted to JSON and sent to a debug node for viewing in the debug tab. These JSON objects contain configuration instructions and data telling FairCom DB what to do. You can edit the inject nodes and open the JSON editor to see the included JSON.
FairCom DB must be installed and running on the same machine that hosts the Node-RED instance.
Node-RED installed and running.
Import the
flows.jsonfile contents into a Node-RED flow.
Click the createSession inject node to connect to FairCom DB and establish a session.
An auth token is stored in the global context by the
Store Auth Tokenfunction node for reuse in the next steps. You should see info about the returned auth token in the debug tab.Click the createTable inject node.
This will send JSON describing an "athlete" table and the fields it should include. FairCom DB will create this table. You should see a result object including errorCode: 0 in the debug tab.
Click the createIndex ranking inject node.
This will send JSON describing an index to add to the table. This index will order records by the
rankingfield. You should see a result object including errorCode: 0 in the debug tab.Click the createIndex earnings inject node.
This will send JSON describing another index to add to the table. This index will ordr records by the
earningsfield. You should see a result object including errorCode: 0 in the debug tab.Click the createIndex name inject node.
This will send JSON describing another index to add to the table. This index ill order records by the
namefield. The data will be ordered descending, case insensitive, and will filter out records that have "livedpast2000" unset. You should see a result object including errorCode: 0 in the debug tab.Click the insertRecords inject node.
This will send JSON describing 6 records of data to be inserted into the table. You should see a result object including errorCode: 0 in the debug tab.
Click the getRecordsByTable inject node.
This will send JSON requesting records from the table including a table filter that will only include records where
rankingis less than or equal to 3. You should see a result object that includes table rows inside adataarray. There should be 3 rows that meet the criteria.Click the getRecordsInKeyRange name inject node.
This will send JSON requesting records from the table sorted by the
name_livedpast2000index where the indexed value is greater than or equal to "P". You should see a result object that includes table rows inside adataarray. There should be 2 rows that meet the criteria.Click the getRecordsInKeyRange earnings inject node.
This will send JSON requesting records from the table sorted by the
earningsindex where the indexed value is less than 2,000,000. You should see a result object that includes table rows inside adataarray. There should be 2 rows that meet the criteria.Click the getRecordsInKeyRange ranking inject node.
This will send JSON requesting records from teh table sorted by the
rankingindex where the indexed value is less than or equal to 3. You should see a result object that includes table rows inside adataarray. There should be 3 rows that meet the criteria.Click the getRecordsUsingSQL inject node.
This will send JSON describing a simple SQL query on the table. you should see a result object that includes table rows inside a
dataarray. There should be 6 rows that meet the criteria.There is a deleteTable inject node. If you click this, the table will be deleted.
Use Node-RED with FairCom DB to create tables, store data, and retrieve data
This FairCom tutorial uses HTTP to communicate with the server on port 8080. Because HTTP is insecure, this port is typically disabled.
Do the following to enable the HTTP protocol on port 8080:
Shut down the FairCom server.
Edit the
services.jsonfile located in the<faircom>/configfolder.Find the listener service named
"http8080".Change
"enabled":falseto"enabled":true.Restart the FairCom server.
The modified listener configuration object in services.json should look something like this:
{
  "serviceName": "http8080",
  "description": "Port 8080 using insecure HTTP protocol...",
  "port": 8080,
  "protocol": "http",
  "enabled": true
}