Tutorials
Tutorials for using TLS
Section | Description |
|---|---|
This tutorial shows how to use the | |
This tutorial shows how to use the | |
This tutorial shows how to use the |
TLS Tutorials for ISAM, CTDB, and SQL APIs
Section | Description |
|---|---|
This tutorial describes how to enable secure TLS communications over the ISAM, CTDB, AND SQL (as well as HTTPS, MQTTS, MQTTWSS, and WSS) protocols. | |
Use TLS to connect client software to FairCom's ISAM, CTDB, and SQL APIs | This tutorial shows how to use TLS to connect client software to Faircom's ISAM, CTDB, and SQL APIs. |
This tutorial shows how to use TLS with ISQL. | |
This tutorial shows how to use TLS with FairCom's CLI utilities. | |
Determine TLS connections in FairCom's CLI utilities and Monitor App | This tutorial describes how to determine TLS connections in FairCom's CLI utilities and Monitor App. |
Enable server-side TLS logging for the FairCom wire protocols | This tutorial shows how to enable server-side TLS logging for the FairCom wire protocols. |
Enable client-side TLS logging for applications using mtclient | This tutorial shows how to enable client-side TLS logging for applications using mtclient. |
Use client certificate authentication with FairCom's ISAM API | This tutorial shows how to use client certificate authentication with FairCom's ISAM API. |
Enable client certificate authentication on a FairCom server | This tutorial shows how to enable client certificate authentication on a FairCom server. |
This tutorial shows how to use client authentication in a FairCom CLI tool. | |
This tutorial shows how to use client authenticate in client software. |
TLS Tutorials for JSON APIs, MQTT, and browser-based apps
Note
Use the Google Chrome browser for FairCom browser-based tools. Other browsers may cause unexpected behavior.
Section | Description |
|---|---|
This tutorial shows how to use FairCom's | |
This tutorial describes how to enable secure TLS communications over the HTTPS, MQTTS, MQTTWSS, and WSS (as well as SQL, ISAM, and CTDB) protocols. | |
This tutorial shows how to use TLS for JSON APIs, MQTT, and browser-based applications. | |
This tutorial provides procedures for configuring the FairCom server, configuring the Python client, and creating a secure connection. | |
This tutorial provides procedures for configuring the FairCom server, configuring the Paho Python client, and establishing communication. | |
This tutorial shows how to use Java HTTP with TLS to communicate with the FairCom JSON DB API. | |
This tutorial shows how to implement TLS using the Paho Java library to secure an MQTT connection. | |
This tutorial details problems and solutions to certificate security issues in the Google Chrome browser. | |
Use TLS to connect client software to FairCom's JSON and MQTT APIs | This tutorial shows how to use TLS to connect client software to FairCom's JSON and MQTT APIs. |
Use TLS with FairCom's browser-based apps running in Google Chrome | This tutorial shows how to use TLS with FairCom's browser-based applications running in Google Chrome. |
Tutorial for using and managing certificates
Complete these steps to secure TCP/IP communications between the FairCom DB Notify service and the FairCom MQ broker. This activates TLS for authenticating and encrypting the network communications.
Note
If the DB Notify service and the MQ broker are going to be run on the same computer, you must ensure that all ports for the DB Notify server are different from the ports used by the MQ server. See Configure ports and services
TLS support optionally allows database user authentication based on a client-provided certificate that is trusted by the server and is in the MQ broker's authorized user database. Users can be added using the ctadmn utility.
The terms TLS and Secure Socket Layer (SSL) are used synonymously throughout this document.
Create certificates
Set up FairCom MQ with TLS
Set up DB Notify on FairCom DB with TLS
When done, you will have files in the following locations:
File folder | FairCom DB running DB Notify | FairCom MQ running MQTT broker |
|---|---|---|
CA | No CA files are needed for ISAM because the CA certificate is included in the server key pair and all client key pairs. | No CA files are needed for ISAM because the CA certificate is included in the server key pair and all client key pairs. |
Server | The FairCom DB server key, server certificate with FairCom DB SAN, and CA certificates. | The FairCom MQ server key, server certificate with FairCom MQ SAN, and CA certificate. |
Client | The Client key, client cert, and CA cert. | No client files are needed. |
Note
You can use different server certs signed by the same CA, but as long as all the DNS names are listed in the SAN, you can use the same cert on both servers.
You can create certificates using the Python scripts provided in the <faircom>\tools\certman\ folder.
Note
Create certificates on the FairCom DB server so you only need to copy two files over to the MQ server.
For secure communications, you need to create a Certificate Authority (CA) certificate file and key file. These two files are a key pair. The CA certificate file is used when creating the server and client certificate files.
Note
FairCom recommends you create certificate files with the following general limits:
CA files expire after 120 months; name the files
ca.crtandca.keyServer certificate files expire after 48 months
The admin client certificate files expire after 24 months
Other client certificate files expire no later than 12 months
Certificates need to be recreated before existing certificates expire. The life of a certificate is determined by the --months argument. The "valid from" date will be the date on which the certificates were created, and the "valid until" date will be the --months value from that creation date.
Steps to create TLS certificates for secure communications using the FairCom-provided Python script files:
Open a command prompt or console.
Change to the
<faircom>\tools\certman\directory.Create the CA certificate and key files. Run
createcacert.pywith appropriate argument values:Note
Run
python createcacert.py --helpfor descriptions of the arguments.python createcacert.py --certManagementFolder Certs --outCertFile ca.crt --outKeyFile ca.key --months 120 --bits 2048 --commonName "Root CA" --org MyCompany --country US --state MyState --location MyCity --unit CompanyGroup
The output indicates where the files were saved.
Successfully created and saved 2 of 2 files:
  <faircom>/tools/certman/Certs/_ca_key/ca.key
  <faircom>/tools/certman/Certs/Expires_On_<future date>/ca.crt
Copy the
ca.crtfile into the current directory:copy <faircom>/tools/certman/Certs/Expires_On_<future date>/ca.crt .Note
The path may need to be in quotes if it has spaces in it.
Create a server certificate file for the FairCom DB server. Run
createservercert.pywith appropriate argument values:python createservercert.py --certManagementFolder Certs --outCertFile server.pem --singleFile True --months 48 --bits 2048 --cipher sha256 --commonName MyServer --altName localhost 127.0.0.1 ::1
--altNameshould include all hostnames and IP addresses you use when connecting to this server. This example shows three addresses, each separated by a space character.--commonNameis typically set to the hostname of the server.Some settings, such as
--org, are not included here because they were saved when the CA certificate was created, and future commands will use the saved settings.Append the CA certificate to the server certificate file:
type ca.crt >> server.pem
Create a client certificate for the admin user. Run
createclientcert.pywith the appropriate argument values:python createclientcert.py --certManagementFolder Certs --singleFile True --months 24 --bits 2048 --outCertFile admin_client.pem --commonName admin
--commonNamedesignates which FairCom account is associated with this client certificate.Append the CA certificate to the client certificate file:
type ca.crt >> admin_client.pem
Create a client certificate for each user. Run
createclientcert.pywith the appropriate argument values:python createclientcert.py --certManagementFolder Certs --outCertFile john_doe_client.pem --singleFile True --months 12 --bits 2048 --commonName JohnDoe
--commonNamedesignates which FairCom account is associated with this certificate.Append the CA certificate to the client certificate file:
type ca.crt >> john_doe_client.pem
To test your TCP/IP TLS connection, deactivate the Shared Memory Protocol even if you are connecting with TCP/IP internally. This is currently required for using TLS with client authentication. If the Shared Memory protocol is activated, the Shared Memory is automatically used when possible. Deactivate Shared Memory by commenting out its keyword in the
<faircom>\config\ctsrvr.cfgfile.; Communication protocols ; COMM_PROTOCOL FSHAREMM
Deny shared memory for SQL also by adding the following line:
SQL_OPTION NO_SHARED_MEMORY
Activate SSL in the FairCom MQ broker by uncommenting the SSL and x509 support in the
<faircom>\config\ctsrvr.cfgfile.;Here is where you can activate (un-comment)SSL SUBSYSTEM COMM_PROTOCOL SSL { ;This is the file name in your server's directory SERVER_CERTIFICATE_FILE server.pem ;For SSL you can specify (un-comment) a debug log file name DEBUG_LOG ssl.log ;Here you can restrict access to SSL ONLY. SSL_CONNECTIONS_ONLY YES ;Require clients to provide a x509 certificate VERIFY_CLIENT_CERTIFICATE YES ;Use x509 client certificate for database authentication x509_AUTHENTICATION YES ;Use the SUBJECT:CN from the client's certificate as their username x509_PATH CN ;SSL_CIPHERS AES256-SHA256:AES256-GCM-SHA384:DHE-RSA-AES256-SHA256:AES256-GCM-SHA384 }Save your changes to
ctsrvr.cfg.If using Linux/Unix, or macOS, update
<faircom>\server\stopserverto stop the server when using TLS.#!/bin/sh echo Stopping the FairCom Database Engine... CTSSL_CLIENT_CERTIFICATE=admin_client.pem export CTSSL_CLIENT_CERTIFICATE CTSSL_CLIENT_KEY=admin_client.pem export CTSSL_CLIENT_KEY cd ../tools ./ctstop -AUTO none none "FCEDGEMQ@localhost^fssltcp"
Copy
server.pem,admin_client.pem, andjohn_doe_client.pemto the<faircom>\server\directory.
Run command-line utilities found in the <faircom>/tools/ folder to test that FairCom MQ is TLS-enabled with a TLS ISAM connection.
Restart FairCom MQ.
The log message
"Initialized SSL support."is written toCTSTATUS.FCS.Check that the server's configuration file (
ctsrvr.cfg) allows only SSL connections.SSL_CONNECTIONS_ONLY YESLaunch two different CMD shells and run these two commands in each of the CMD shells to set environment variables in both. These enable client certificate-based authentication.
set CTSSL_CLIENT_CERTIFICATE=admin_client.pem
set CTSSL_CLIENT_KEY=admin_client.pem
(optional) Run the following to enable SSL-related diagnostic messages:
Set CTSSL_DEBUG_LOG=ssl.log
The CA certificate MUST be available to the client process as the file
ca.crtin the working directory. Copy the CA certificate to the file namedca.crtin the<faircom>\tools\folder.Copy <faircom>\tools\certman\Certs\Expires_On_<future date>\ca.crt <faircom>\tools\ca.crt
Verify that TLS connections are working correctly for the ctixmg, ctadmn, and ctixmb tools, and check each tool's connection type.
Verify connections
In the first CMD shell, from the FairCom MQ
<faircom>\tools\folder, run each of the following command lines one at a time to check each tool's connection type.These commands append
^fssltcpto the server name to request an SSL-enabled connection for an ISAM connection. In these examples, you may need to changeFCEDGEMQto match thectsrvr.cfgSERVER_NAME value of your MQ server.Be sure to use quotes on the command line.
It is not necessary to send user/password because the TLS certificate supplies the necessary credentials.
Note
NOTE: Some utilities have position-based arguments that must be supplied. When client certificate authentication is enabled, any supplied username or password is ignored.
ctixmg ADMIN ADMIN "FCEDGEMQ@localhost^fssltcp"
ctadmn ADMIN ADMIN "" "FCEDGEMQ@localhost^fssltcp"
ctixmg none none "FCEDGEMQ@localhost^fssltcp"
If you get an error such as "Could not initialize c-tree Plus" or "Could not logon to server", the configuration is not configured correctly. If you get a menu or are asked a question, the x509 connection is working.
Check the connection type
While one tool is running in the first CMD shell, run ctadmn in the second CMD shell from the FairCom MQ
toolsfolder whereca.crtis present.ctadmn none none "" "FCEDGEMQ@localhost^fssltcp" **** FairCom(R) Server Administration Utility **** 1. User Operations 2. Group Definitions 3. File Security 4. Monitor Clients Enter your choice (1-10), or 'q' to quit>> 4Enter 4 to choose
Monitor Clients.Monitor Clients: 1. List Attached Clients 2. Kill Client Enter your choice (1-2), or 'q' to return to previous menu>> 1Enter 1 to choose
List Attached Clients:Look at the
NodeNameof each client that is listed to find the ctixmg, ctadmn, or ctixmb tool you are currently running in the first CMD shell.You might have to press enter a few times because our tool might be last on the list after other internal MQ threads.
The following examples are outputs for the ctixmg and ctadmn tools, with the items of interest bolded.
UserID: ADMIN                      NodeName: ctixmg
Task 20                            Communications: FSSLTCP
    Memory: 235K       Open Files: 3      Logon Time:   0:06
    Tran Time:   --    Rqst Time:   0:06  NoRequest  Rqst# 196 OPNRFIL

UserID: ADMIN                      NodeName: ctadmn
Task 34                            Communications: FSSLTCP
    Memory: 288K       Open Files: 9      Logon Time:   7:38
    Tran Time:   --    Rqst Time:   7:38  NoRequest  Rqst# 196 OPNRFIL
Communications: FSSLTCP, as in these examples, indicates the TCP/IP connection is using TLS.
Note: The following protocols are some of the more common TCP/IP connections you might observe:
F_TCPIP	indicates an unencrypted ISAM TCP/IP connection.
FSSLTCP	indicates an SSL/TLS-enabled ISAM TCP/IP connection.
SQL_TCPIP  indicates an unencrypted SQL TCP/IP connection.
SQL_SSLTCP  indicates an SSL/TLS-enabled ISAM TCP/IP connection.
Enter q to return to the ctadmn main menu.
In the first command shell, kill the tool that is running by pressing ctrl-c,. Launch the next tool and check its connection type until all three tools are verified.
In the second CMD shell running the ctadmn tool, add the
JonDoeuser to your Server/Broker's database.User Operations: 1. Add New User 2. Remove Existing User 3. List Users Enter your choice (1-9), or 'q' to return to previous menu>> 1
Enter 1,
Add New User.Enter User Id >> Jon Doe Enter User Description >> Jon Doe
Answer the remaining prompts as you prefer. After the last prompt, press q to return to the main menu. Press q again to exit ctadmn.
Set two environment variables to establish the user
JonDoewith x509 authentication.set CTSSL_CLIENT_CERTIFICATE=john_doe_client.pem set CTSSL_CLIENT_KEY=john_doe_client.pem
Run the ctixmg tool again, without a user or password, to verify that the
JonDoeuser is correctly configured with a TLS connection. This should launch without a "Could not initialize c-tree Plus" error. You may need to changeFCEDGEMQto match yourSERVER_NAMEvalue.ctixmg none none "FCEDGEMQ@localhost^fssltcp"
With the FairCom DB installation, edit the
<faircom>\config\dbnotifyconnections.jsonfile to configure a secure connection between your FairCom DB server and the FairCom MQ Broker:Set the
faircomServerNametoFCEDGEMQ. This is theSERVER_NAMEof the MQ broker that is set in the/config/ctsrvr.cfgfile in the FairCom MQ installation.Enable
tlsandx509_authentication.At
tls, set thecertificateFilenamewith the name of the client-side certificate file that you previously created (server.pemin this tutorial).At
x509_authentication, setcertificateFilenamewith the FairCom ADMIN user certificate key you previously created (admin_client.pemin this tutorial).{ "logLevel":"development", "directConnectionsToFairComMq":[ { "brokerConnectionName":"brokerCtree", "faircomServerName":"FCEDGEMQ", "brokerHostname":"localhost", "reconnectFrequencySeconds":15, "tls":{ "certificateFilename":"server.pem", "enabled":true, "x509_authentication":{ "certificateFilename":"admin_client.pem", "enabled":true } } } ] }
Edit the
<faircom>\config\dbnotify\ctreeSQLcustmast.jsonfile to configure the DB notification criteria.When the DB Server enables the FairCom DB Notify service at startup, it looks in the
config\dbnotifyfolder for any.jsonfiles. Each.jsonfile is expected to contain the necessary information related to one database file to be monitored. A separate.jsonfile is needed for each database file you want to monitor.{ "databaseName":"ctreeSQL", "tableName":"custmast", "ownerName":"admin", "publishMqttMessages":[ { "topic": "topic1", "brokerConnectionName":"brokerCtree", "triggers":["delete"], "QoS":0, "recordFilter":"!stricmp(cm_custstat,\"CA\")", "includedFields":[ "cm_custnumb", "cm_custzipc", "cm_custcity" ], "includePrimaryKey":"never" }, { "topic": "topic1", "brokerConnectionName":"brokerCtree", "triggers":["insert","update"], "QoS":0, "recordFilter":"atoi(cm_custnumb) >= 1000", "includePrimaryKey":"never", "tagChanges":"forEachField" } ] }The
"topic": "topic1"on"brokerConnectionName":"brokerCtree"that you set up when you configured your connection is used for published messages.Note
You can optionally define the
"persistence table"for the topic in FairCom MQ that will receive the messages from DB notify by defining the following properties inctreeSQLcustmast.json:"persistenceDatabaseName":"replaceWithDatabaseName", "persistenceOwnerName":"replaceWithOwnerName", "persistenceTableName":"replaceWithTableName",If these properties are omitted, FairCom MQ will automatically define them.
Copy certificates to the
<faircom>\server\folder.FairCom DB Notify acts as a client of the FairCom MQ Broker, so we need to copy the client-side certificates to the FairCom DB server folder.
Copy the
server.pemfile (SSL client-side certificate) into your FairCom DBserverfolder.> copy .\<YourWorkFolder>\server.pem .\<faircom>\server\server.pem
Copy the
adminuser certificate file into the FairCom DBserverfolder (x509 authentication):> copy .\<YourWorkFolder>\admin_client.pem .\<faircom>\server\admin_client.pem
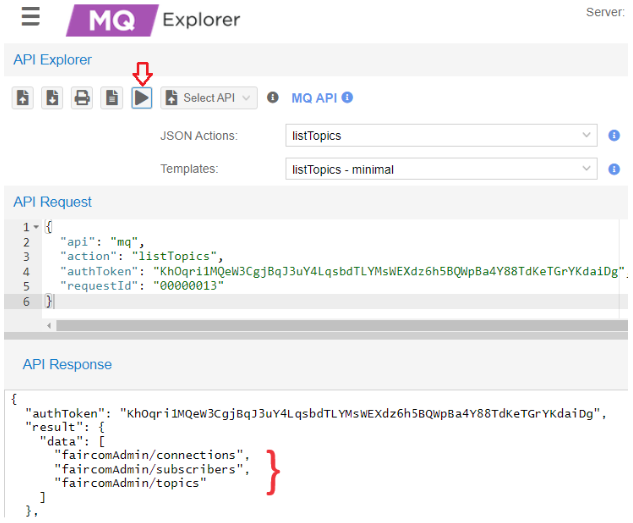
Switch to the machine that FairCom MQ is running on and use MQ Explorer to check if the topics are already there:
If you have already run FairCom DB Notify without x509 in this environment,
"topic1"and"FairComServer/NotificationPlugin/Errors"topics are already created and will appear in this list.In API Explorer, in the drop-down list choose MQ API.
In the drop-down list select listTopics then click Send request (
 ) to execute the
 listTopicsaction.The API Response will list all topics that are subscribed to in this broker.

In this example,
"topic1"is not on the server.
Create topics
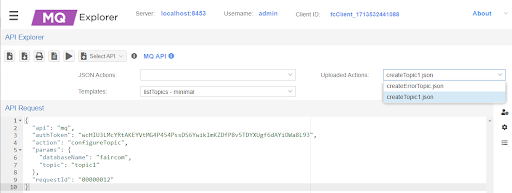
"topic1"and"FairComServer/NotificationPlugin/Errors"if they do not exist in the FairCom MQ broker.In API Explorer, click Upload Set of Json files (
 )
)
Select and upload
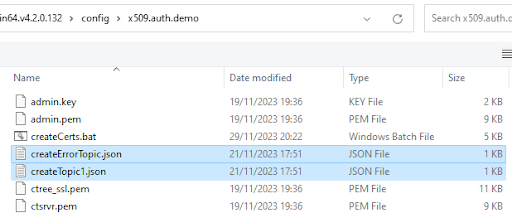
createErrorTopic.jsonandcreateTopic1.jsonfound in the<faircom>\config\x509.auth.demo\folder.
In select and execute the API request for each action.

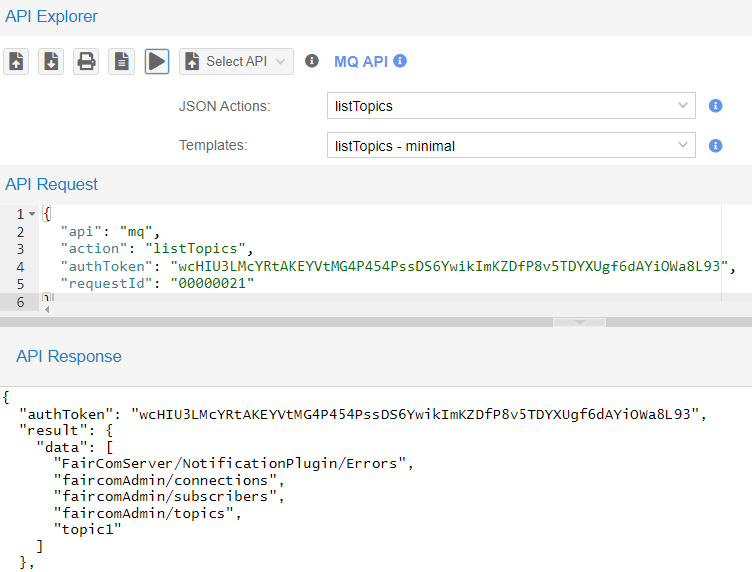
Execute listTopics again to show those topics.

Note: FairCom DB will support the automatic creation of topics with x509 in the future.
On the machine that FairCom DB is installed on, restart the FairCom DB Server.
Proceed to Test FairCom DB Notify using secure communication and x509 authentication.
FIPS-140.2 security requires a revision of FairCom DB file encryption.
When the Advanced Encryption option is enabled (ADVANCED_ENCRYPTION YES), FairCom supports file encryption.
File encryption requires a Master Password, a secret known only to the server administrator, to access the encrypted data. This Master Password is the basis for file encryption security.
A Key Derivation Function (KDF) uses the Master Password to derive a fixed-width Master Key. Prior to V12.5, this KDF was based on MD5, which is not FIPS-140.2 compliant.
When an application requests that a file be encrypted, it specifies the type of encryption algorithm to use.
(create table mytable (f1 integer) STORAGE_ATTRIBUTES 'encr=aes32')
FIPS-140.2 allows only the AES encryption algorithm, while a number of non-compliant algorithms were available in previous versions.
A cryptographic random generator is used to generate a file-specific key (File Key) used to encrypt the data. The File Key is encrypted with a master cipher algorithm using the Master Key, and stored in the header of the file. Prior to V12.0, the master cipher was not FIPS-140.2 compliant.
Both the data and the File Key are encrypted using a cipher block chaining (CBC) mode.
For FIPS-140.2 the following changes were made:
The Master Cipher used for new files or when changing the Master Password now defaults to AES.
Support for non-AES algorithms has been removed.
DCOD_ERR (606)is returned for any other encryption algorithms. A conversion utility or library is required to access such files.A new KDF based on the SHA3 hash function is now the default. Files encrypted with the MD5-based KDF can still be read unless
FIPS_ENCRYPTION YESis enabled.The format of the Master Password verification file (
ctsrvr.pvf) was changed.
FIPS Encryption Provider
The described changes allow the FairCom DB server to be run in FIPS mode by enabling the ctsrvr.cfg keyword: FIPS_ENCRYPTION YES.
When specified, FairCom DB uses the OpenSSL 3.0 FIPS module for encryption routines.
Compatibility
Compatibility with prior versions of encrypted files requires some type of conversion or custom FairCom DB libraries depending on the specific options the file was created with. The ctinfo utility has been enhanced to display file encryption details.
For an AES file created with V12.5 server defaults (FIPS compatible), ctinfo reports the following:
Data visibility: AES encrypted      << Required For FIPS-140.2
Encryption Key length: 256 bits
Encryption Attributes: 0x1d
    256 bit master key
    Master key using AES            << Required For FIPS-140.2
    OpenSSL created
    KDF uses SHA3                   << Required For FIPS-140.2
For an AES encrypted file created by V11.8, ctinfo* shows:
Data visibility: AES encrypted
Encryption Key length: 256 bits
Encryption Attributes: 0x1
    256 bit master key
    KDF uses MD5
Data Migration
When migrating a Pre-V12 file to a FIPS-140.2 compatible encoding, if ctinfo reports data visibility as "AES encrypted" then only the File Key in the header of the file needs to be re-encrypted. This can be accomplished using the standalone utility ctencrypt to change the Master Password (the new and old master password can be the same if desired), which re-encrypts the File Key.
If ctinfo reports data visibility as anything but "AES encrypted", then the entire file must be re-encrypted. This can be done using the standalone version of ctcmpcif* with -encrypt = {aes16,aes24,aes32} .
(*) This requires compilation with NO_ctFeatOpenSSL_ONLY to avoid DCOD_ERR(606) due to the Master Key encryption using a non-AES cipher.
Backwards compatibility
To use V12.5 servers to create file encryption options that remain compatible with pre-V12 servers requires a custom database built with #define NO_ctFeatOpenSSL_ONLY. This restores support for legacy encryption routines but disables explicit FIPS support (FIPS_ENCRYPTION YES will fail). New files will still default to FIPS compatible encryption options, and old files using the MD5 KDF and/or the legacy Master CIpher can be accessed normally.
To force new files to use keys derived using MD5 requires creating the Master Key verification file (ctsrvr.pvf) with the -kdfv1 option of the ctcpvf utility.
ctcpvf -kdfv1
To force new files to be encrypted with the legacy Master Cipher use ctsrvr.cfg option: COMPATIBILITY PREV_V12_MASTER_CIPHER.
Note
When this is enabled, the database is unable to access encrypted files using AES as the Master Cipher.