Data Change Stream Tutorials
Install, configure, and modify data change streams
The Data Change Streaming API configures FairCom servers to send and receive data change streams. Each time an insert, update, or delete occurs in a FairCom DB or RTG server, it sends a data change event to FairCom MQ. Customers can go to FairCom MQ to bulk download data change events or they can subscribe to a live feed.
Unlike the old DB Notify, the Data Change Streaming API and engine runs on FairCom MQ and connects to other Faircom servers. See "Comparing Data Change Streaming API with DB Notify API" for more information.
Important
Ensure that FairCom DB and FairCom MQ are installed and running before following the steps below.
Set up Faircom DB (or RTG) to be able to be a Data Change Streaming source server.
Add the
REPL_NODEID <nodeid>configuration option to the server configuration file,ctsrvr.cfg. Specify the<nodeid>value in IPv4 format, for example 10.0.0.1. The value should be unique for each FairCom server that is used in the system.REPL_NODEID 10.0.0.1
If DBNotify has been used, disable it. It is not possible to use DBNotify and Data Change Streaming together.
	{
		"serviceName": "dbnotify",
		"serviceLibrary": "./dbnotify/fcdbnotify.dll",
		"enabled": false
	},
Configure Faircom MQ to use the Data Change Streaming API.
Enable the
datachangestreamplugin in theotherServicesarray inservices.json."otherServices": [ { "serviceName": "datachangestream", "serviceLibrary": "./datachangestream/datachangestreamservice.dll", "enabled": true } ]Restart FairCom DB and FairCom MQ
In Faircom DB (or RTG), create the custmast table within the ctreeSQL database.
There are two SQL scripts to assist with this tutorial. The
custmast1.sqlscript creates files to monitor, andcustmast2.sqlmodifies the files. Copy both of the script files to your.\toolsdirectory.copy config\x509.auth.demo\custmast1.sql .\tools copy config\x509.auth.demo\custmast2.sql .\tools
Run the following command from the
.\toolsdirectory to create custmast.isql -s custmast1.sql -u ADMIN -a ADMIN ctreeSQL
INIT
DEFINE
Create table...
MANAGE
Add records...
1 record inserted.
1 record inserted.
1 record inserted.
1 record inserted.
Display records...
NUMBER NAME
------ ----
1000 Bryan Williams
1001 Michael Jordan
1002 Joshua Brown
1003 Keyon Dooling
4 records selected
DONE
The resulting files are saved in
<faircom>/data/ctreeSQL.dbsCreate Data Change Streaming connection.
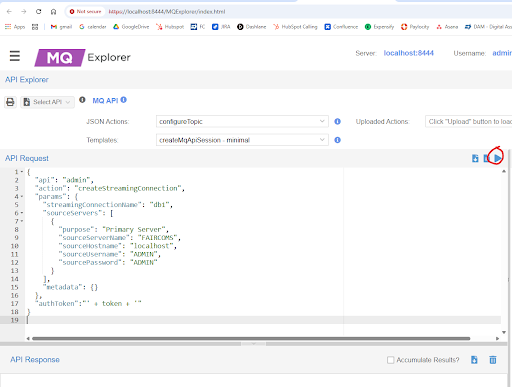
Within Faircom MQ, start the FairCom browser-based tool MQ Explorer. Pull down the hamburger menu (the 3 horizontal bars in the top left) and select
"API Explorer". In the API Request editor place the following JSON:{ "api": "admin", "action": "createStreamingConnection", "params": { "streamingConnectionName": "db1", "sourceServers": [ { "purpose": "Primary Server", "sourceServerName": "FAIRCOMS", "sourceHostname": "localhost", "sourceUsername": "ADMIN", "sourcePassword": "ADMIN" } ], "metadata": {} }, "authToken":"' + token + '" }Click Apply defaults to JSON request (
) to replace the
"authToken"value with the valid one from your session.Click Send request (

) to issue the JSON-based request.

Observe the response and ensure the action is completed successfully.
Start Data Change Streaming connection for custmast file.
Following the same sequence of previous step, run this command to start Data Change Streaming for custmast using db1 DCS connection.
{
   "api":"admin",
   "action":"createAndStartDataChangeStreams",
   "params":{
      "streamingConnectionName":"db1",
      "streams":[
         {
            "description":"ctreesql_admin_custmast",
            "topic":"topic1",
            "sourceTableName":"custmast",
            "sourceOwnerName":"admin",
            "sourceDatabaseName":"ctreeSQL",
            "sourceDataFilePath":"",
            "recordFilter":"atoi(cm_custnumb) >= 1000",
            "triggers":["insert","update","delete"],
            "tagChanges":"forEachField",
            "includePrimaryKey":"never"
         }
      ]
   },
  "authToken":"' + token + '"
}
Observe the response and also look at the FairCom MQ
CTSTATUS.FCSfile to make sure it was executed with success.
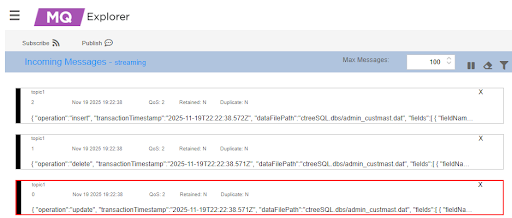
In MQ Explorer, Subscribe to topic1.
Leave the "MQTT Management" window open to view "Incoming Messages - streaming".

On the FairCom DB instance, change data in the custmast file using the custmast2.sql script. From <faircom>/tools, execute the following command:
isql -s custmast2.sql -u ADMIN -a ADMIN ctreeSQL
This runs a script that performs an update, a delete, and an insert command for the custmast file that triggers notification messages.
In MQ Explorer, view the messages in MQ Explorer - MQTT Management. (Run custmast2.sql multiple times to see more incoming notifications.)

Error 1141 creating a DCS
  "errorCode": 1141,
  "errorMessage": "Could not retrieve information for plugin datachangestream"
Possible problems:
Data Change Streaming is not enabled in
services.json.Error loading the Data Change Streaming library. Look at the FairCom MQ
CTSTATUS.FCSfile.You are executing DCS instructions in FairCom DB/RTG, not FMQ. This is very common at the beginning as we are used to executing commands within FDB/RTG.
Error 12 or 3 starting DCS
Logread: ERR: _raCreateDumpScript - Couldn't open source file for resync - 12 (2) - C:/builds/251117.25.EDGE.v13.1.0.EDGE.Candidate.013/FairCom-Edge.windows.64bit.v5.1.0.25.251117.EDGE/FairCom-Edge.windows.64bit.v5.1.0.25/data/ctreeSQL: 12


 "errorCode": 3,
  "errorMessage": "Could not move file ../data/20251128_102350_resync/restore\\C\\builds/251119.26.ACE.v13.1.0.DB.Candidate.014/FairCom-DB.windows.64bit.v13.1.0.26.251119.ACE/FairCom-DB.windows.64bit.v13.1.0.26/data/ctreeSQL.dbs/admin_custmast.dat to file ../data/\\faircom.dbs/stream_def_4.dat"
With a big path, we can get this error. Use a small path for FDB and FMQ. You can also get error 12 if custmast was not created within FDB/RTG (custmast1.sql)