|
|
|
When you drag from the source to the target server and release the mouse, the Replication Plan window will open. You will use that window to set up replication.
For an explanation about publications and subscriptions, see Publish and Subscribe in the Glossary.
The topics in this section explain the tabs provided by the Replication Plan window: Basic Options, Extension Library, Advanced Options, and Replication Latencies.
Initiating Replication
After you have published the material to be replicated from the source server and subscribed to it on the target server, you will be ready to initiate replication. See Deploying & Managing Existing Replication Plans.
|
|
|
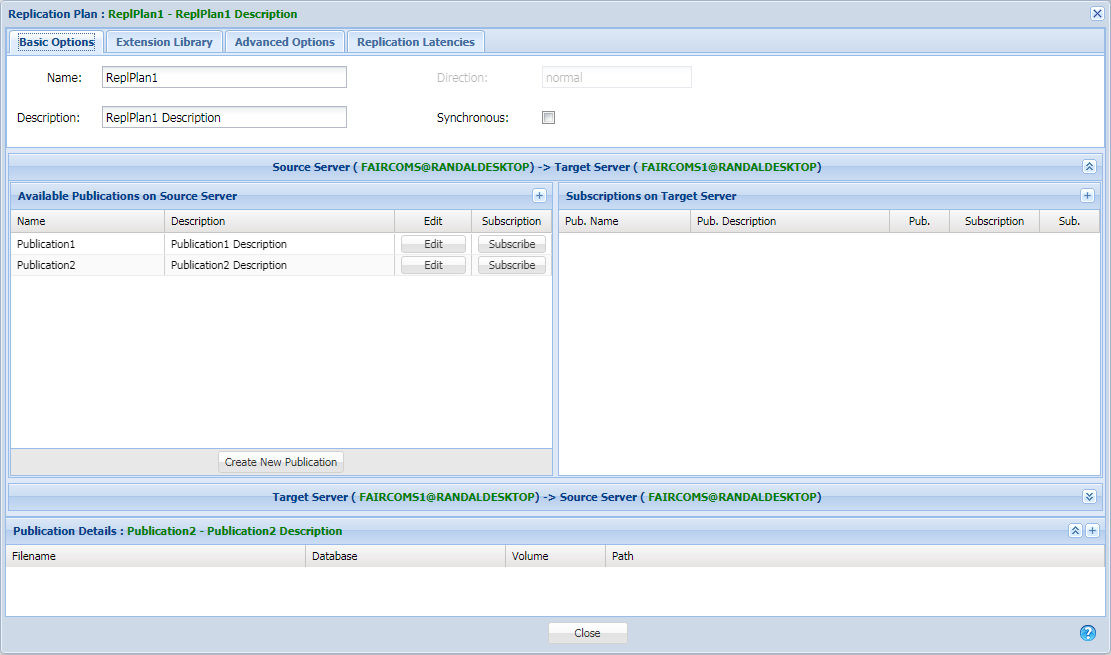
The Basic Options tab of the Replication Plan window is where you define the source and target for your replication.
Notice the button labeled Create New Publication in the bottom of the list of publications on the left. Click this button to define the files, folders, or database folders to be replicated. See Creating a New Publication.
|
|
|
The Extension Library tab of the Replication Plan window allows you to add functionality to your replication plan.
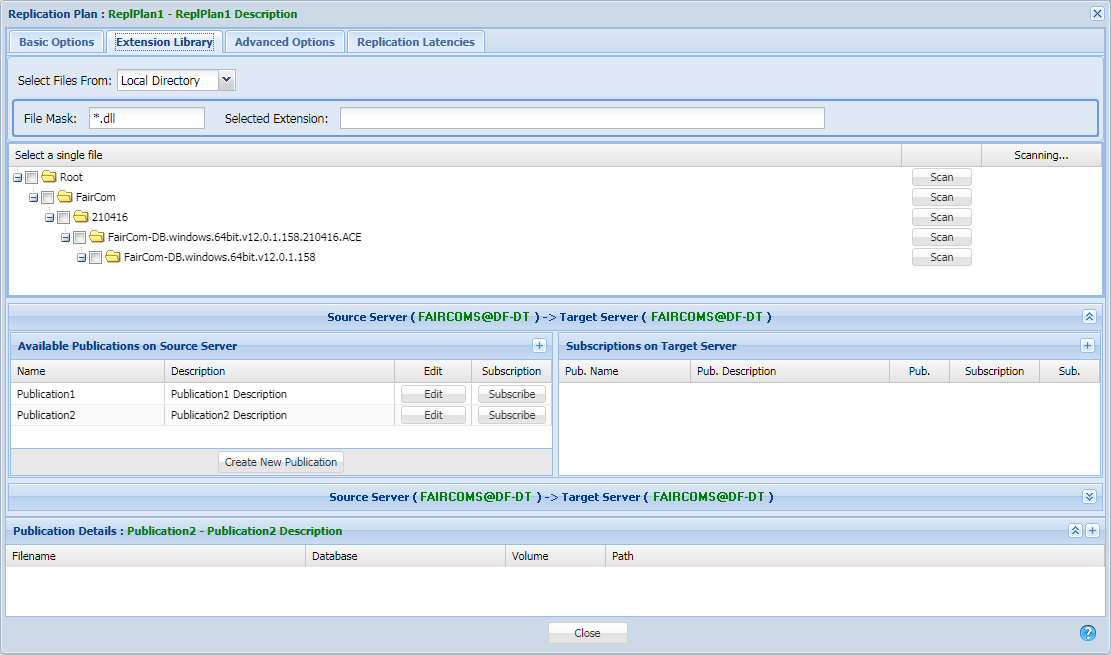
Select Files From - This drop-down allows you to select the source of the files shown below:
File Mask - You can enter a filter using wild cards. Default is *.dll, which searches for all DLLs.
Selected Extension - Displays the name of the extension library (DLL) that is selected from the file tree shown below.
Select a Single File - Presents a tree view of the file system. You can navigate through the files to find the desired library.
To select an extension:
|
|
|
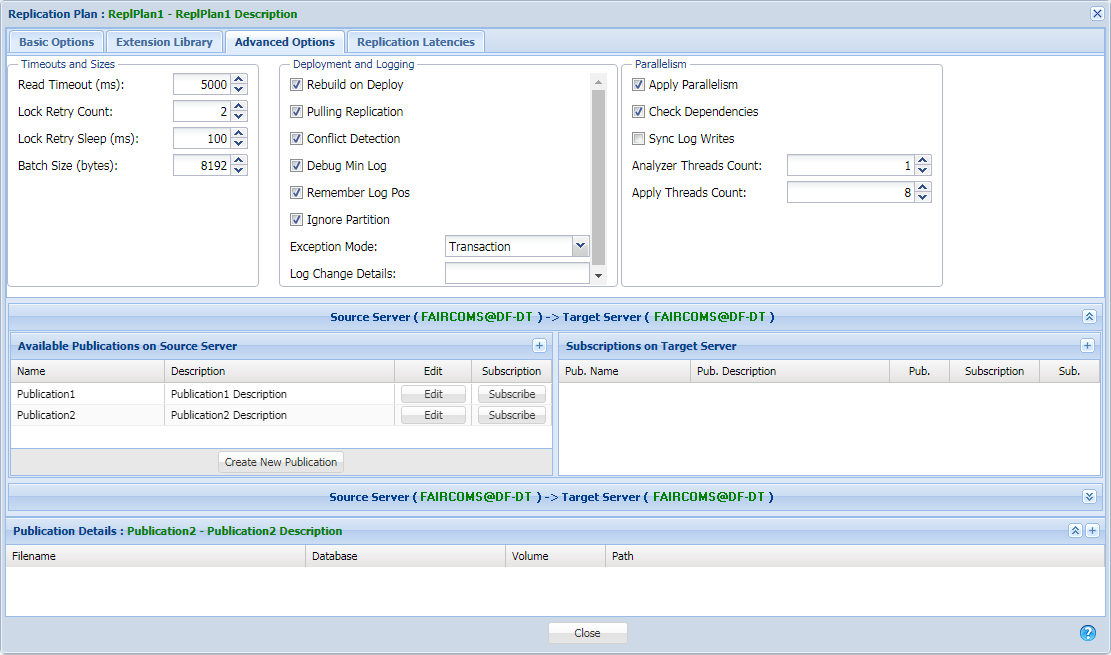
The Advanced Options tab of the Replication Plan window allows you to fine-tune your replication plan. If you have configured the Replication Agent by manually entering keywords in the replication configuration file, you may recognize these options, because they map to the settings in the replication configuration file.
The plus buttons (+) in the upper-right of the publications and subscriptions lists display additional information in the lists: the ID assigned to each item in the list.
Timeouts and Sizes
Read Timeout (default: 5000) – Set the polling timeout value to use when reading from the source server.
Lock Retry Count (default: 2) – Specify how many times to attempt to lock a record. These options are used when the Replication Agent attempts to update a record on the target c-tree Server.
Lock Retry Sleep (default: 100) – Specify how much time (in milliseconds) to sleep between record lock attempts. This option is used when the Replication Agent attempts to update a record on the target c-tree Server.
Batch Size (default: 8192) – The size of the batch to read from the source server.
Deployment and Logging
Rebuild on Deploy (default: checked) – During the deployment, if it is set, only data files are copied and indexes are rebuilt. Otherwise deployment will also add indexes in the stream dynamic dump and no rebuild will be executed.
Pulling Replication (default: checked) – When checked, the replication engine resides on the destination servers, so data is pulled from the source servers to the target servers (default). When unchecked, the replication engine resides on the source servers, so data is pushed from the source servers to the target servers (e.g., as used when security prevents outside processes from making requests, such as with the FairCom Edge).
Conflict Detection (default: checked) – Replication conflicts are detected.
Debug Min Log (default: checked) – Enables logging messages to ctreplagent.log when the minimum log number is changed.
Remember Log Pos (default: checked) – Requests the source server to persist required logs in lieu of using the server-side KEEP_LOGS option.
Ignore Partition - When this box checked, partitioned files on the source will be converted to non-partitioned files on the target.
Exception Mode (default: Transaction) – Determines how errors that occur when applying operations to the target server are handled:
Log Change Details – Log change details to the specified file.
Parallelism
Apply Parallelism - Check this box to enable parallel replication, which uses multiple threads running in parallel while ensuring transaction order. This can be much faster than serial replication. See Plans - How to Replicate in the clustering concept book.
Check Dependencies - Dependent changes are serialized by parallel replication. In the unusual case where many transactions have dependencies, parallel replication becomes slower than serial replication because of the overhead of dependency checking combined with the net result of serialized transactions. If you know your transactions have no dependencies, uncheck this box to improve performance.
Sync Log Writes - Check this box to enable synchronous log writes.
Analyzer Threads Count - Sets the number of threads dedicated to analyzing replication dependencies.
Apply Threads Count - Sets the number of threads used for replicating files.
|
|
|
The Replication Latencies tab of the Replication Plan window allows you to set limits for the number of seconds of latency allowed. You will receive warning or error alerts when latency exceeds these limits.
The goal of replication is to keep the replicated data as "fresh" as possible: when a change is made on the source server, it must be immediately replicated to the target server. The latency is a measure of the time required to update the replicated data.
The latency value is shown in the Plan Activity window. The Replication Latencies tab of the Replication Plan window, shown below, allows you to set the limits for alerts.
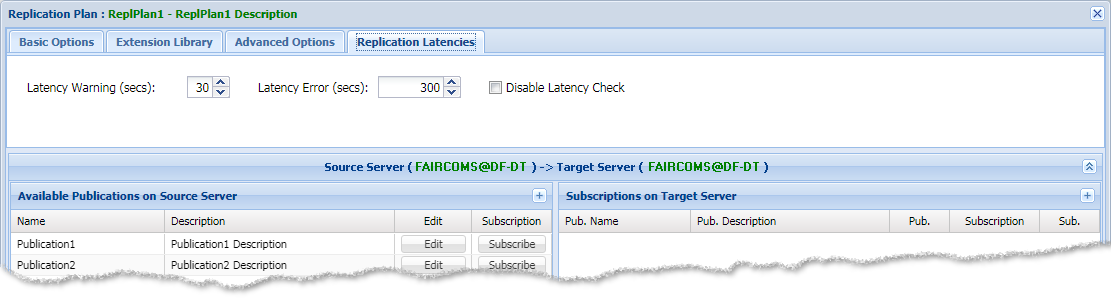
Latency Warning – A warning alert will be issued if the latency exceeds the number of seconds set here.
Latency Error – An error alert will be issued if the latency exceeds the number of seconds set here.
Disable Latency Check – Check this box if you do not want latencies to be monitored. For example, if your system is tolerant to large latencies, you can disable this check.

