|
|
|
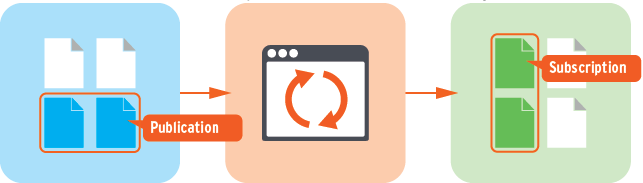
The Replication Manager uses a publish and subscribe metaphor: The source server will "publish" the tables or files to be replicated. The target server will "subscribe" to that publication. This determines which files will be replicated from the source to the target server.
To create a publication, click the button labeled Create New Publication in the Replication Plan window.
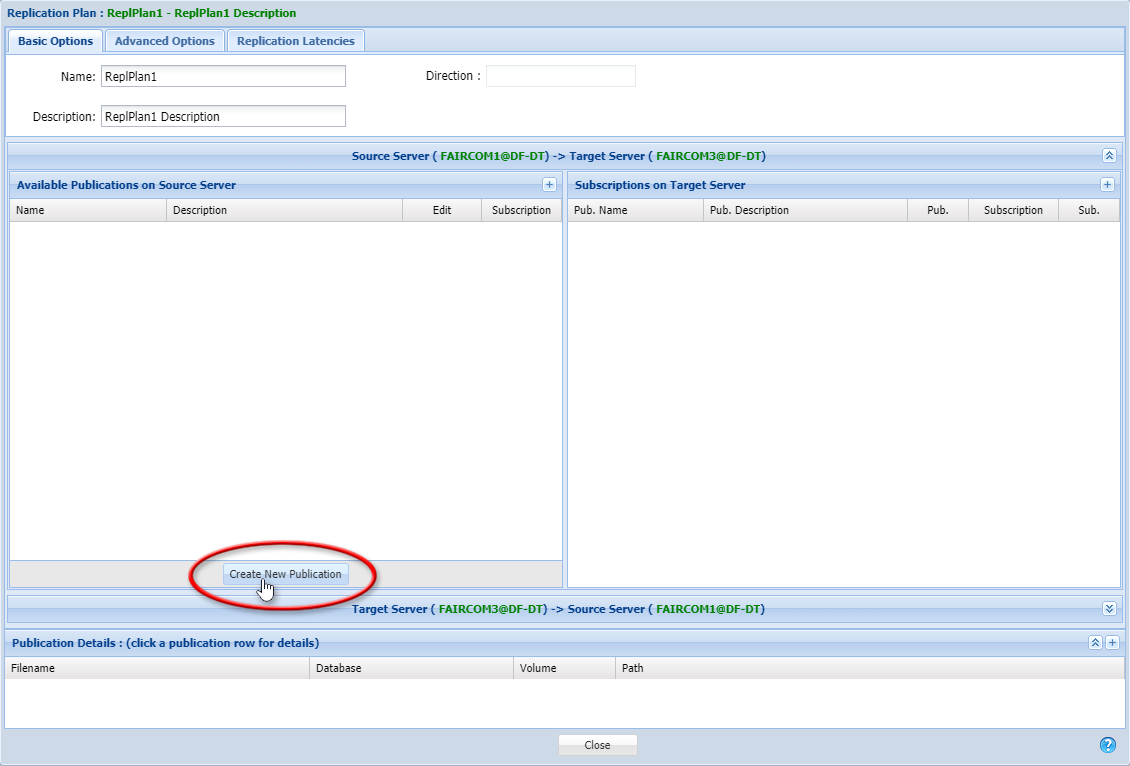
You will see a window labeled Publications for FairCom Server: ..." (it will include the name of the source server, which is "FAIRCOM1" in this example). This will begin a wizard to help you create a new publication.
The first step of the wizard asks you to select a mode (Publication Type) for the publication:
You will use this wizard to select the database folders or files to be published so they will be available for replication. The target server will need to subscribe to this publication to receive the replicated files (that step will be done in the Replication Plan window).
Note: c-tree supports several types of files, some of which cannot be replicated (for example, non-transaction controlled files cannot be replicated). Only files that can be replicated will be included in the publication. If you check the publish checkbox on a file that it is not suitable for replication, an error message indicates that this file cannot be published because it does not qualify for c-tree replication.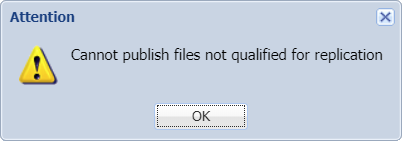
|
|
|
To delete a publication and remove it from the replication plan:
|
|
|
Step 1 - Basic Info
Publication Name and Description
Provide a name and, optionally, a description for this publication. A single replication plan can include multiple publications, so it is useful to provide a descriptive name for each one.
Publication Type
Mode:
For this tutorial, select By Database Folders. If you want to publish by folders or files, see the tutorials listed above.
Note: If you change modes (By Database Folder, By Folder, and By Files) after you have made selections, those selections will be lost when you change modes. When you click one of the Mode buttons you will be asked to confirm that you want to lose your selections and start over in the other mode.
Click Next (in the lower-left corner of the window) to continue with the wizard.
Step 2 - Select Database
If you selected by By Database Folders in step 1, you will be asked to select a database in step 2. (If you selected By Folder or By Files in step 1, you will skip this step.)
The drop-down list labeled Database will allow you to select from the list of databases on the server.
When publishing by database, the remaining steps are optional. Click Next to continue or click Finish if you do not want to add files, folders, or filters.
Step 3 - Additional Folders
This step is optional if you selected by By Database Folders in step 1.
This step shows the file system on the server in a tree view. You can click the + and - symbols to expand and collapse the tree.
Click a folder if you want to add it to the publication. It will appear in the list labeled Additional Folders and the box labeled Added will be checked. (You can uncheck the box to remove the folder from the publication.)
Click Finish if you are done or click Next to continue.
Step 5 - Excluding from Replication
This step allows you to exclude files from the publication. Notice that excluding a file from the publication excludes it from replication, so you are selecting the file you do not want to replicate..
The tree labeled Select Files allows you to navigate through the files on the server. Use the + and - buttons to expand and collapse the tree. Notice that the Scan Options allow you to see c-tree/FairCom DB files only. The File Mask field allows you to filter the displayed files using wile cards.
Click a file to select it to be excluded from the publication. The selected files will be shown in the list labeled Excluded files. (You can use the check box in the right column of this list to remove a file from the list.)
Step 5 - Defining Lists
This step allows you to use wild cards and regular expressions to create lists of files to exclude from the publication.
Begin by selecting a folder from the drop-down list:
The exclusion lists will apply to the files in the selected folder. Notice you can select one folder for each row in the wildcards and regular expressions (RegEx).
Enter your criteria in the fields labeled Wildcard or RegEx. For example, you could enter a wildcard of *.txt to match any text files found in that folder and exclude them from the publication.
Click Add to add the criteria to the list. (To remove a row from a list, click the trash can icon in the right column.)
You can repeat this process to add another folder and another Wildcard or RegEx to the list. This gives you a simple way to create complex lists.
Step 6 - Summary
The final step displays a summary of the publication.
Click Previous if you need to go back and fix anything. Click Finish when you are done.
You will return to the Replication Plan window.
See Also:
|
|
|
In this tutorial you will publish the data files in a specified folder. If data files are added to the folder later, they are included in the replication. You can set up filters to exclude selected files from the replication.
Step 1 - Basic Info
This step is the same for all publication types: you will give the publication and name and description and select the mode.
Publication Name and Description
Provide a name and, optionally, a description for this publication. A single replication plan can include multiple publications, so it is useful to provide a descriptive name for each one.
Publication Type
Mode:
For this tutorial, select By Folders. If you want to publish by database, folders or files, see the tutorials listed above.
Note: If you change modes (By Database Folder, By Folder, and By Files) after you have made selections, those selections will be lost when you change modes. When you click one of the Mode buttons you will be asked to confirm that you want to lose your selections and start over in the other mode.
Click Next (in the lower-left corner of the window) to continue with the wizard.
Step 2 - Selecting a Folder
The top of the window summarizes the Basic Info entered in the first step of this wizard.
The controls below that allow you to modify the tree depicting the folders:
Local Directory - The tree of files is open to the data directory of the c-tree server.
C: Drive - The tree of files is open to the server's C: drive.
As you select folders, you will see them listed in the lower part of the window, labeled Published Folders.
Tip: If you need more room to see the folders, click the chevron (circled in red below) to expand the area where they are displayed.
You can click the button labeled Refresh Folders if you want to clear your selections.
After selecting folders, click a button to continue:
Step 3 - Excluding Specific Files (optional)
This step is optional.
It is not necessary to replicate every file in a selected folder. This optional step allows you to exclude selected files from the publication. Notice that excluding a file from the publication excludes it from replication, so you are selecting the files you do not want to replicate.
The tree labeled Select Files allows you to navigate through the files on the server. Use the + and - buttons to expand and collapse the tree. Notice that the Scan Options allow you to see c-tree (FairCom DB) files only. The File Mask field allows you to filter the displayed files using wile cards.
Tip: If you need more room to see the folders, click the small chevron to expand the area where they are displayed.
Click a file to select it to be excluded from the publication. The selected files will be shown in the list labeled Excluded files. (You can use the check box in the right column of this list to remove a file from the list.)
Click Next if you want to continue or Finish if you are done.
Step 4 - Excluding Wildcards and RegEx
This optional step allows you to use wild cards and regular expressions to create lists of files to exclude from the publication.
Begin by selecting a folder from the drop-down list labeled Folder.
The exclusion lists will apply to the files in the selected folder. Notice you can select one folder for each row in the wildcards and regular expressions (RegEx).
Enter your criteria in the fields labeled Wildcard or RegEx. For example, you could enter a wildcard of *.txt to match any text files found in that folder and exclude them from the publication.
Click Add to add the criteria to the list. (To remove a row from a list, click the trash can icon in the right column.)
You can repeat this process to add another folder and another Wildcard or RegEx to the list. This gives you a simple way to create complex lists.
Step 5 - Summary
The final step displays a summary of the publication.
Click Previous if you need to go back and fix anything. Click Finish when you are done.
You will return to the Replication Plan window.
See Also:
|
|
|
If your c-tree data files do not use a data dictionary, they will not appear when the mode is set to By Database. In this case, the Replication Manager allows you to select By Files.
Step 1 - Basic Info
Publication Name and Description
Provide a name and, optionally, a description for this publication. A single replication plan can include multiple publications, so it is useful to provide a descriptive name for each one.
Publication Type
Mode:
For this tutorial, select By Files. If you want to publish by folders or files, see the tutorials listed above.
Note: If you change modes (By Database Folder, By Folder, and By Files) after you have made selections, those selections will be lost when you change modes. When you click one of the Mode buttons you will be asked to confirm that you want to lose your selections and start over in the other mode.
Click Next (in the lower-left corner of the window) to continue with the wizard.
Step 2 - Selecting Files
This wizard has only one more step: selecting the files.
The check box next to each file is used to select that file for replication. The check box next to each folder allows you to quickly select all files in that folder.
The selected file will be listed at the bottom of the window under Published Files.
Available Options
Select Files From – The options are Local Directory and the drives found on the selected server.
The Scan Options group provides these controls:
c-tree Files Only – When checked, this restricts the displayed files to files controlled by c-tree (FairCom DB).
File Mask – Allows you to filter the displayed files. The default, *.*, shows all c-tree files.
The tree labeled Select Files allows you to choose the files to be published for replication.
If you try to select a file that is not controlled by c-tree (FairCom DB), you will see a pop-up indicating that it is "not c-tree."
Use the + and - buttons to expand and collapse the tree.
Tip: If you need more room to see the files and folders, click the chevron (circled in red below) to expand the area where they are displayed.
You can click the button labeled Refresh Folders if you want to clear your selections.
After selecting files, click a button to continue:
See Also:

