|
|
|
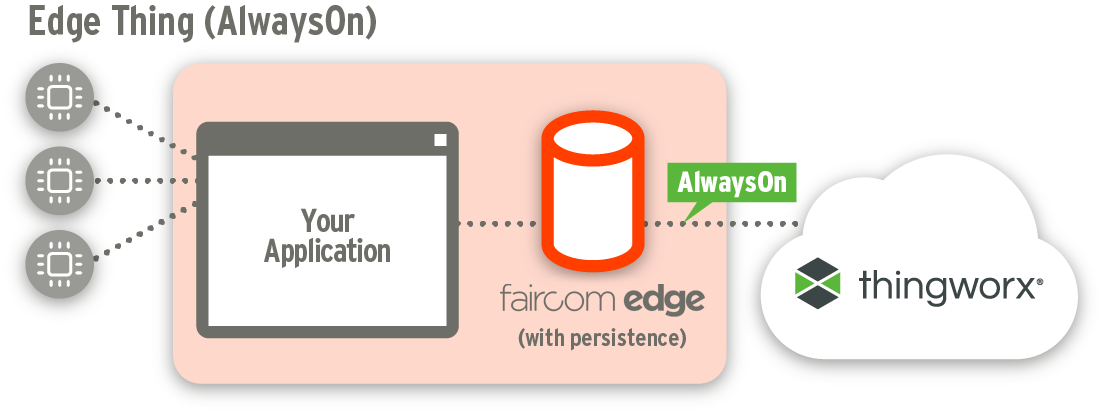
This tutorial demonstrates the basics of installing and using the FairCom Edge ThingWorx AlwaysOn Connector.
This tutorial assumes an existing ThingWorx platform is available. It will connect to ThingWorx using the ThingWorx AlwaysOn protocol (https://developer.thingworx.com/sdks).
FairCom Edge requires the creation and configuration of a FairCom Edge "thing" in ThingWorx. Refer to the ThingWorx website for more information about using ThingWorx.
You will need to install and start the FairCom Edge server, as described in Download and Installation in the FairCom Edge Developer's Guide.
The following PLUGIN keyword has been added to the FairCom Edge ctsrvr.cfg file, which is located in the /config folder:
PLUGIN ctthingworx;./thingworx/libctthingworx.so
The following directory has been added to the FairCom Edge Configuration File under the /server folder:
libctthingworx.so - plug-in dynamic library (Linux only)
ctThingWorx.dll - plug-in dynamic library (Windows only)
fccert.pem - self-signed certificate for SSL
ctreeEDGE_entities.xml - required platform entities for the plug-in
FairCom Edge also adds a new configuration file to the /config folder: ctthingworx.json. This file is used to configure the ThingWorx AlwaysOn plug-in.
|
|
|
This guide assumes an existing ThingWorx platform is available.
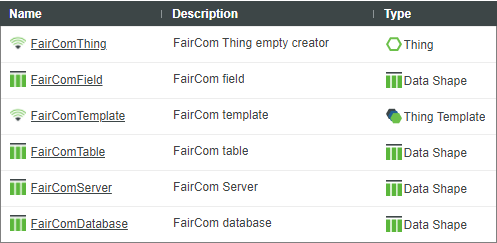
ThingWorx entity requirements - The FairCom Edge ThingWorx connector requires some entities that this step will make available in the ThingWorx platform:
These entities are available in the ctreeEDGE_entities.xml file provided in the FairCom Edge package (in the server/thingworx folder). Please import them into ThingWorx using the option From File and the type of Entity:
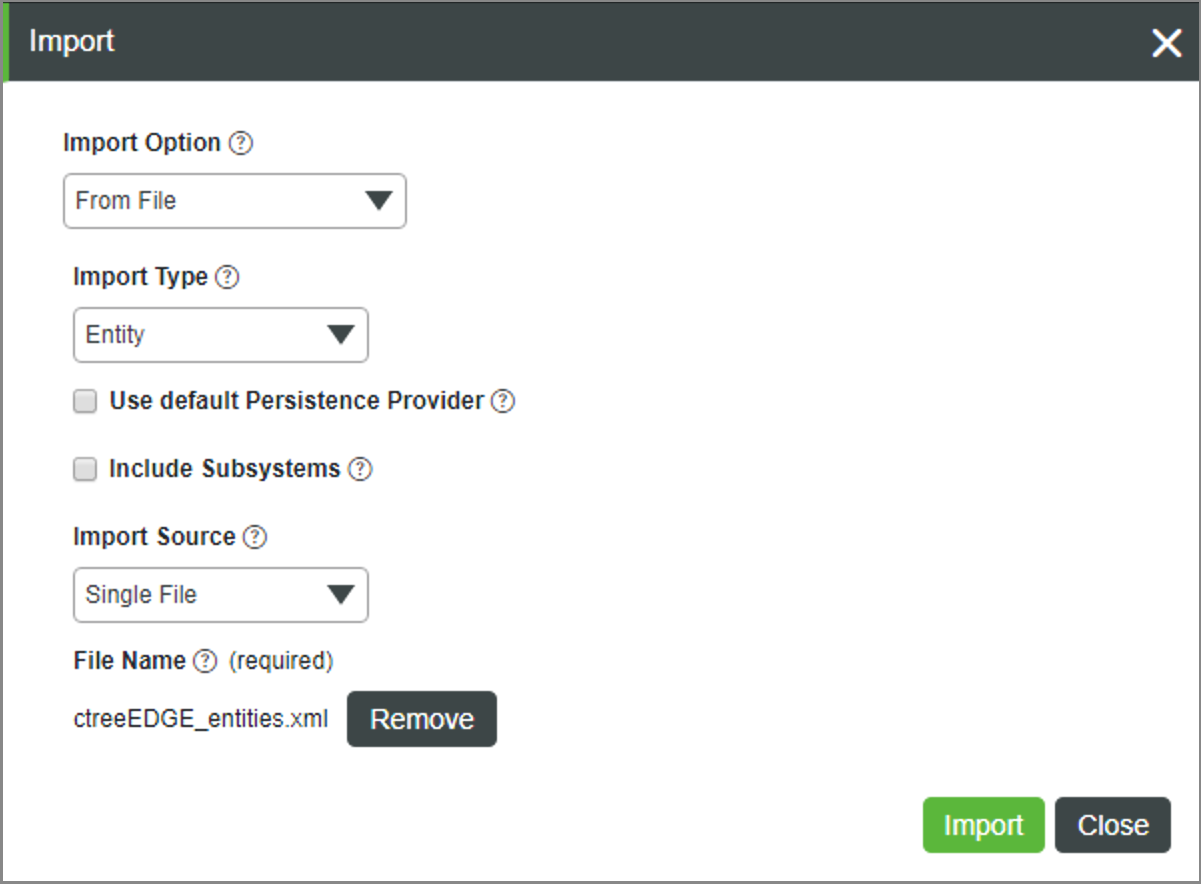
After importing, you should see the following entities in your ThingWorx platform:
Note: As the ctreeEDGE_entities.xml file can change from version to version of FairCom Edge, it is important to import the file that shipped with your copy of FairCom Edge, even if you have previously imported a different version of the file into ThingWorx.
|
|
|
You will need to install the FairCom Edge server, as described in Download and Installation in the FairCom Installation Guide. Do not start the FairCom Edge server until you have completed the changes to the config files described in the next sections.
|
|
|
The PLUGIN keyword has been added to the FairCom Edge ctsrvr.cfg file, which is located in the config folder:
PLUGIN ctthingworx;./thingworx/libctthingworx.so
|
|
|
config/ctthingworx.json is a JSON setting file that is used to configure how FairCom Edge communicates with ThingWorx.
Before making changes to this file, you need to determine whether your ThingWorx server is configured to accept secure (https) or non-secure (http) connections. Look at the URL you use to connect to ThingWorx with your web browser. If it starts with "https://" ("s" at the end), you are using a secure connection. If it starts with "http://" (no "s" at the end), you are using a non-secure connection.
Exporting a Certificate from Your Browser
If you are using a secure connection (https) then you need to first download the root certificate from the site certificate for the ThingWorx Platform you are connecting to. Here is how you do it with the Chrome browser:
Now rename the file you just saved to have a .pem extension instead of a .cer extension.
If you are NOT using secure mode, then you do not have to download the certificate. Continue with the next step, which is editing a JSON file.
Configuration File
config/ctthingworx.json is a JSON setting file that is used to configure how FairCom Edge communicates with ThingWorx. It has the following format:
{
"thingworxHost": "ThingWorx host",
"thingworxPort": 80,
"thingworxAppkey": "ThingWorx app key",
"thingworxSSLCertificate": "./thingworx/fccert.pem",
"thingworxCACertificate": "CA Certificate",
"thingworxCertType": 2,
"thingworxThings": [
{
"thingName": "FairComThing2",
"thingCreator": "FairComThing"
}
]
}
Where:
Example File
{
"thingworxHost": "THINGWORX9000",
"thingworxPort": 80,
"thingworxAppkey": "66412e88-8495-4dd7-b409-7d94507e836e",
"thingworxSSLCertificate": "./thingworx/fccert.pem",
"thingworxCACertificate": "./thingworx/CACert.pem",
"thingworxCertType": 2,
"thingworxThings": [
{
"thingName": "FairComThing2",
"thingCreator": "FairComThing"
}
]
}
|
|
|
After saving your changes to ctsrvr.cfg and the ctthingworx.json file (discussed above), please start / restart the FairCom Edge server to make your changes take effect.
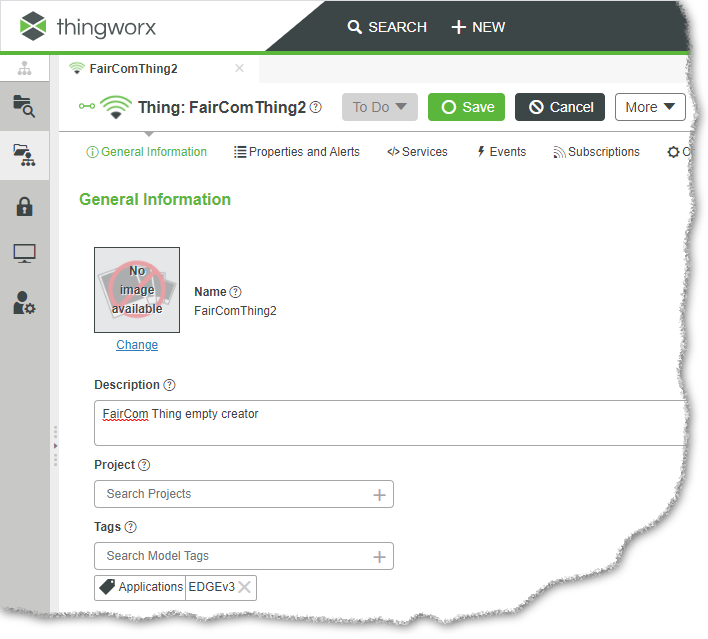
When FairCom Edge starts with the active connector set accordingly, it connects to the ThingWorx platform and creates one or more new "things" with the <thingName> set in the ctthingworx.json file based on the existing <thingCreator>. Each of these new things is based on the existing <thingCreator>.
If there is already a "thing" with this same name in ThingWorx, it tries to use it. If the template does not match, the connector initialization will fail. Check the FairCom Edge data\CTSTATUS.FCS file, and the various ThingWorx log files (in the C:\ThingworxStorage\logs folder) for error messages.
This is what the new thing looks like if you use the default name FairComThing2:
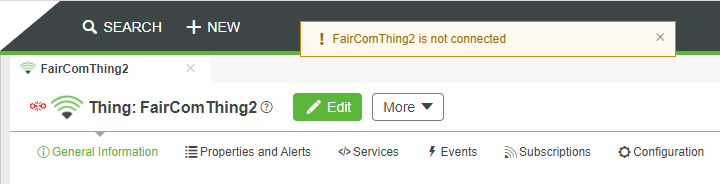
Note that when the FairCom Edge server is not running, the following icon (indicated by the mouse pointer) will show that the "thing" is disconnected.
![]()
When the disconnect happens (for example, when the FairCom Edge server is shut down), the following message may be presented briefly:
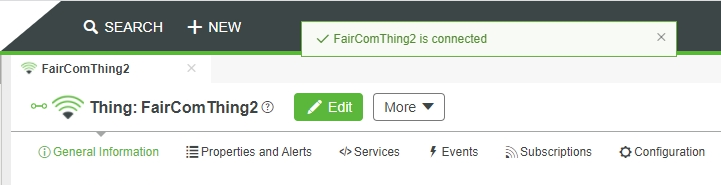
When the connection is first established, the following icon may briefly appear to indicate the "thing" is connected:
![]()
While connected, the following message will be presented:
Note that, in certain situations, neither of these icons will be presented. This indicates a problem, and the log files should be consulted.
|
|
|
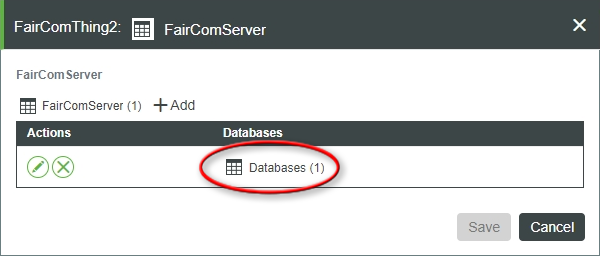
When the FairCom Edge server starts, just after connecting to the ThingWorx platform for the first time and creating the FairComThing2, the connector loops through all the databases, tables, and fields in the FairCom Edge server and populates them in a property in the "thing."
Note that this schema copy only happens when the FairComThing2 thing is actually created in ThingWorx (when the FairComThing2 initially comes into existence). In other words, if the FairComThing2 already exists in ThingWorx, this schema copy will not happen when the FairCom Edge server starts. In this situation, the user can manually cause the schema copy to happen by executing the UpdateFairComServer service if desired. This process is described on the following page. The property that contains the copy of the FairCom Edge schema is called FairComServer:
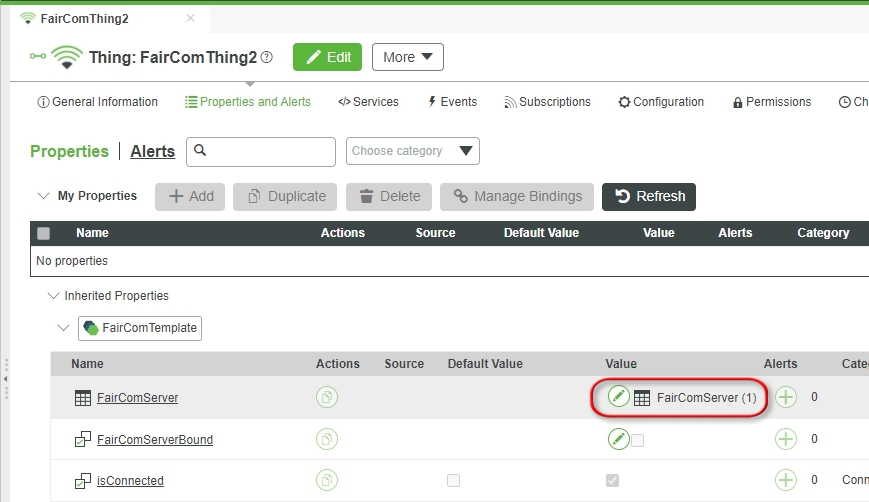
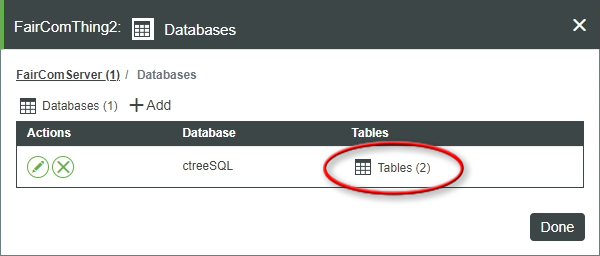
You can navigate and visualize all the databases, tables, and fields on this property:
If any schema change happens in FairCom Edge after the schema has been loaded into the ThingWorx platform, it will not be automatically reloaded when the FairCom Edge server launches. So, a service is provided in the “thing” to reload this information manually. Go to the Services > UpdateFairComServer > Execute button:
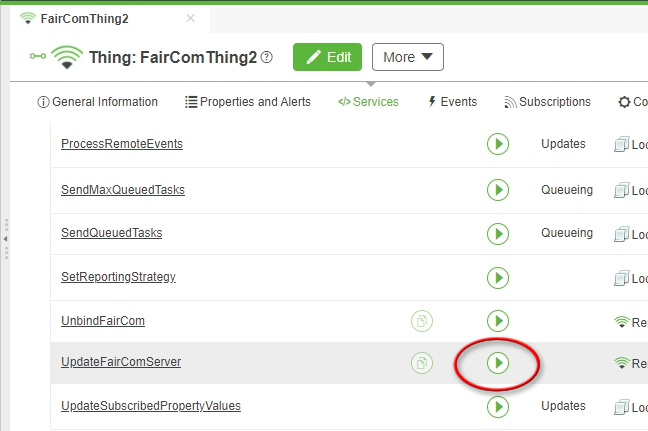
When the Execute Service window appears, press the green Execute button in the lower right-hand corner to perform the copy.
This service copies the schema (the list of tables in FairCom Edge and their fields and columns) from FairCom Edge to ThingWorx. It is important to realize that this service does not copy any of the data from the tables (the tables’ rows). To copy table data, the columns of the tables must first be mapped to ThingWorx properties.
|
|
|
FairCom Edge can map "time series" tables into ThingWorx. A time series table is one in which new data values are stored by inserting new records / rows into the table, rather than by editing existing rows in the table. For example, a device with several sensors might periodically sample those sensors and store their values in the table by inserting a new row for each sample, often with a timestamp. This allows the table to track the sensors' values over time. When we map a column of that table into ThingWorx, ThingWorx receives the data from the last row that was inserted into the time series table. Note that if you edit an existing row in the table, ThingWorx will not receive that update.
When we map a FairCom Edge table column into ThingWorx, we create a new property inside the single FairComThing2 "thing" in ThingWorx. This property is updated with the latest value from the FairCom Edge table column. If you map four FairCom Edge table columns into ThingWorx, you will have four properties inside your single ThingWorx Thing, each of which will display the latest value from its FairCom Edge table column. Note that if you want ThingWorx to remember more than just the latest value from its FairCom Edge column, enable the property's "Logged" attribute.
While navigating through the FairComServer property when getting into the field level, we can set how the field value from FairCom Edge persistence should be mapped to a property in the current “thing” at the platform. Execute the following steps:
![]()
From the Tables window, there are several different screens you need to use to configure the mapping and the ThingWorx update mode. The section below, A Guide to the Windows, shows how to access the windows you need.
|
|
|
The guide below shows the various windows that can be accessed from the window that lists the tables in the database on the FairCom Server:
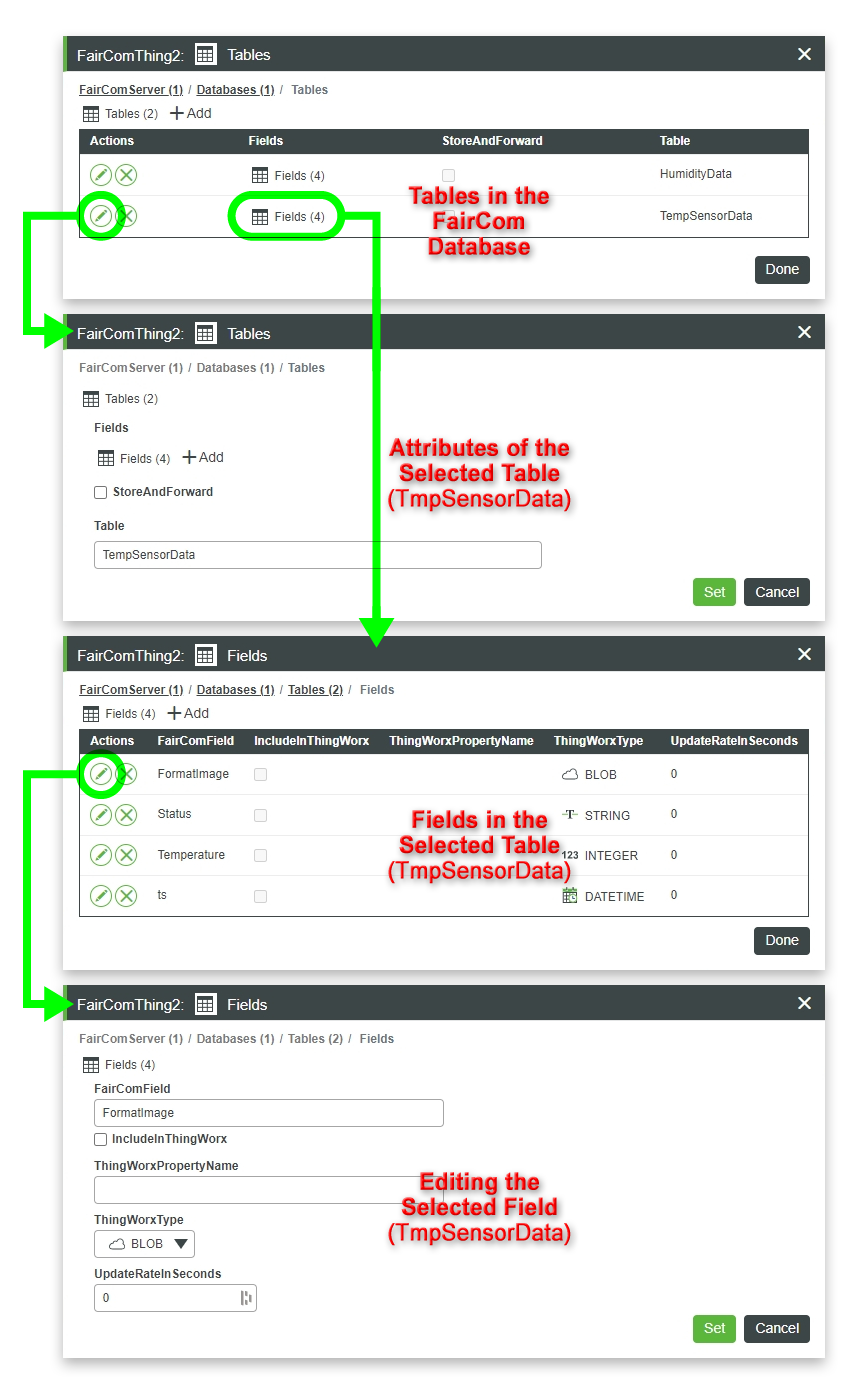
Using these windows, you will configure the mapping and the update mode discussed in Three ThingWorx Update Modes. Here is a reminder and how to set the above controls to achieve those modes for each column you wish to map into ThingWorx:
The following descriptions explain how to use the windows shown in the guide above.
|
|
|
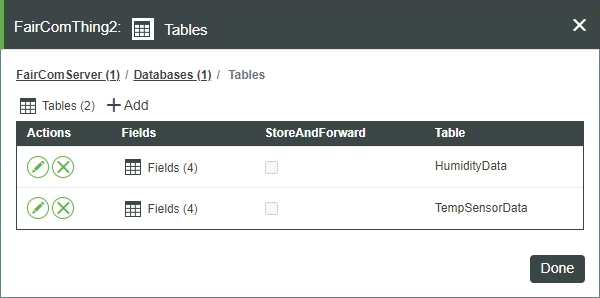
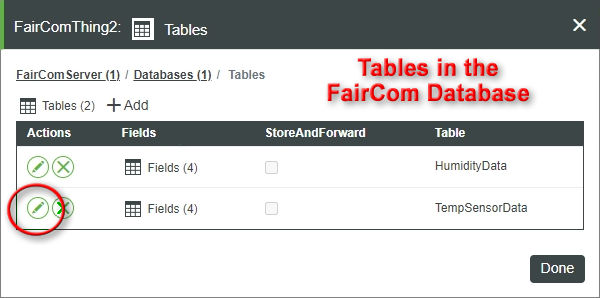
The window below (labeled "Tables in the FairCom Database") lists all the tables in the selected FairCom Edge database. These two columns are important:
To change the StoreAndForward checkbox, click the green pencil icon to edit the table of interest.
|
|
|
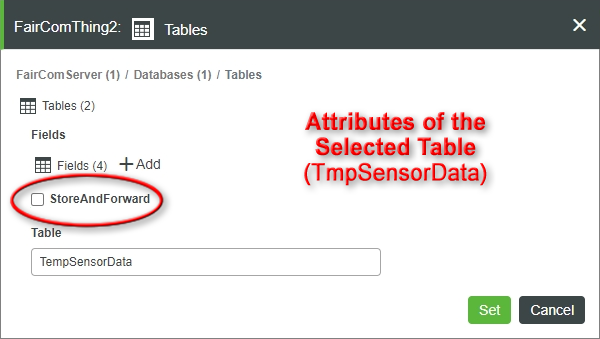
Clicking the green pencil in the window above opens a window to edit the table's attributes. It is used to change the table's StoreAndForward setting. The Table control reminds you of the name of the FairCom table — do not change this control. When done, click the green Set button.
|
|
|
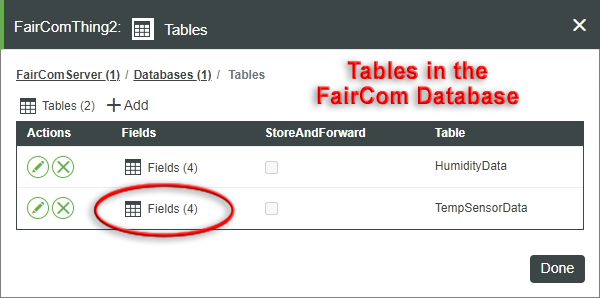
Once you are back at the window showing the list of tables ("Tables in the FairCom Database"), click the Fields control for the table of interest to see a list of that table's fields / columns.
|
|
|
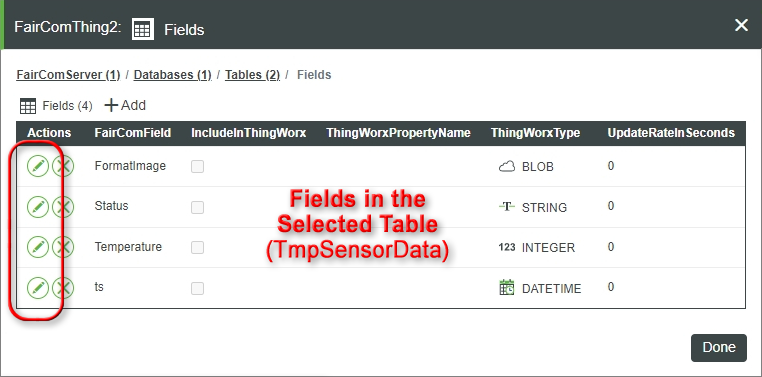
The window below (labeled "Fields in the Selected Table") lists the fields / columns in the table you selected in the previous window. To change the settings for a field, click its green pencil icon (in the Actions column):
|
|
|
The window shown below (labeled "Editing the Selected Field") is used to edit the properties listed under FairComField.
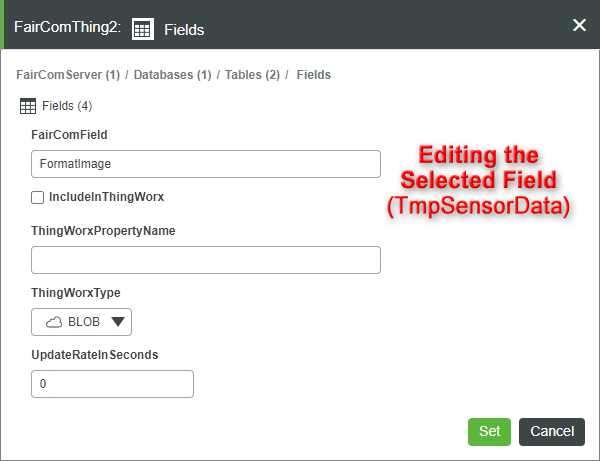
Click the green Set button when you are done editing these values.
Remember the FairComField control contains the name of the FairCom table's field / column — do not edit this control.
When you are done mapping FairCom Edge fields using these windows, close each of the windows by clicking their Set or Save buttons.
Next it is important to run the BindFairCom service to create the new properties in ThingWorx, as shown below.
|
|
|
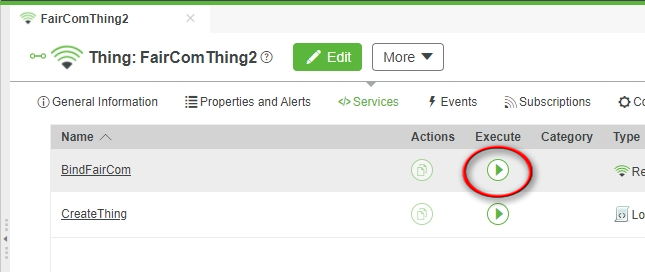
Now that you have configured the properties, it is necessary to run the BindFairCom service to create them in ThingWorx.
Run the BindFairCom service (by clicking Execute) to create the new properties in ThingWorx and start them syncing with FairCom Edge.
Note that the new properties will not appear in the "thing" until you complete the next two steps.
The Bind service is described in more detail later, in the Connecting section of this tutorial.
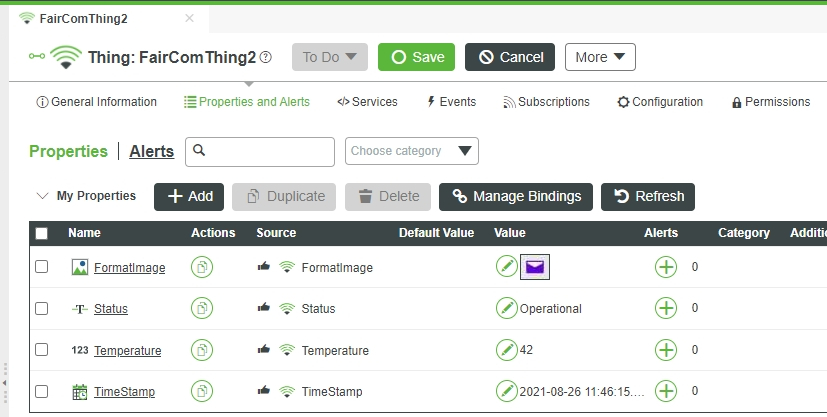
Close the FairComThing2 using the X button on the left, and then re-open it. Note that the Minimize button on the right is NOT adequate.
Switch to the Properties and Alerts tab and the new properties you mapped will be there.
With these steps you are able to set all the mapping between the desired field data persisted in FairCom Edge and its "thing" in the ThingWorx platform.
|
|
|
The table below shows the data type mapping between the c-tree fields in FairCom Edge and ThingWorx properties:
FairCom Type |
ThingWorx Type |
|---|---|
CT_BOOL |
TW_BOOLEAN |
CT_CHAR CT_CHARU CT_INT2 CT_INT2U CT_INT4 CT_INT4U CT_INT8 CT_INT8U |
TW_INTEGER |
CT_SFLOAT CT_DFLOAT CT_EFLOAT CT_SQLBCD CT_MONEY CT_CURRENCY |
TW_NUMBER |
CT_DATE CT_TIMES CT_TIMES_MS |
TW_DATETIME |
CT_FSTRING CT_FPSTRING CT_F4STRING CT_STRING CT_PSTRING CT_F2STRING CT_ARRAY CT_FUNICODE CT_F2UNICODE CT_UNICODE CT_2UNICODE CT_TIME_MS CT_TIME |
TW_STRING |
CT_JSON |
TW_JSON |
CT_ARRAY |
TW_BLOB |
CT_2STRING CT_4STRING |
TW_STRING or TW_BLOB depending on “binary flag” in FairCom Edge: CTDB_BINARY_VARCHAR causes it to be TW_STRING |
|
|
|
To enable the mapping between the data persisted in FairCom Edge and the “thing” in the ThingWorx platform, execute the service called BindFairCom. Go to the Services > BindFairCom > Execute button, circled in the image below:
This service loops through all the mappings set in the previous section and executes the following steps:
After these steps, no matter how the new data records are inserted in the persisted table, the last value is uploaded automatically to the mapped property in the platform, following the rules of the selected ThingWorx upload mode for that property.
Note 1: ThingWorx may be slow refreshing existing "things" and after executing these steps new properties may not display. Close the "thing" and reopen it to see your newly-created properties.
Note 2: ThingWorx platform error messages are redirected to the FairCom Edge CTSTATUS.FCS log.
|
|
|
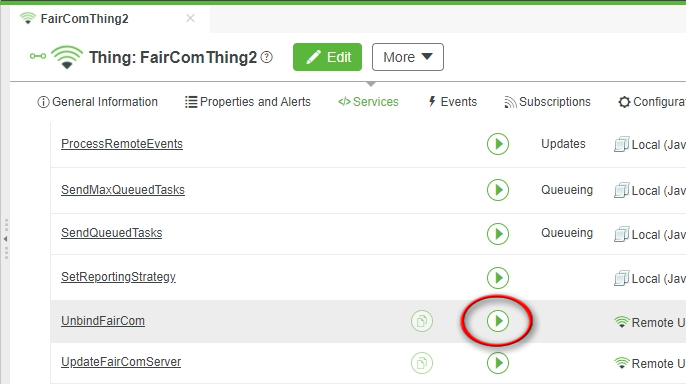
To disable mapping between data persisted in FairCom Edge and the “thing” in the platform, execute the service UnbindFairCom. Go to the Services > UnbindFairCom > Execute button (you may need to scroll down to the bottom to see the UnbindCTEdge service):
|
|
|
Connection problems and other issues can often be debugged by checking the FairCom log file, which is called CTSTATUS.FCS. Generally, this file can be found in your <faircom>/data folder. Here are some common error messages and their meanings.
ThingWorx plugin - Connected
ThingWorx plugin - Disconnected
These indicate that the FairCom ThingWorx plug-in has connected / disconnected from the ThingWorx application / platform. They are informational only.
TW_ERROR - ThingWorx Plugin - twApi_Connect: Max number of connect retries: 3, has been reached
TW_ERROR - ThingWorx Plugin - ctThingWorx - Error connecting to the ThingWorx platform - error: 1101
TW_ERROR - ThingWorx Plugin - ctThingWorx - Error connecting to the ThingWorx platform - error: 1114
Couldn't establish connection to the ThingWorx platform. Retrying in 5 seconds...: 1101
Couldn't establish connection to the ThingWorx platform. Retrying in 5 seconds...: 1114
These indicate the FairCom ThingWorx plugin is having trouble connecting to the ThingWorx application / platform. Either configuration information is incorrect, or a firewall might be blocking the connection, or there is some other problem.
TW_ERROR - ThingWorx Plugin - twStream_CreateFromFile: error opening file: /opt/thingworx/subscribed_properties.bin
TW_ERROR - ThingWorx Plugin - subscribedPropsMgr_Initialize: Error opening: /opt/thingworx/subscribed_properties.bin
TW_ERROR - ThingWorx Plugin - subscribedPropsMgr_UpdateSavedValues: spm->persistedValues not initialized
These errors come from the ThingWorx application / platform itself. Please refer to the ThingWorx documentation for information about these errors.
ctThingWorx - Not able to position table at the last record [TWDemoTable1]: 101
This indicates an internal problem with the FairCom ThingWorx plug-in. Please contact FairCom customer support.

