|
|
|
FairCom RTG/ISAM allows you to create a SQL index on your Btrieve tables. You can execute CREATE INDEX on imported tables or you can use the graphical tools, FairCom DB SQL Explorer and FairCom DB Explorer.
Performance of SQL Queries
A practical use of this feature is in handling Btrieve indexes that do not translate well to SQL. In some cases, the index is imported into SQL by sqlize with limited functionality, so it can be used only to perform searches using the "=" and the "<>" (not equal) operators. In a small number of cases, the index cannot be sqlized at all.
These cases may impact the performance of SQL queries on those fields. This issue is now easily addressed: simply create SQL indexes where needed to speed up queries. It is not necessary to replace every Btrieve index, simply replace those that are needed to speed up your SQL queries.
Note: A SQL index cannot be created on Btrieve "bit" data types (Boolean).
Date/time types (date, time, datetime / timestamp) can have additional indexes created if their type definitions are in collation order (YYYYMMDD for dates).
The presence of a SQL index will better optimize some queries. As a side effect, the index returns rows sorted in logical order as opposed to binary order as is the case for Btrieve indexes.

Creating an Index in FairCom DB SQL Explorer
Several options are available for creating an index, such as creating with a direct CREATE statement in ISQL or using FairCom DB SQL Explorer.
To create a new index for a table using FairCom DB SQL Explorer, click the table name to see the group labeled  Indexes, right-click on the group, and select Create from the context menu. The following window will appear for creating the new index definition including defining index columns (segments):
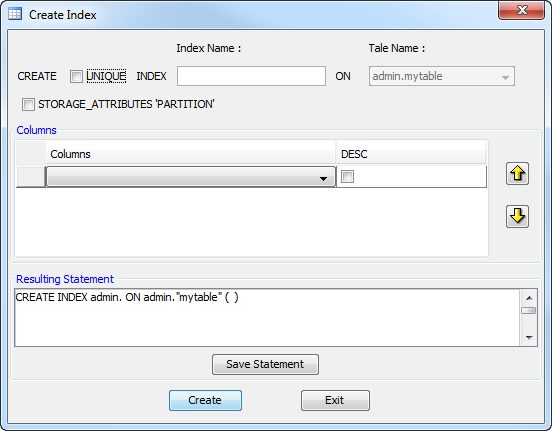
Create Definition Controls
Column Definitions
Use the controls in the Columns group to define the columns composing your new index. New lines can be added by filling the line marked with the asterisk:
 - Use this button to move a column up the index column list. Note, the column in the top of this list will appear first (to the left) within the index.
  - Use this button to move a column down the index column list.
To delete an index column: Select the row header that contains the column to be deleted and then press the Delete key on your keyboard.
Resulting Statement
The Resulting Statement window will show the CREATE statement to be executed for building the new index. Once your index is completely defined, press the Create button to create your index and remember to check Result in the left corner of the status bar at the bottom of the window for either Success or an error message. Once you see Success in the status window, click on exit to return to the main window.
You can save the CREATE statement shown in the Resulting Statement window by clicking Save Statement or using the File menu or pressing CTRL+S.
Finishing Up
Save Statement - Click this button if you want to save the SQL statement so you can execute it at a later time.
Create - Click this button to create the index.
Exit - Click this button to close this dialog.
Opening Your File
Once you update your index definition, the default configuration of your COBOL application probably won't open the file (FS 39), indicating there is a mismatch between the number of indexes indicated in the FD and the real file. COBOL runtimes generally allow this behavior when so configured depending on your COBOL environment.

