To compile PHP, and to compile and install the SQL PHP 5 extension on Windows, follow the steps in this section.
These instructions assume you are using Microsoft Visual C++ 11.0 (Visual Studio 2012) and PHP 5.5 or 5.6. If you are using an earlier version of PHP, some of these instructions will have to be modified. Please refer to this webpage for details: https://wiki.php.net/internals/windows/stepbystepbuild
Step 1: Build PHP 5 and the SQL PHP extension
Download the PHP 5.5 or 5.6 source code from https://www.php.net/downloads. For PHP version 5 files, you will have to click the “Old archives” link. Do not download the Windows ZIP version of the files, only the tar files contain the source code we need. The tar files are available in three different compression formats: bz2, gz, and xz. For example, if you chose the bz2 compression format, your file will have a name like like "php-5.6.40.tar.bz2". Be sure you choose version 5.5 or 5.6, making a note of which PHP option you chose.
Download the PHP 5 Binary Tools from https://windows.php.net/downloads/php-sdk/. The archive files have names like “php-sdk-binary-tools-YYYYMMDD.zip”. Note that you must use a decompression software such as 7zip or WinZIP to unzip the files.
Download the PHP 5 dependencies. Still at the website from step 2, click into the “archives” folder and download the archive that corresponds to the version of PHP you downloaded in step 1 (again, must be PHP 5.5 or 5.6). The archive files are named “deps-<php version>-<vc version>-<architecture>”. Be sure to select a bit depth that matches your version of the FairCom product you are using. If your FairCom product is 32-bits, choose the "x86" version. If your FairCom product is 64-bits, choose the "x64" version.
Create the following directory: c:\php-sdk
Extract the contents of the binary tools ZIP archive (from step 2) into this directory. You should end up with the following three directories:
C:\php-sdk\bin
C:\php-sdk\script
C:\php-sdk\share
Open a Developer Command Prompt / Native Tools Command Prompt window for Microsoft Visual Studio 2012. Typically, this is available from the Start menu, following a path similar to "Microsoft Visual Studio 2012 > Open VS2012 x64 Native Tools Command Prompt". Warning - the Developer Command Prompt Start menu entries which do not specify a bit depth actually open the 32-bit version of the Developer Command Prompt. For more details, see the Microsoft Developer Command Prompt (https://docs.microsoft.com/en-us/cpp/build/building-on-the-command-line) web page.
In the Developer Command Prompt window, move to the C:\php-sdk folder that you created in step 4 using the commands below.| C: cd \php-sdk
Execute the following batch file, which will create some folders: bin\phpsdk_buildtree.bat phpdev
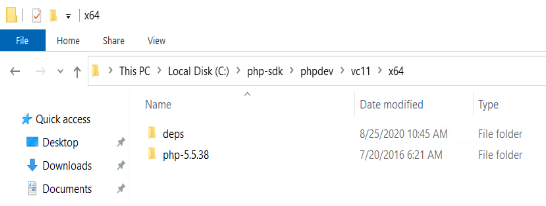
Using Windows Explorer, navigate to the “C:\php-sdk\phpdev” folder that just got created in step 8, and make a copy of the “vc9” folder, and rename that copy to “vc11”.
Open the PHP source code tar file you downloaded in step 1. This should show a single folder, (“php-5.6.40” in this example). Drag that PHP folder into the “C:\php-sdk\phpdev\vc11\x64” (or x86) folder (depending on your bit depth). This should result in that “vc11\x64” (or "vc11\x86") folder having two children - “deps” and a new folder with a name like “php-5.6.40”. This new PHP folder contains the source code of PHP 5.
Open the dependencies file you downloaded in step 3. This should show a single “deps” folder. Extract it into the “C:\php-sdk\phpdev\vc11\x64” (or x86) folder.
Back in the Developer Command Prompt window, Set up the build environment variables by running the following command: bin\phpsdk_setvars.bat
Change directory to the location of your PHP source code, using something like the following.: cd phpdev\vc11\x64\php-5.6.40 or cd phpdev\vc11\x86\php-5.6.40
Run the following based on the FairCom product you are using (where <basedir> is the full path of your FairCom product c-treeACE installation directory): c-treeACE buildconf --force --add-modules-dir=<basedir>\sdk\sql.php c-treeRTG buildconf --force --add-modules-dir=<basedir>\Driver\sql.php c-treeEDGE FairCom-DB FairCom-EDGE FairCom-RTG buildconf --force --add-modules-dir=<basedir>\drivers\php.sql You should get a message about adding the specified folder to the module search path.
Enable the c-treeACE PHP extension and turn off Thread Safety by running the following command: configure --disable-all --enable-cli --enable-cgi --enable-object-out-dir=.. --disable-ipv6 --disable-zts --with-ctsql=shared,<basedir> Where <basedir> is the full path of your FairCom product c-treeACE or c-treeRTG installation directory. In the printout that follows, there should be no warnings or error messages, and it should end by telling you to “Type 'nmake' to build PHP”. You know this step worked correctly if you see something like the following in the output, which indicates the our PHP SQL extension was found and enabled: Enabling extension __________\drivers\php.sql\src The last box of configuration information that is printed should have “Thread Safety” shown as “No”. That is the purpose of the “--disable-zts” flag (“Zend Thread Safety”). If “Thread Safety” is still shown as “Yes”, then add the “--disable-maintainer-zts” flag as well. Using IIS + FastCGI, and this combination requires thread safety to be turned off.
To build PHP, run the following, still in the Developer Command Prompt: nmake clean (in case you need to recompile) nmake It is likely that there will be many compiler warnings as PHP is built. There isn’t anything we can do about that. If everything goes well, it should end with a message about the build being complete.
Still in the Developer Command Prompt, make sure a new “Release” folder has appeared in the “working folder”: dir .. The folder should be called “Release”. If there is no “Release” folder, but there is a “Release_TS” folder, it means that Thread Safety was not turned off in step 17. The “Release” folder should contain the “php.exe” application you just built in step 19. Now copy one of the INI file templates from the current folder into that Release folder, using the following command: copy php.ini-development ..\Release\php.ini Make a note of this “Release” folder’s full path, because you will need it in subsequent steps of these instructions, and you will need it in step 4 of the “Configure Microsoft IIS” instructions.
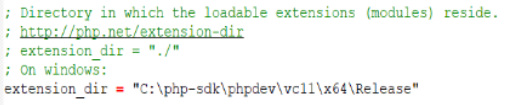
Use a text editor to open the php.ini file you just created and search for the “extension_dir” lines..
Un-comment one of them (by removing the leading semicolon) and then change the directory to be the Release folder that contains this INI file and “php.exe”...
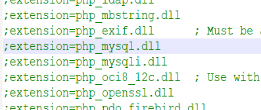
Find the section of the INI file that contains the commented-out list of extensions and find the line for “php_mysql.dll”
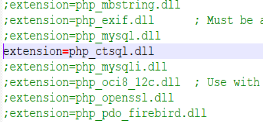
Copy that line, remove the leading semicolon, and change two letters to make it “php_ctsql.dll”: Note that the examples shown are from PHP 5.6.40 and PHP 5.5.38 on Windows 10. The “extension” lines in other versions of PHP might look different. That is why we suggest making a copy of the existing php_mysql line and then editing the copy to refer to php_ctsql.
Save your changes to the INI file.
Copy the “ctsqlapi.dll” file from the appropriate FairCom product folder to the “Release” folder that contains the INI file you just edited and “php.exe”. You can find “ctsqlapi.dll” in the following folder, where <basedir> is the full path of your FairCom product installation directory: c-treeACE <basedir>\bin\sql.direct\ c-treeRTG <basedir>\bin\sql.direct\ c-treeEDGE FairCom-DB FairCom-EDGE FairCom-RTG <basedir>\drivers\ctree.drivers\lib\
Back in the Developer Command Prompt, verify that PHP built correctly and the extension loads correctly by first changing into the Release folder and then running the PHP version command: cd ..\Release php -v It should print some version information. There should be no warnings or error messages. If there is an error about being unable to load dynamic library 'php_ctsql', it means that something probably went wrong with steps 20-26..
At this point, you can test the c-tree PHP SQL tutorials from the command line as follows: c-treeACE php -f <basedir>\sdk\sql.php\tutorials\PHP_Tutorial1.php c-treeRTG php -f <basedir>\Driver\sql.php\tutorials\PHP_Tutorial1.php c-treeEDGE FairCom-DB FairCom-EDGE FairCom-RTG php -f <basedir>\drivers\php.sql\tutorials\PHP_Tutorial1.php
It should print the HTML source code of a web page. If an “ctsql_connect() - SQL ERROR: [-20212] - Error in Network Daemon” error is shown, it means the c-tree server is not running. Start the c-tree server and re-do this step. Here is what the correct output of this command should look like:
<html>
<head>
<title>PHP Tutorial 1</title>
</head>
<body>
<h4>INIT</h4>
Logon to server...<br>
<h4>DEFINE</h4>
Create table...<br>
<h4>MANAGE</h4>
Delete records...<br>
Add records...<br>
Display records...<br>
<TABLE border=1>
<TR><TH>Number</TH><TH>Name</TH></TR>
<TR><TD>1000</TD><TD>Bryan Williams</TD></TR>
<TR><TD>1001</TD><TD>Michael Jordan</TD></TR>
<TR><TD>1002</TD><TD>Joshua Brown</TD></TR>
<TR><TD>1003</TD><TD>Keyon Dooling</TD></TR>
</TABLE>
<h4>DONE</h4>
Logout...<br>
</body>
</html>
If you wish, you can repeat this step for each of the four PHP SQL tutorials.
Additional details about how to build PHP can be found at this URL: https://wiki.php.net/internals/windows/stepbystepbuild
Note that the instructions above do not follow that web page exactly.