|
|
|
FairCom DB Replication Server in Windows Server 2019 Cluster High Availability Environment
This chapter describes steps for installing and configuring FairCom DB Server with synchronous replication in a Windows Server 2019 Cluster environment.
Initial Requirements:
The infrastructure required a third Windows 2019 Server, to be used as the Active Directory Server (AD Server). In this test, the AD Server machine is named win-fcbr12. The first node in the cluster is named win-fcbr10 and the second node is win-fcbr11. The AD Server configuration is not part of this document.
Once the two-node cluster is configured sharing the virtual IP, a high-availability test can be executed with the FairCom DB Server. The test consists of a C program that inserts data to the server in node 1 (win-fcbr10). Synchronous replication is enabled between the two FairCom DB Servers (nodes 1 and 2), and the client program connects to the servers using the Cluster IP. There is no need to have a shared storage for this test.
The first image shows the Windows Server Manager pointing to the installed Cluster Service. In this case, notice we are accessing the Server Manager from win-fcbr10 (our node 1), that is part of the domain fcbr.domain.com, and the cluster name is FCBR_CLUSTER01.
Note: This environment was created to provide a reliable form of high availability for FairCom DB and replication. However, the use of Windows Cluster is not done in an orthodox way because storage sharing is not used. This example uses only the ability to move virtual IP addresses from one node in the cluster to another.
|
|
|
Let’s start by creating a specific cluster configuration to define the nodes of this cluster. Click on the Tools option and select the Failover Cluster Manager. Or, click on Start on Windows and select Cluster Manager.

The next step is to include the Windows Server 2019 servers as the cluster nodes. Just inform the name of the future node as seen in the Windows Network, and the cluster installation will complete the process.

The next step is to define the name of the cluster. In this case, we chose FCBR-CLUSTER01. There should be no spaces and a maximum of 15 characters. Once this process is finished, one virtual IP will be created and associated to the cluster. When connecting with this IP or FCBR-CLUSTER01, we will, in fact, connect to the active node in the cluster.

Confirm the next options, and we will reach the confirmation screen, where we can check the information to create the cluster before hitting Finish and really create our Cluster.
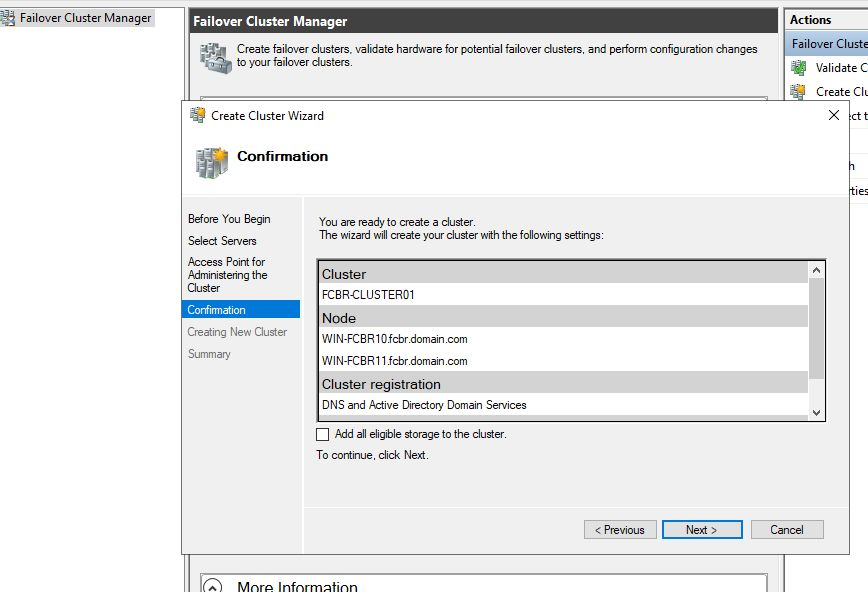
As can be seen in the previous picture, now we have one Cluster (FCBR-CLUSTER01) with two nodes (WIN-FCBR10.fcvbr.domain.com and WIN-FCBR11.fcbr.domain.com) and the IP. When connecting to the cluster, we should use the connection with the name, FCBR-CLUSTER01.
Once the Cluster is created, we can move on to define what kind of role (resource) we’ll need to use. In this example, we will use a Generic Script role. A Generic Script, according to Microsoft, consists of a series of Entry Point functions that must be implemented by the Cluster user in order to use this environment. The Cluster's Resource Monitor calls these entry point functions during the cluster operation. For the moment, let us assume that we have this script already created and named script.vbs, and that it is located in both nodes at: C:\FairCom\Scripts. We will return to the script itself in a later section of this document.
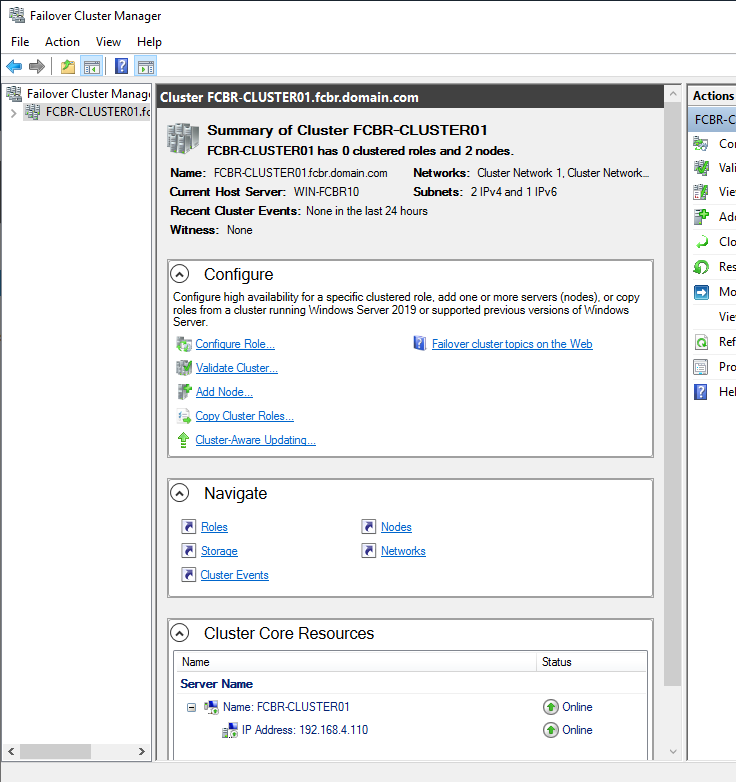
Before creating the role, check the summary of the Cluster to confirm all settings were done appropriately and there are no error or warning messages.
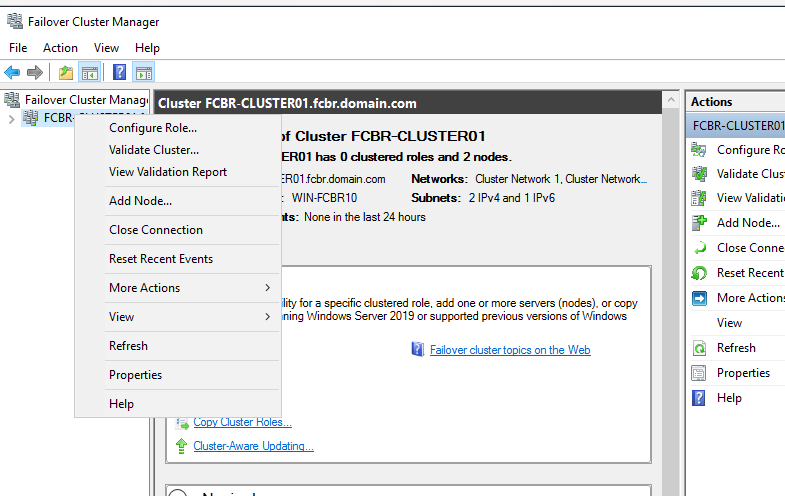
To create a role (the former Group resource), right-click on the created cluster to choose the <Configure Role> option.
Looking at the bottom of the screen in the Cluster Core Resources panel we can see the Cluster name. Clicking the plus sign (+), a internal information window will show the Cluster IP. We can ping that address as shown below:
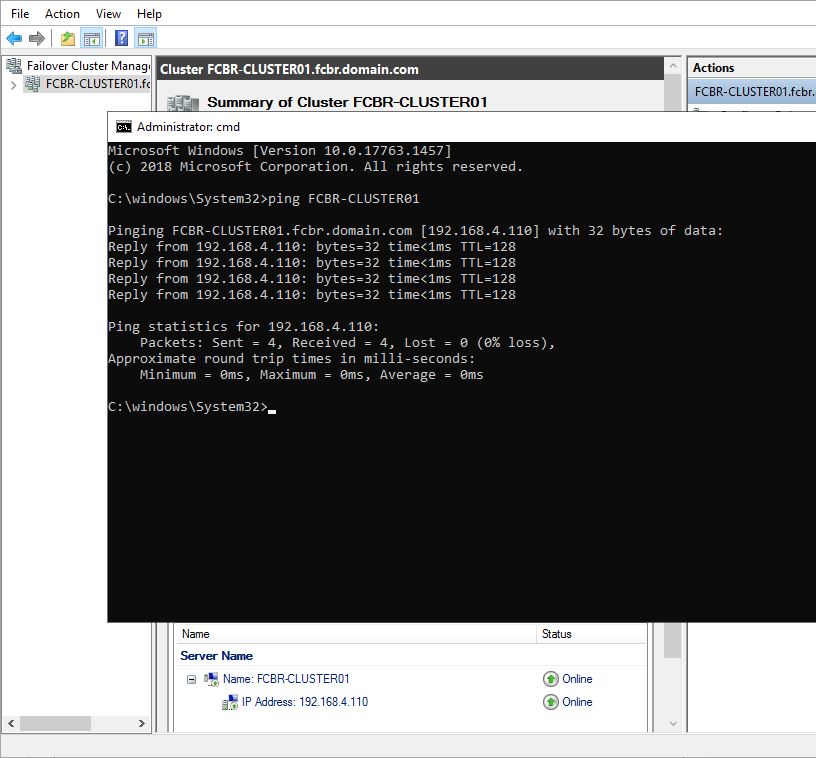
With that we can see some interesting information about the cluster, such as the entire name of the Cluster (the Cluster name plus the domain name), as well as the virtual IP address created for that cluster.
Note: It is important to notice that each Cluster created will allocate a new IP address to a Cluster name, and each one will be registered with the domain server as a common computer in that network. This means there are a limited number of connections for users and devices which must not exceed the number licensed in a production environment. The default number of connections is 10 and it can be increased.
The Cluster Role is the basis of the cluster resource. It defines the type of computer component that will be the object of the cluster. For this demonstration, we use the Generic Script Role.
|
|
|
Let us create one Generic Script to handle the FairCom DB Server by a Visual Basic Script (VBS) script. Right-click on Roles on the left panel, and select Configure Role.
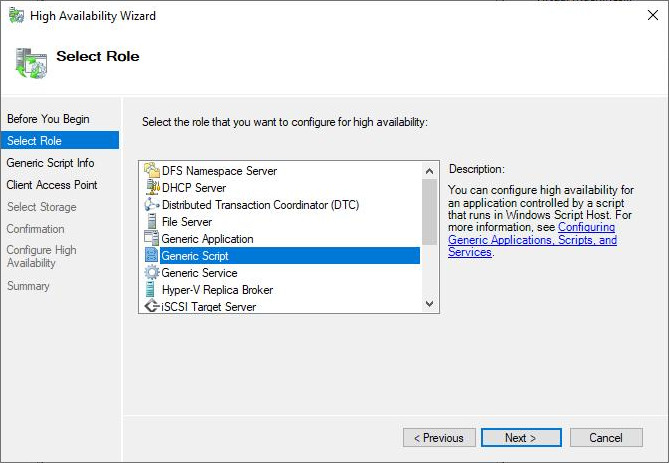
After choosing the Configure Role option, you will see the resources options (the resource concept will be explained further at the VBS script section). For this example, choose the Generic Script. This resource is used for non-cluster-aware applications, the FairCom DB database is a non-cluster-aware application and can be installed as service or application. The only option is Generic Script, so we can control the basic operations of the cluster.
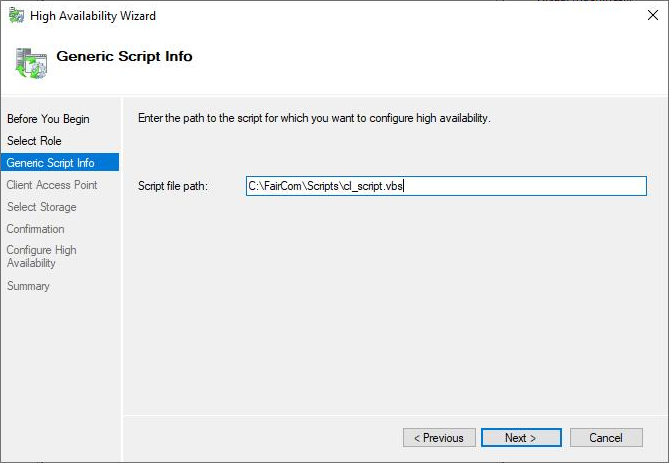
Now, we need to enter the path and name of the VBS script. Notice that it is important to have the script in a local directory for each machine, under the same path.
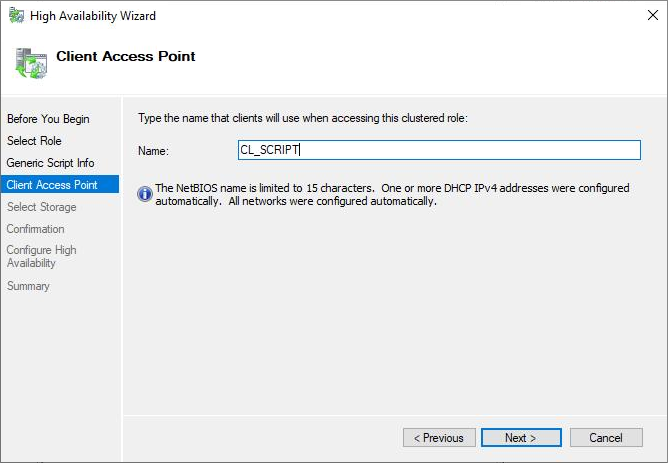
Next we provide a name for the Client Access Point. This name follows the same rules as the cluster name and it will be registered in the domain server as a common computer.
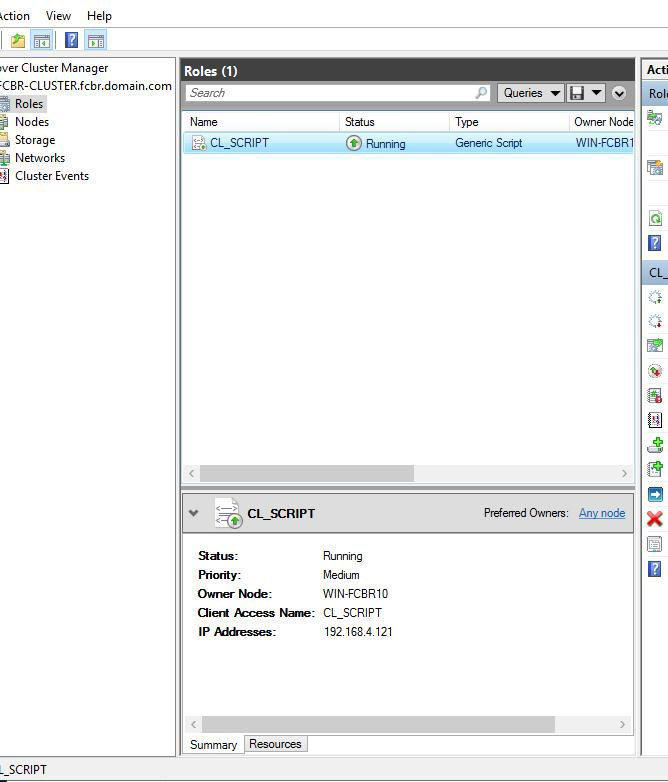
And now the Summary panel has all the information about that role and successful status.

We can see the role created and its information, such as status, the virtual IP, the client access name, and the owner node.
With this, the Cluster is configured and can be tested, as we'll do this right after examining the script.
|
|
|
The Generic Script is the role used for the High Availability test used in this Windows Cluster example. A Generic Script is a script that runs in the Windows Script Host, and has a few websites describing the entry point functions that must be defined. According to Microsoft, the Generic Script is a built-in resource type included in Windows Server Failover Clusters, and it only supports Visual Basic scripts.
The table below describes the Generic Script entry point functions:
Function |
Description |
|---|---|
Open |
Perform when the script is opened. |
Online |
Perform when the resource goes online. |
LooksAlive |
Perform a very quick and basic check in the instance trying to identify potential problems and not the operational status - the Resource Monitor calls this function at configurable intervals (the default is 5 s), and it takes no more than 300 ms to run. |
IsAlive |
Perform a complete check of the resource to see if it is functioning properly. The set of procedures you need to use depends on your resource. If the resource has definitely failed, return FALSE. The Resource Monitor immediately sets the status of the resource to "ClusterResourceFailed" and calls the Terminate entry point function. Resource Monitor calls [IsAlive] repeatedly at a specified time interval (the default is once every sixty seconds). |
Offline |
Perform when the resource goes offline. |
Close |
Perform when the script is closed. |
Terminate |
Perform when terminating the script. |
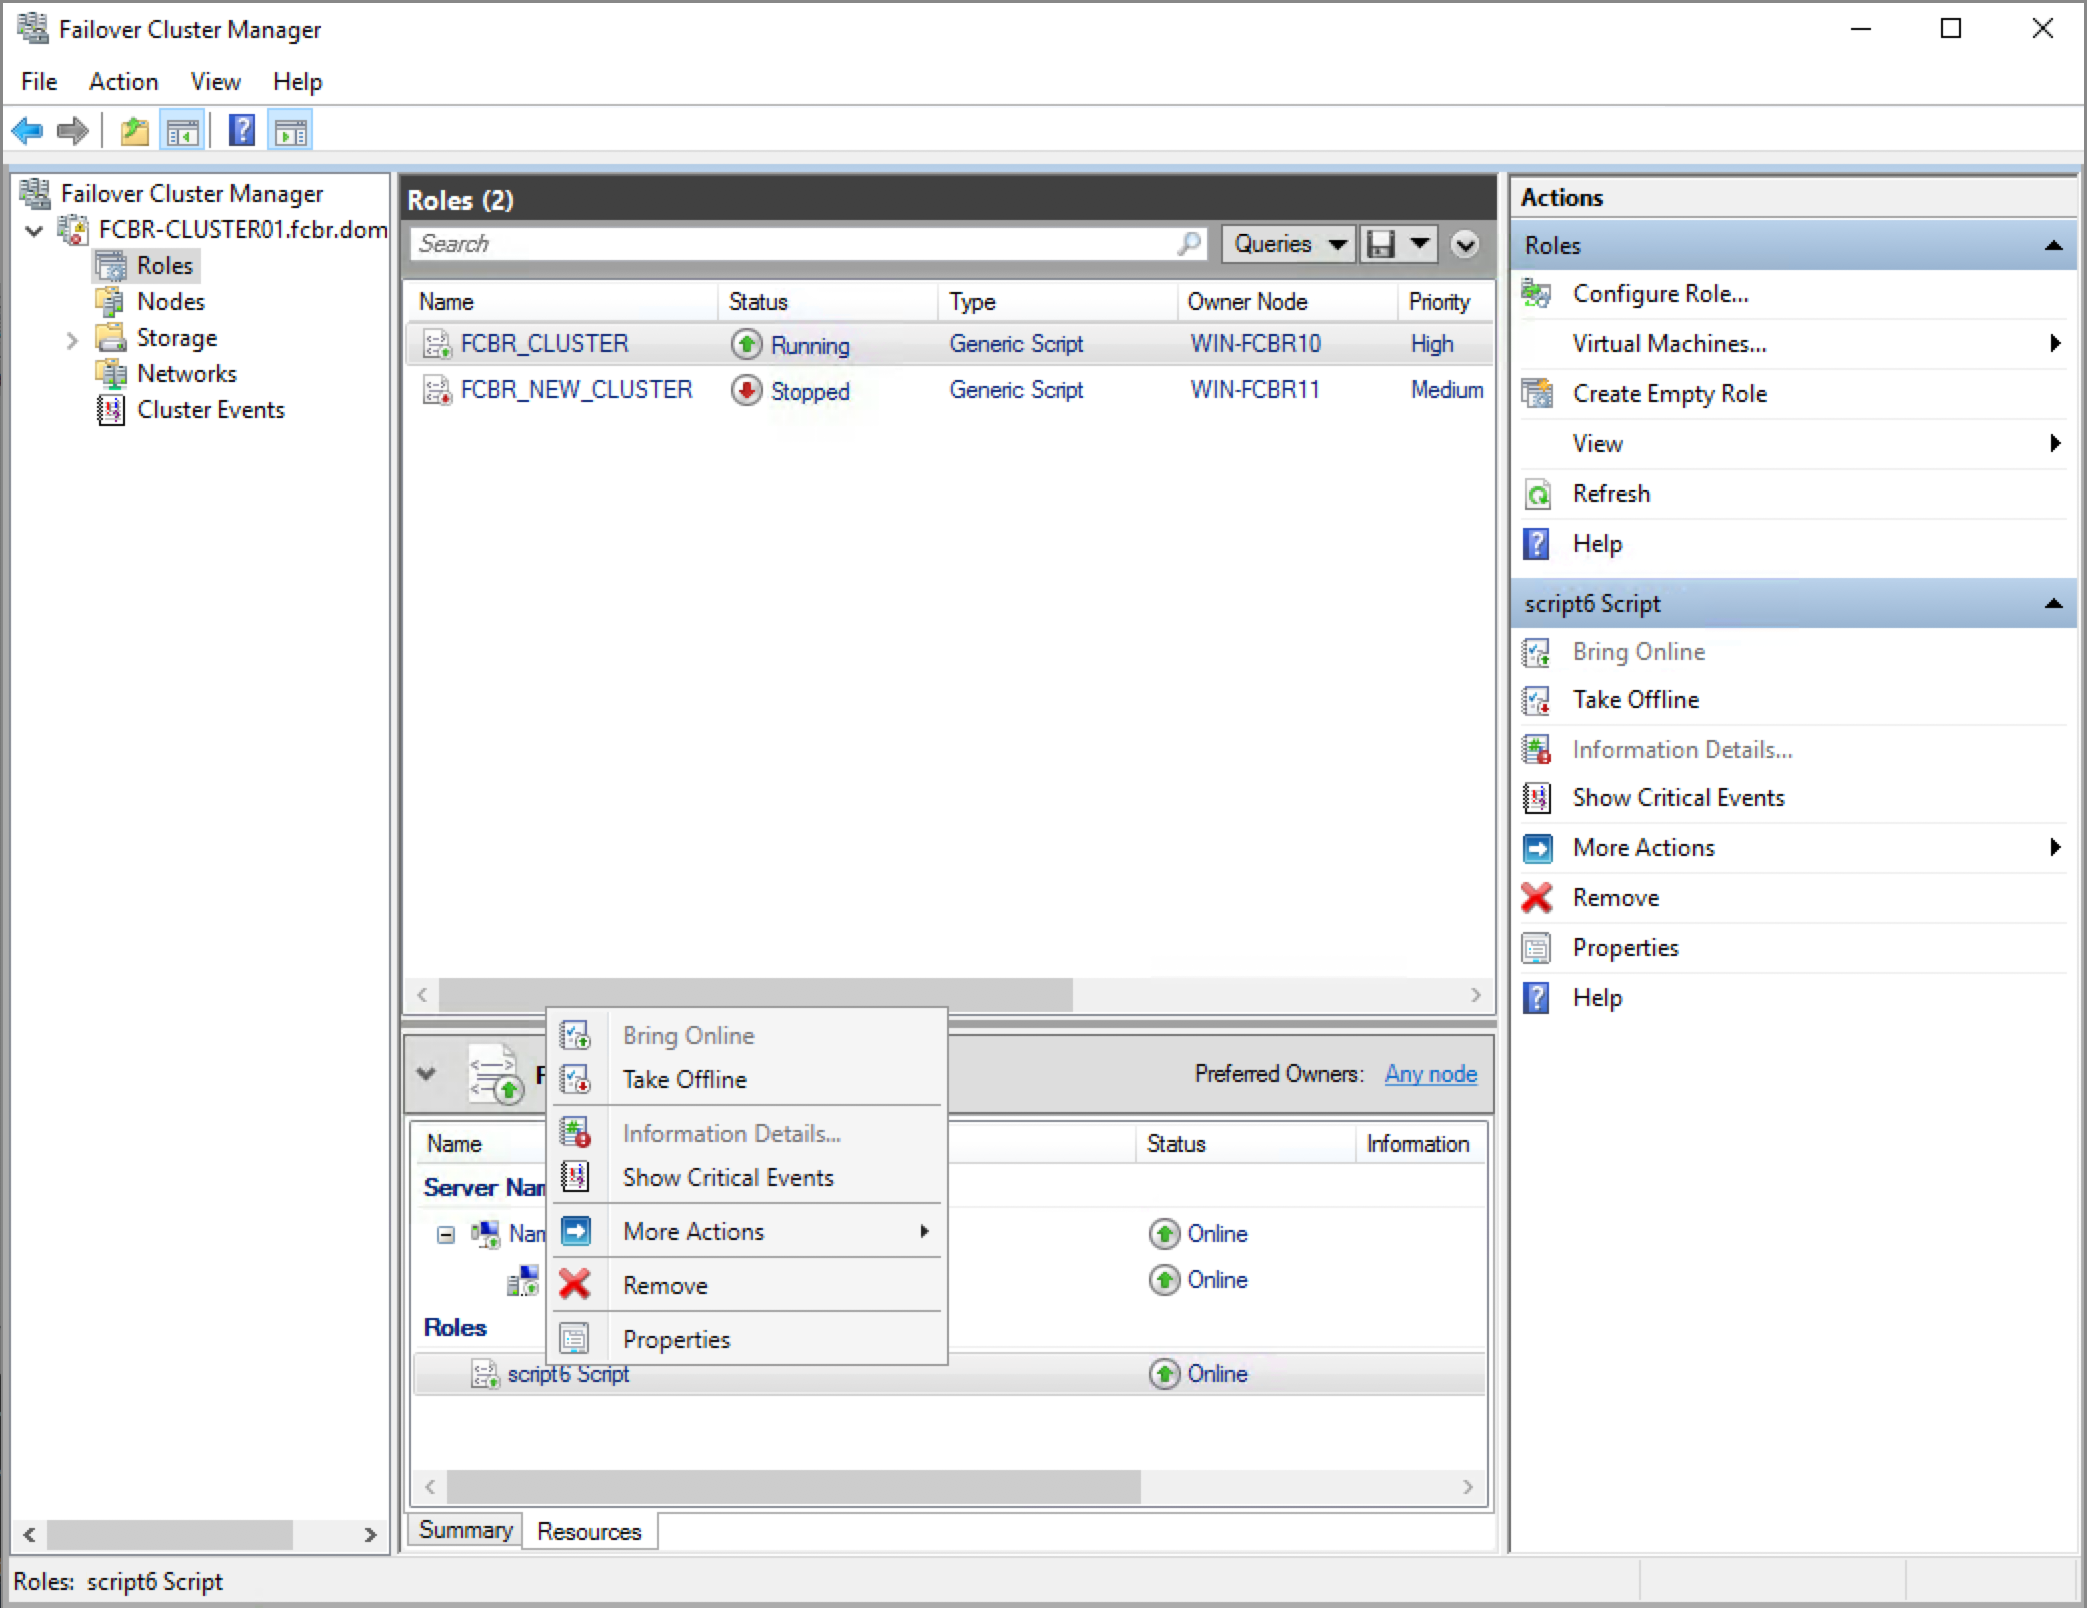
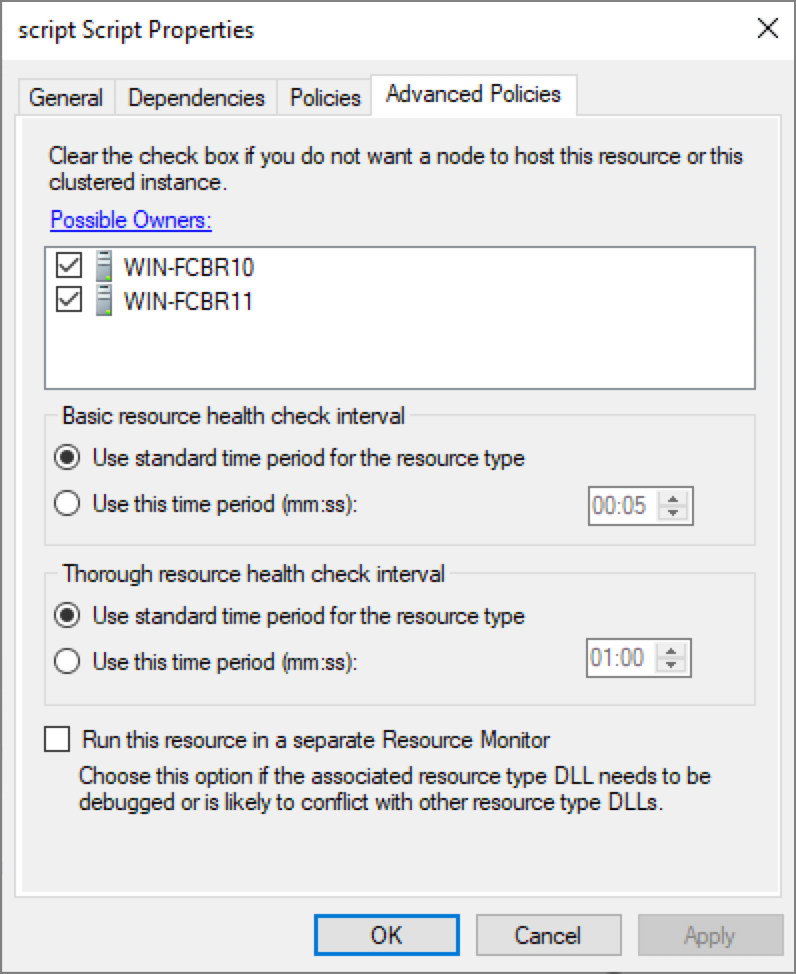
The default interval for the LooksAlive and IsAlive functions calls can be modified in the Advanced Policies of the script. In order to view the Advanced Policies and other configuration tabs, select the Cluster Rule you are configuring, the Resources tab at the bottom, and then you will see the resources that are part of the role. Right-click on the script and select Properties.
In the Script Property window, select the Advanced Policies tab as seen below and set the desired time for the interval or keep the default settings.
In many scenarios, the Cluster is responsible for starting up the application in the Open function and it manages to keep just one of the two application instances alive. In this paper, we are discussing a different approach using FairCom DB synchronous replication to keep both databases in sync. For this example, we will implement only the LooksAlive and IsAlive functions.
Function Wait (i)
WshShell.Run "c:\Faircom\Scripts\sleep.vbs " & """" & i & """", 1, True
Function LooksAlive( )
Set oLooksAlive = WshShell.Exec("C:\FairCom\Scripts\ctsmon.exe -u admin -p ADMIN -s FAIRCOMS")
Do While oLooksAlive.Status = 0
Wait(50)
Loop
LooksAlive = oLooksAlive.ExitCode
End Function
Function IsAlive( )
Resource.LogInformation "IsAlive"
Set oIsAlive = WshShell.Exec("C:\FairCom\Scripts\ctsmon.exe -u admin -p ADMIN -s FAIRCOMS -o curtime")
Do While oIsAlive.Status = 0
Wait(50)
Loop
If oIsAlive.ExitCode <> 0 Then
Resource.LogInformation "Error ctreeSQL Server: """ & oIsAlive.ExitCode
Resource.LogInformation oIsAlive.StdErr.ReadAll
End If
IsAlive = oIsAlive.ExitCode
End Function
To make it simpler, FairCom's ctsmon utility (located in the <faircom>/tools folder) was copied over to C:\FairCom\Scripts, where the Generic script is located on both machines. This function returns -1 in case of improper use of the function, 0 in case of success, or n, where n is the error code associated with the call to InitISAMXtd (133 is the expected result if the server is not found). When a non-zero return happens in the IsAlive function, the Cluster Resource Monitor will definitely fail the node and, according to our definition in the role properties, switch to the secondary node.
The sleep.vbs auxiliary script is an external script to run a 50 ms sleep in the run command to obtain the return of the asynchronous WshShell.Exec call. It is coded as indicated below:
Dim Arg
Arg = WScript.Arguments (0)
WScript.Sleep Arg
|
|
|
We have installed identical FairCom DB packages into C:\FairCom on all nodes.
Cluster monitoring requires a script to monitor the availability of a resource. The FairCom DB monitoring utility, ctsmon, provides this “heartbeat” functionality. It is called directly by the Cluster script in both the IsAlive and LooksAlive entry point functions in our implementation.
ctsmon returns the following output:
For ease and convenience, we have copied the following programs to the work folder, C:\FairCom\Scripts:
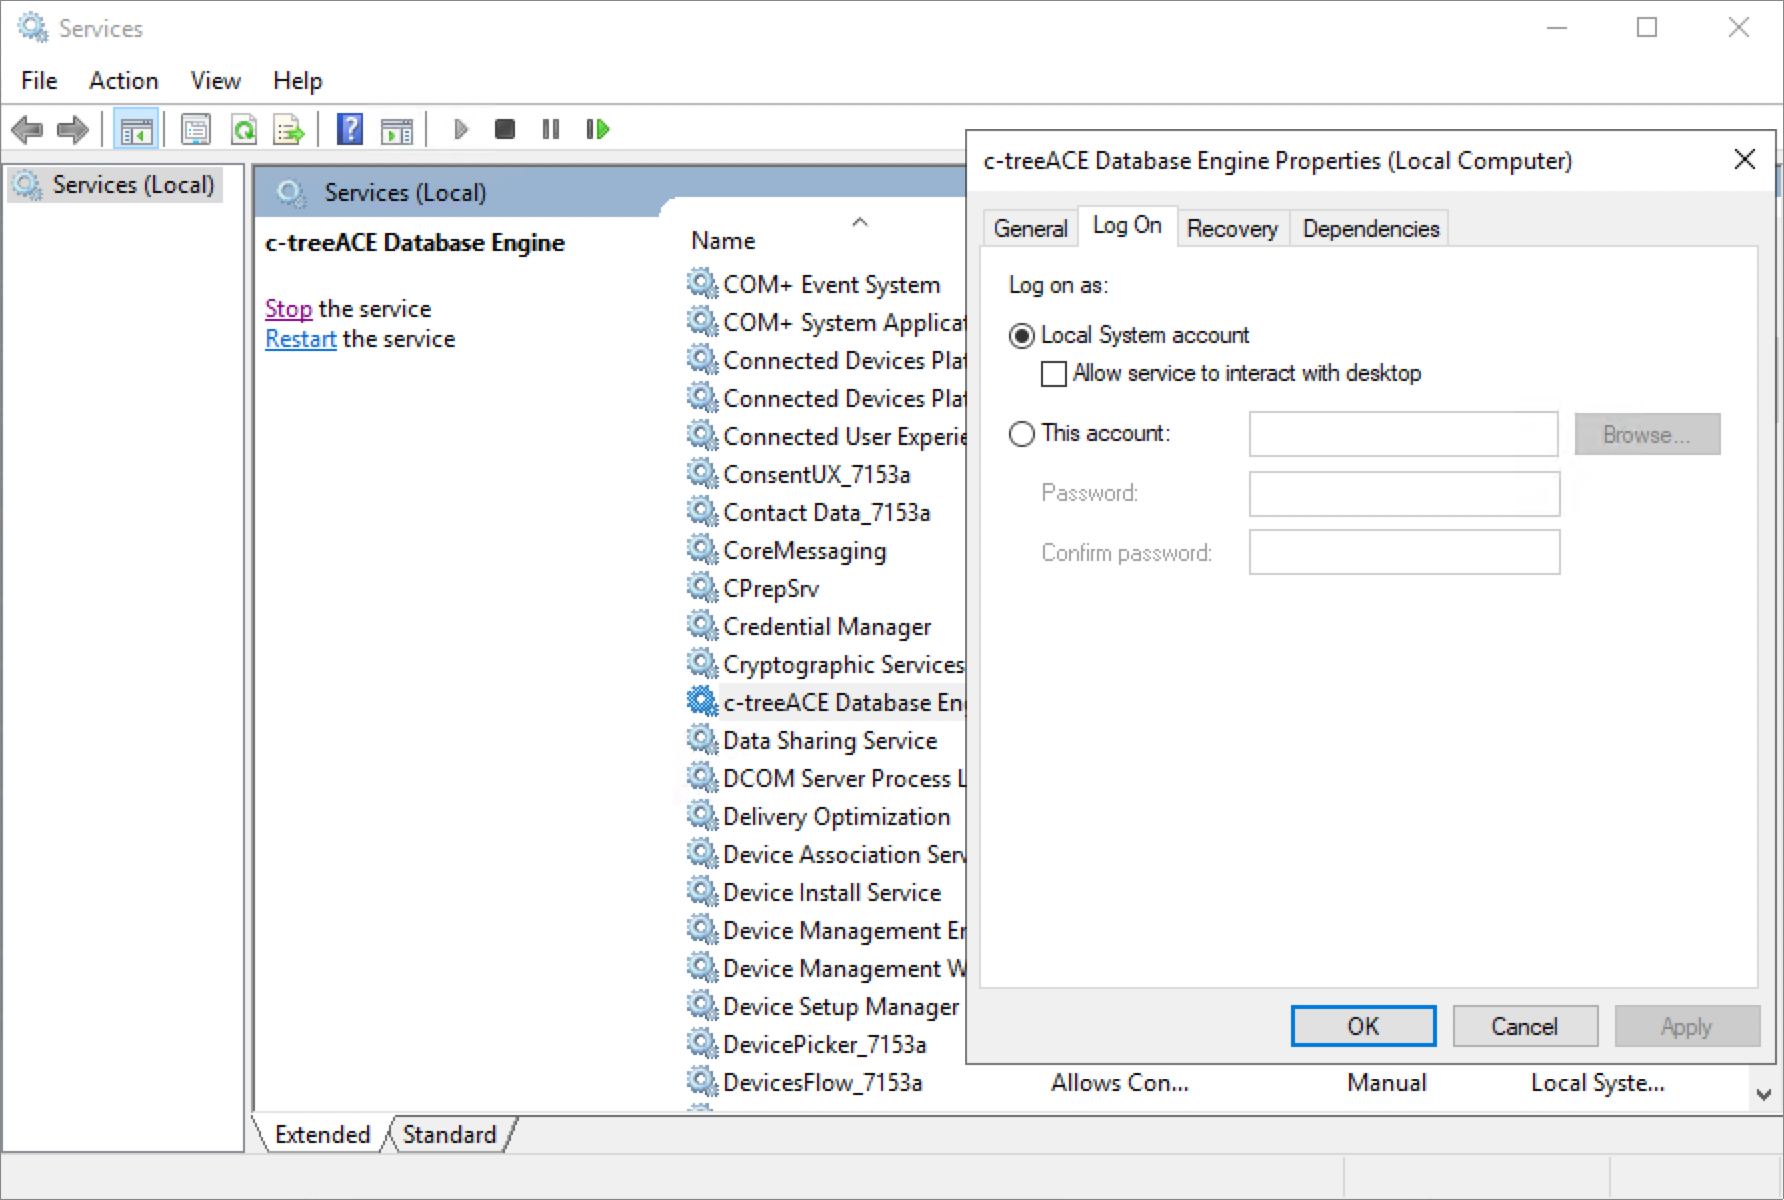
FairCom DB is intended to be started as a service, with the user Local System Account.
Node ONE is considered the active “hot” node. This instance of FairCom DB is a read-write server. The active node is the only FairCom DB server that should process changes to data.
Node TWO is considered a passive “warm” node. This instance of FairCom DB is a read-only server. For example, it could be used for query reporting and analytics. This FairCom DB server instance should never allow changes to data.
Using Immediately Consistent Replication
To ensure all data is the same on both Node ONE and Node TWO, we use FairCom DB synchronous replication. This is a new feature for FairCom products released in 2020. It provides high-speed, parallel, synchronous data replication between two or more FairCom DB servers. When a transaction on the primary server is committed, it guarantees that the transaction log on the secondary server contains the same transaction.
Note that FairCom DB asynchronously applies committed data changes to data and index files. They are typically applied faster on the secondary server than on the primary because it is read-only. If there is a heavy read load on the secondary server, they may be applied slightly slower. This does not affect high availability because all transactions are always persisted on disk in the commit logs of both servers before the database returns a commit confirmation to the application.
|
|
|
Configuring the Source Server
Edit the source Server (node 1) configuration file, ctsrvr.cfg, located in the config folder, and add these commands at the bottom of the file. Restart the server service after modifying and saving the configuration file.
REPLICATE ./ctreeSQL.dbs/admin_test.dat
REPL_NODEID 10.0.0.1
SYNC_COMMIT_TIMEOUT 10
Configuring the Target Server
To configure the target server, edit the ctsrvr.cfg file (located in the config folder) and add these keywords at the bottom:
REPL_NODEID 10.0.0.2
Before restarting the server, it is important also to configure the <FC_PRPD_REPL> plug-in, as discussed in the next topic.
Configuring the Replication Plug-in
In this test, the <FC_PRPD_REPL> will run on the target server. Enable the <FC_PRPD_REPL> plug-in in the same ctsrvr.cfg file for the target server. Enable the following keyword, by removing the the ";" that we have at the beginning of the line:
PLUGIN ctagent;./agent/ctagent.dll
Edit the ctreplagent.cfg file to make sure the name and IP of the target_server is correct and add the option to enable the synchronous replication. In our test case, we have set:
; Target server connection info
target_authfile ../replication/target_auth.set
target_server FAIRCOMS@WIN-FCBR11.fcbr.domain.com
; Source server connection info
source_authfile ../replication/source_auth.set
source_server FAIRCOMS@WIN-FCBR10.fcbr.domain.com
syncagent yes
Next, edit the ctaget.json file, located in the config folder, to indicate we are using the "detached mode":
{
"detached": true,
"configurationFileList": [
"../replication/ctreplagent.cfg"
]
}
Next, we need to adjust the agent to make commits of transactions synchronous for the specified files by running the repadm utility, located in the tools folder:
repadm -c changefilter -x ../replication/filter.xml -s FAIRCOMS@WIN-FCBR11
Notice that we run this command to enable the agent, so it is run on the target by default. A sample version of the filter.xml file can be as seen below:
<?xml version="1.0" encoding="us-ascii"?>
<replfilefilter version="1" persistent="y">
<file status="include">.\ctreeSQL.dbs\admin_test.dat</file>
<purpose>create_file</purpose>
<purpose>read_log</purpose>
<purpose>sync_commit</purpose>
</replfilefilter>
|
|
|
You can confirm replication is active using this command:
repadm -c getstate -u ADMIN -p ADMIN -s CLUSTERREP@node1
Example:
s t lognum logpos state seqno time func
n n 0 0 target 2 - INTISAM
n n 0 0 source 3 - INTISAM
n n 0 0 source 3 - INTISAM
|
|
|
FairCom provides the source code for a C++ application that inserts unique records at a high rate and verifies all data is inserted as expected. The source code is found in failover_tutorial1.cpp. See Appendix A.
Test Process
Create a Test Table
The test application needs a table to be created on the primary and secondary database servers. This is a simple table named admin.test. It has a single primary key called "pk" to ensure each record is uniquely identified. It also has another column called "name" that contains a string up to 32 characters.
Use the following command to create the admin.test table. Run the script on the primary and the secondary database servers.
isql -u admin -a ADMIN 6597@node:ctreeSQL
ISQL> CREATE TABLE admin.test( "pk" BIGINT NOT NULL ,"name" CHAR (32), PRIMARY KEY("pk") );
ISQL> COMMIT;
ISQL> exit
Causing the Primary Node to Fail
We have stopped the FairCom DB Server by stopping its service on Node 1. Since we are not starting the server using the Cluster Script, the Cluster Resource Monitor will automatically switch to the second node when this happens. We have also stopped the server using FairCom's ctstop utility, and also shutting down the Windows Server. In all cases, the Cluster nicely managed the switch to the second node, and since the test application is pointing to the FCBR_CLUSTER IP, it will continue to run after an initial delay while the Cluster manages the change. In this case, the data will be inserted only in the FairCom DB Server on node 2.
Example Output from the Test Application
====================
Inserted [3720] records
3700 - Layton Phillips
3701 - Warren Terry
3702 - Oswaldo Golden
3703 - Alessandro Hobbs
3704 - Lilah Rollins
3705 - Ezekiel Hubbard
3706 - Lydia Fitzgerald
3707 - Aryan Hawkins
3708 - Callie Glover
3709 - Henry Graves
3710 - Xiomara Kaiser
3711 - Fabian Bass
3712 - Karter Mccormick
3713 - Fletcher Jordan
3714 - Kaliyah Salazar
3715 - Bradyn Nguyen
3716 - Kareem Peck
3717 - Hope Macdonald
3718 - Jaliyah Skinner
3719 - Yurem Scott
===================
...
*************************************
Failover detected at record [3884]...
*************************************
Add records...
====================
Inserted [3890] records
3870 - Judah Potter
3871 - Solomon Bryant
3872 - Philip Herrera
3873 - Gerardo Hester
3874 - Barrett Coffey
3875 - Rodney Dorsey
3876 - Mario Holden
3877 - Zack Shepherd
3878 - Genesis Stewart
3879 - Ulises Brooks
3880 - Gabriella Sherman
3881 - Kai Cox
3882 - Talon Costa
3883 - Geovanni Mcmillan
3884 - Cristina Campbell
3885 - Dallas Glenn
3886 - Jacquelyn Delgado
3887 - Kianna Gordon
3888 - Aleah Wilkinson
Validating Test Data
After the test program has started and the failover has completed, you can verify that no data was lost. Start the original primary database server, which is now no longer the primary and no longer an active part of the cluster.
You can use the ISQL interactive command line interface to run SQL statements.
Run the following SQL queries on the primary and second server to verify data integrity:
SELECT COUNT(*) FROM TEST;
SELECT MAX(pk) FROM TEST;
SELECT MIN(pk) FROM TEST;
SELECT pk+1 FROM TEST t1 WHERE NOT EXISTS (SELECT * FROM test t2 WHERE t1.pk+1 = t2.pk);
The last query selects all the gaps between records primary keys. Because of its logic, if SELECT MAX(pk) FROM TEST + 2 is the only result in the resultsets of both the machines, there are no gaps in the primary keys values so the data is expected to be intact on both servers.
Example of No Missing Data
select pk+1 from test t1 where not exists (select * from test t2 where t1.pk+1 = t2.pk);
Running the same queries above on each database server, should produce matching output:
Primary |
Secondary |
|---|---|
185 198 397 725 5630 5 records selected |
185 198 397 725 5630 5 records selected |
|
|
|
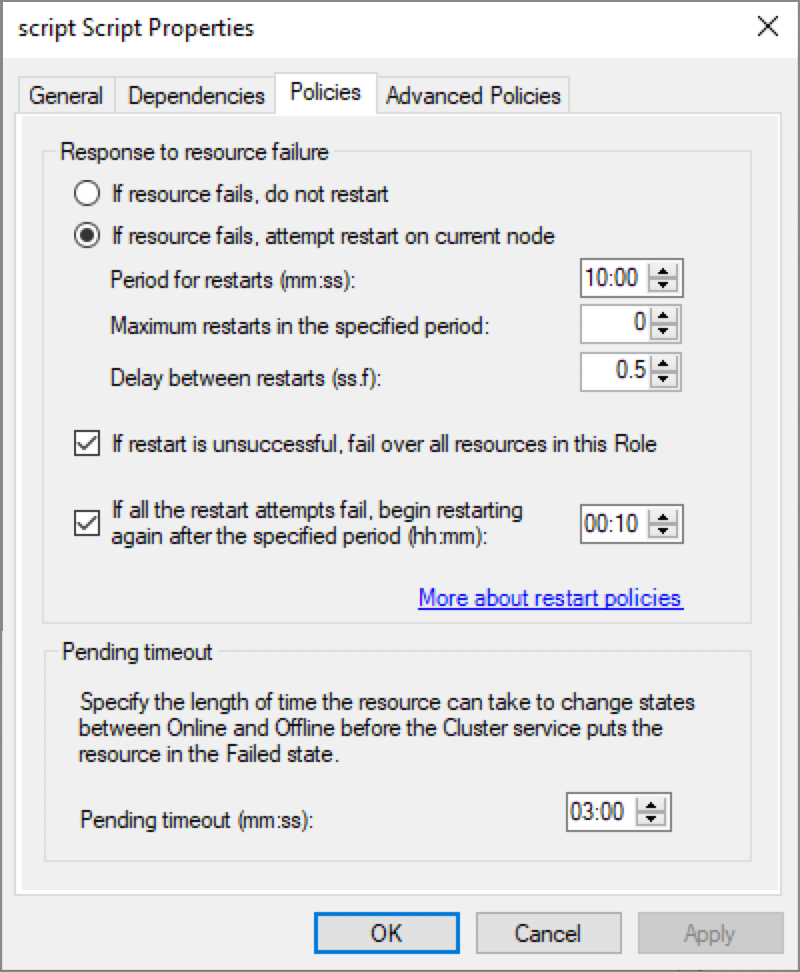
It is strongly recommended that the server is started as a service and with the Local System Account, the same logon used for the Cluster Service. Otherwise an error 978 will happen when the heartbeat functions from the Cluster Service try to connect with the server, failing over to the other node.
To immediately failover to the second node, we have set the Cluster configuration to its default values, as seen below:
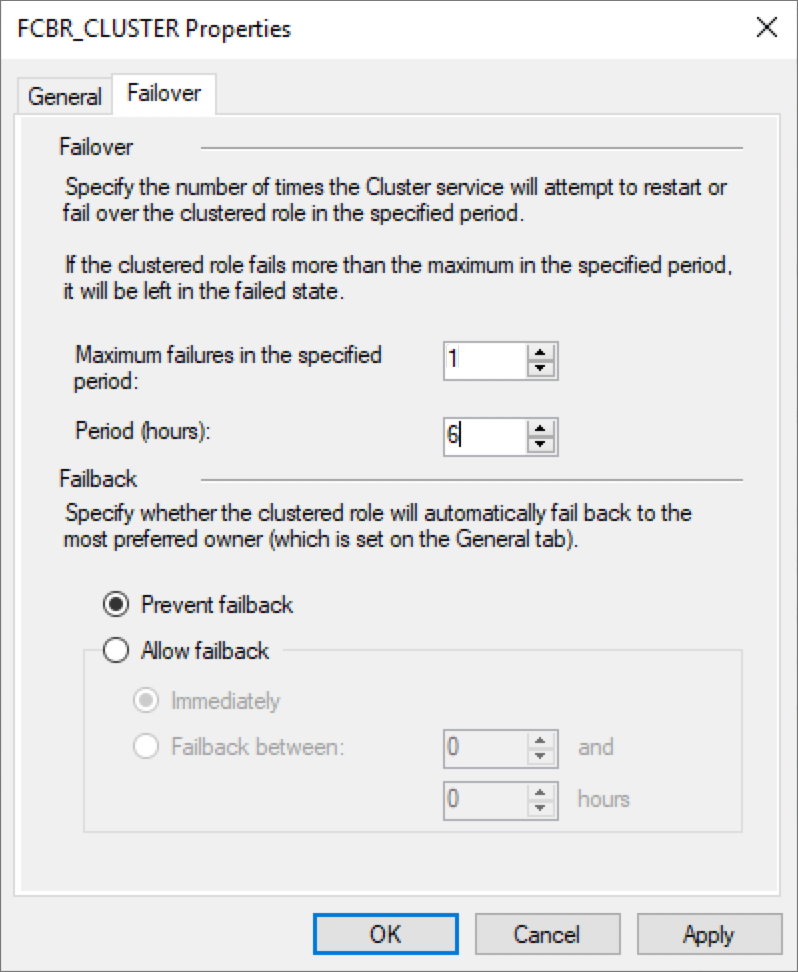
However, we have configured the Maximum attempts to restart on the same node to 0 in the Policies of the script property.