|
|
|
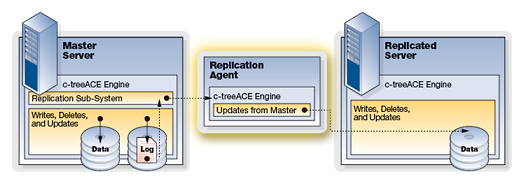
In this tutorial, you will run an example that demonstrates one possible use of the User-Defined Extensions for replication by providing detailed logging of the replication subsystem.
To exercise replication allowing us to monitor its behavior, we will compile ctrepluser.c with #define REPLUSER_TUTORIAL uncommented. This will enable code that calls a function to log a message to the file ctrepluser.log each time one of the callback functions is called. The sample code also tracks the number of calls made to each callback function using the #define REPLUSER_LOGGING logic discussed in Replication Logging. Note this is only one simple use of the callback extension. By reviewing the code in ctrepluser.c, you will be able to explore many alternate uses for this technology.
To begin the tutorial, we will execute some scripts to build the data on Source Server and Target Server. With data on both servers, we can insert data and delete data in the table we built. We will connect to the Source and watch the Replication Agent replicating data to the Target Server.
|
|
|
To enable replication, set the following keyword in the ctsrvr.cfg file on the Source Server:
REPLICATE *.*
This tells the source server to replicate all its files. This configuration only takes effect during server initialization; if the Source Server is running, you must restart.
If the Target server is not running, start it now. Both servers must be running.
Note: See the Replication Agent documentation for more details about the command to turn on replication.
|
|
|
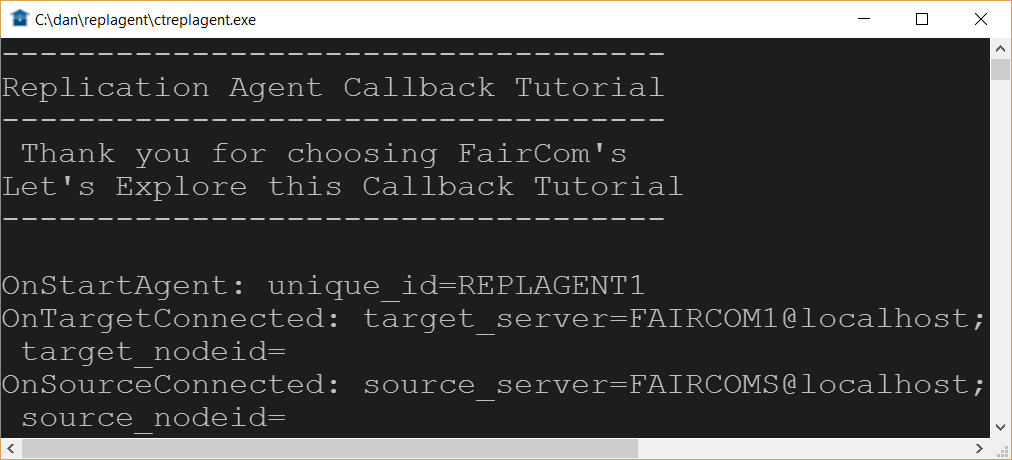
Execute the ctreplagent command to start replication, for example:
# ./ctreplagent
With the Replication Agent started, we are now able to run the scripts to insert and delete data. Please check if your screen appears like the one below, if not please recheck your compilation.
|
|
|
Now run the following SQL command using FairCom DB SQL Explorer, or the ISQL command-line utility to create data on the Source and Target:
CREATE TABLE custmast (cm_custnumb CHAR(4), cm_custzipc CHAR(9), cm_custstat CHAR(2), cm_custrtng CHAR(1), cm_custname VARCHAR(47), cm_custaddr VARCHAR(47), cm_custcity VARCHAR(47));
COMMIT;
The image below shows a batch file, Create.bat, that uses ISQL to execute a script, create.sql, that contains the commands shown above:

|
|
|
For this tutorial, we will insert some sample data into the database to be replicated:
INSERT INTO custmast VALUES ('1000','92867','CA','1','Bryan Williams','2999 Regency','Orange');
INSERT INTO custmast VALUES ('1001','61434','CT','1','Michael Jordan','13 Main','Harford');
INSERT INTO custmast VALUES ('1002','73677','GA','1','Joshua Brown','4356 Cambridge','Atlanta');
INSERT INTO custmast VALUES ('1003','10034','MO','1','Keyon Dooling','19771 Park Avenue','Columbia');
COMMIT;
The image below shows ISQL running a SQL script that executes the commands shown above: 
|
|
|
Next, we will delete the data to test replication:
DELETE FROM custmast;
COMMIT;
The image below shows a batch file (Delete.bat) that does the deletion using ISQL by executing a script (delete.sql) that contains the commands shown above: 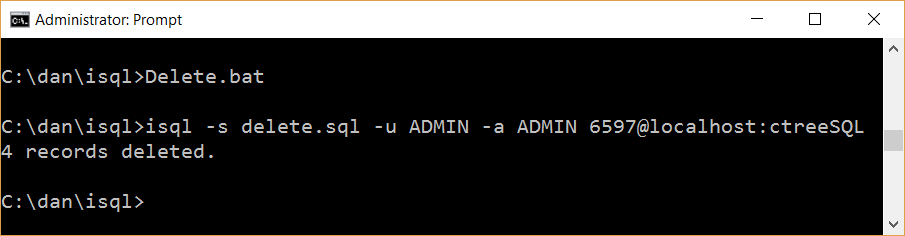
|
|
|
Now we can check the results of the callback functions executed. The image below shows a sequence of events seen while inserting data:


